
How to Measure Inseam for a Bike: A Practical Fit Guide
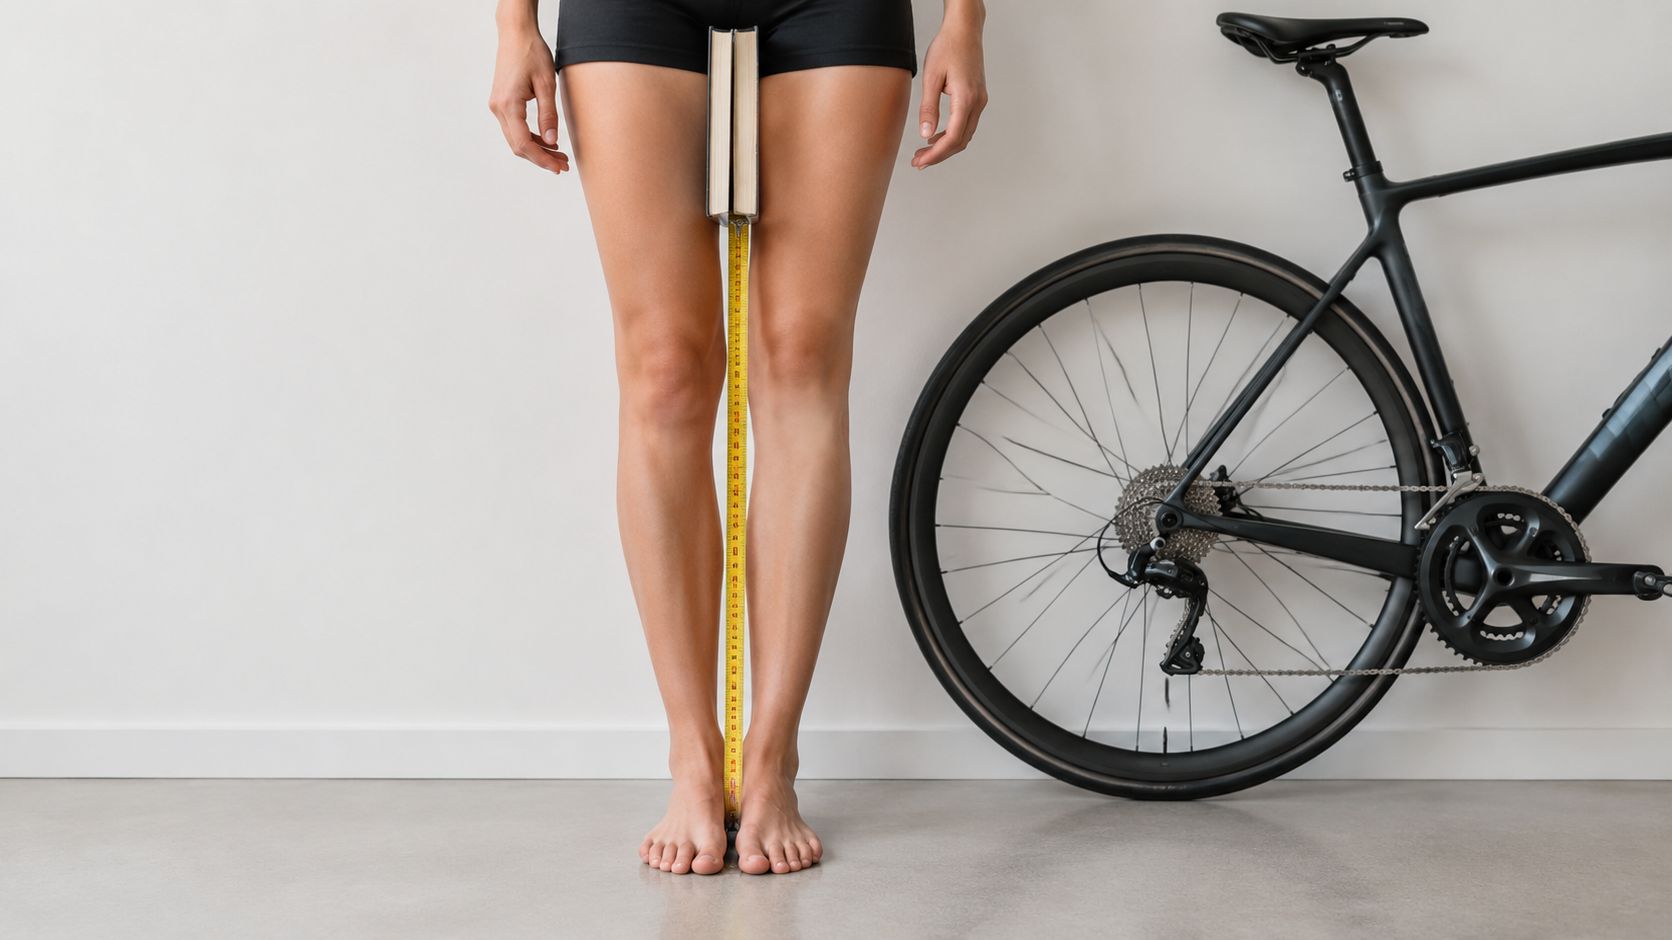
You're comparing two road bikes, or perhaps a road bike and a gravel bike, and the size chart asks for your inseam. Height is easy to find, but a trouser label will not give you the measurement a bike brand actually needs. A careful cycling inseam measurement gives you basic sizing and clearance context. It is useful, but it is not a formula for frame size, stack, reach, saddle height, crank length, road vs gravel sizing, or a fixed standover target.
The reliable home method is simple. Use a wall, a rigid book, and a tape measure. Measure barefoot on a hard, level floor, keep the book level, apply firm and consistent contact, and measure vertically from the floor to the top edge of the book. Repeat the process several times. If the readings differ meaningfully, reset your stance and the book position before recording the result.
Table of Contents
- Standing Inseam Measurement, the Wall and Book Way
- Getting a Reliable Number
- How to Use Inseam for Bike Fit Context
- Road vs Gravel, Compare the Exact Bike
- Why Inseam Alone Is Not Enough
- Common Inseam Mistakes and How to Avoid Them
- Using Inseam With SYCLR
- How to Measure Inseam for a Bike FAQs
- What is a cycling inseam?
- Should I measure my inseam barefoot?
- What should I use to measure inseam at home?
- How many times should I measure my inseam?
- Does inseam tell me my bike size?
- Can I use inseam to choose between road and gravel bikes?
- Does inseam determine saddle height?
- Is standover clearance based on one universal number?
- What matters more than inseam if I already have a bike that fits?
- What should I compare after measuring inseam?
Standing Inseam Measurement, the Wall and Book Way
A cycling inseam is the floor-to-crotch measurement used as basic sizing and clearance context. It is different from the inseam printed inside your trousers. The wall-and-book method provides a simple, repeatable way to measure it at home, as described in this cycling inseam measurement guide.
Start on a hard, level floor beside a flat wall. Remove your shoes, and wear thin socks only if you prefer them. Stand tall with your back against the wall and use a natural, repeatable stance.
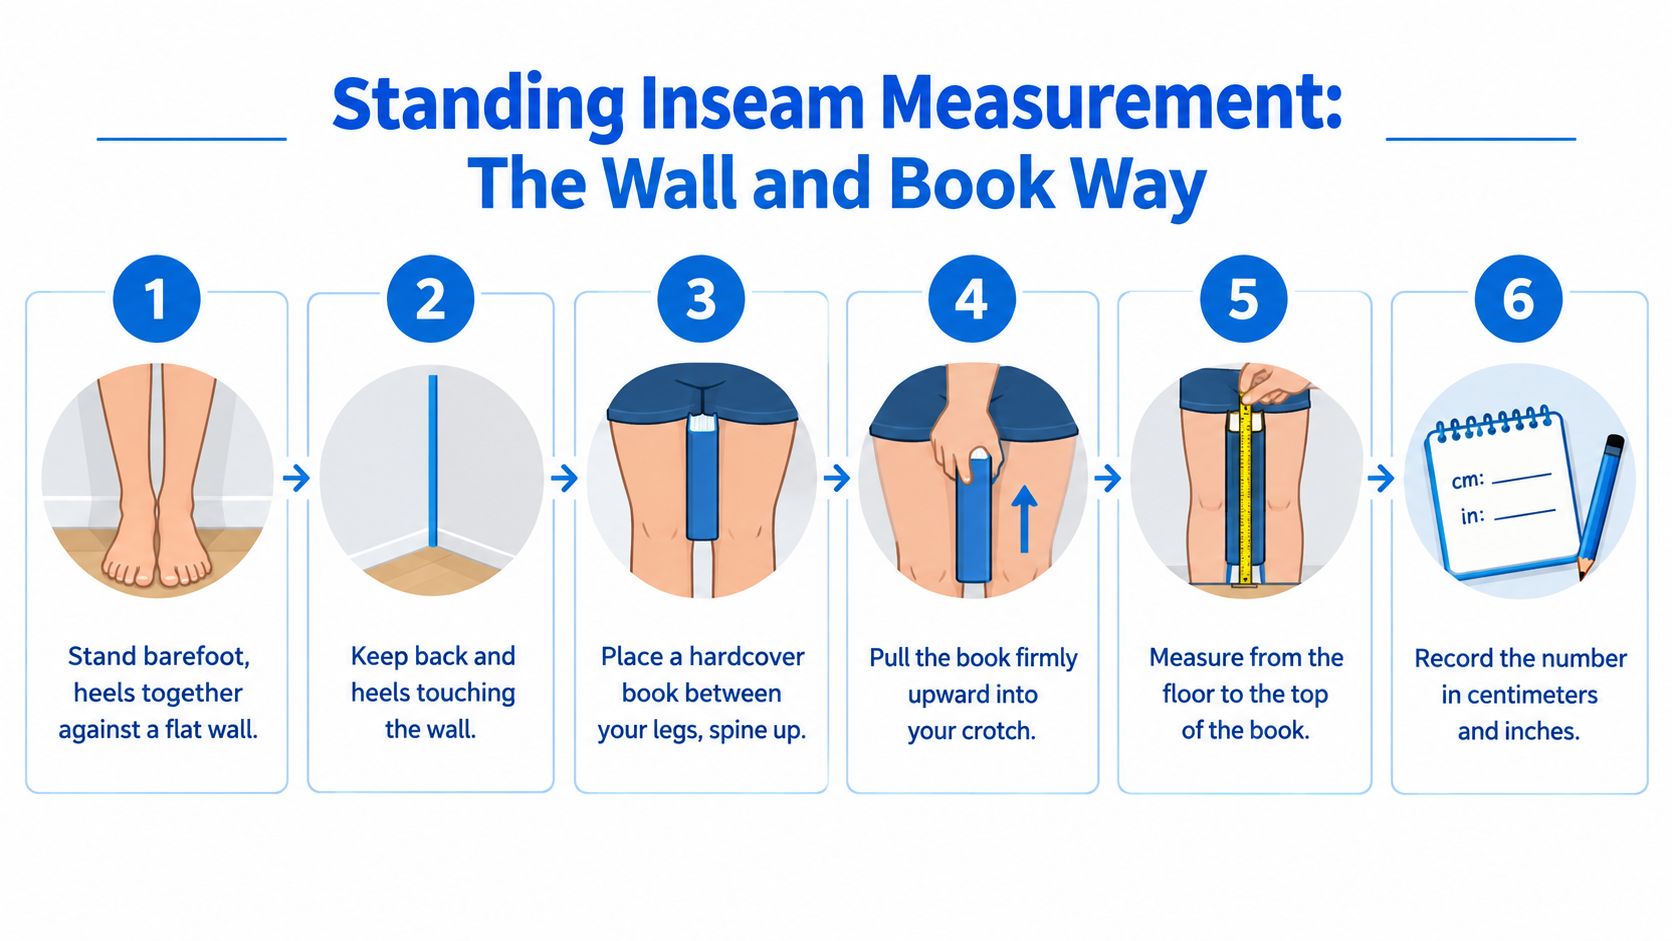
Follow the measurement steps
-
Stand barefoot. Keep your feet stable on a hard, level floor.
-
Set your posture. Stand naturally against the wall without hunching or forcing your pelvis into an unusual position.
-
Position a rigid book. Place the book between your legs with the spine facing upward. A rigid spirit level can also work.
-
Apply firm, consistent contact. Pull the book upward into the crotch as if it were contacting a saddle. The pressure should be firm and repeatable, not painful.
-
Keep the book level. The top edge should be parallel with the floor. Ask someone to check if needed.
-
Measure vertically. Mark the wall at the top edge of the book, then measure straight up from the floor to that mark.
The result is your standing inseam, usually recorded in centimetres. Avoid measuring on carpet, wearing shoes, tilting the book, or angling the tape. Small setup errors can produce a number that looks precise but is less useful when you compare actual bike geometry.
Practical rule: Measure the body, not the clothing. Trouser inseams follow garment seams. Cycling inseam measures the floor-to-crotch distance used as basic bike-sizing context.
Getting a Reliable Number
Inseam readings can drift if your stance changes, the book angle changes, or the pressure into the body is inconsistent. The goal is not perfect laboratory precision. The goal is a repeatable number you can use as one fit signal among several.
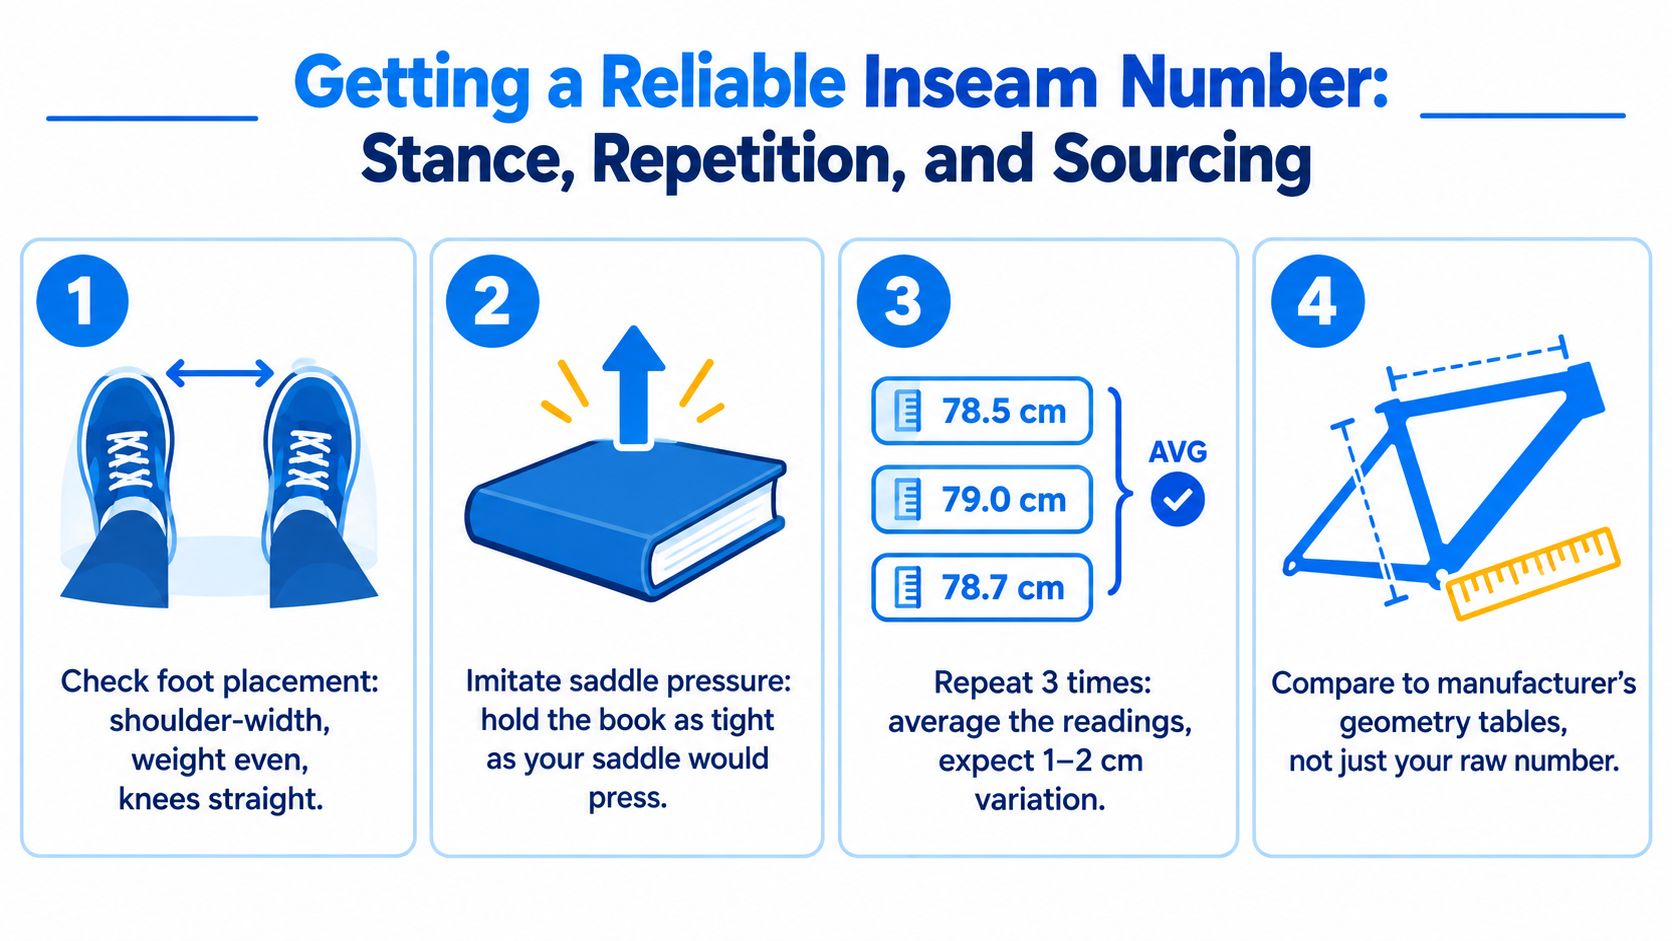
Use a natural, repeatable stance each time. A hardcover book or spirit level works better than a soft object because it gives you a clearer contact point. A rigid tape measure or a wall mark also helps keep the measurement truly vertical.
Repeat before you record
Take the measurement several times before you settle on a final number, a practice recommended in cycling guidance such as this inseam measuring guide. If the readings differ meaningfully, reset the stance and book position and measure again. The purpose of repetition is to catch setup changes before the number goes into a size chart or bike comparison.
Use this quick reliability check:
-
Surface: Hard and level.
-
Stance: Natural and repeatable.
-
Book: Rigid, level, and firmly positioned.
-
Contact: Consistent from one attempt to the next.
-
Tape: Vertical from the floor to the wall mark.
-
Record: Use a consistent result from repeated measurements rather than selecting the most convenient reading.
A consistent inseam number is useful. It still does not tell you what stack, reach, cockpit length, or saddle position a bike must have. Those decisions depend on the exact bike and the rider's broader fit context.
How to Use Inseam for Bike Fit Context
Height and inseam together provide initial context only. They can help you begin with a manufacturer's size chart, check whether a bike is in the right general range, and think about practical clearance and saddle-position context. They do not derive the geometry you need.
Use inseam for:
-
Initial manufacturer size-chart context
-
Standover and clearance context
-
Supporting saddle-position context
Then compare the bike itself:
-
Exact model
-
Model year
-
Size
-
Stack
-
Reach
-
Standover
-
Cockpit
-
Adjustment range
That sequence matters. Inseam helps narrow the conversation. The bike's exact geometry and adjustment range provide stronger context for deciding whether it deserves closer consideration.
Road vs Gravel, Compare the Exact Bike
Do not use separate inseam multipliers for road and gravel bikes. Category labels do not reliably tell you what stack, reach, posture, or front-end height a bike will have. Two gravel bikes can fit very differently. Two road bikes can also fit very differently, even at the same labeled size.
Instead, compare the exact model geometry for the exact size and model year. Look at how the frame is shaped, how much standover it offers, what cockpit it uses, and how much saddle and bar adjustment room is available. Inseam helps provide context for that comparison, but it does not prescribe a road size or a gravel size on its own.
Standover should also be treated as practical clearance context, not as a universal target. Top-tube shape, frame design, and actual bike setup affect practical standover clearance. Check whether the bike provides sensible clearance for you, but do not rely on a fixed number as a universal rule.
Why Inseam Alone Is Not Enough
Two riders can share the same inseam and still prefer different bikes or different setups. Inseam does not capture upper-body proportions, riding history, comfort preferences, mobility, or how a rider is already positioned successfully on a current bike.
That is why inseam should be treated as supporting fit context, not a stand-alone answer. It can help narrow the initial candidate range, but it cannot tell you the exact frame, exact cockpit, or exact riding position you should choose.
Inseam answers a limited question: whether the bike is broadly plausible in terms of basic sizing and clearance. It does not answer whether the full riding position will work well.
A current bike can tell you more
If you already have a bike that fits well, that position is often stronger evidence than a body measurement taken in isolation. A known-good current-bike position, or a professional-fit reference, gives you more useful context when comparing another frame.
When available, compare candidate geometry with a known-good current-bike position or professional-fit reference, including stack, reach, cockpit, and saddle-position context. This is especially helpful when size labels overlap or when two bikes look similar on paper but are shaped differently in use.
Common Inseam Mistakes and How to Avoid Them
Most inaccurate results come from simple setup errors. Fix the measurement process first, then decide whether a bike is actually in the wrong range.
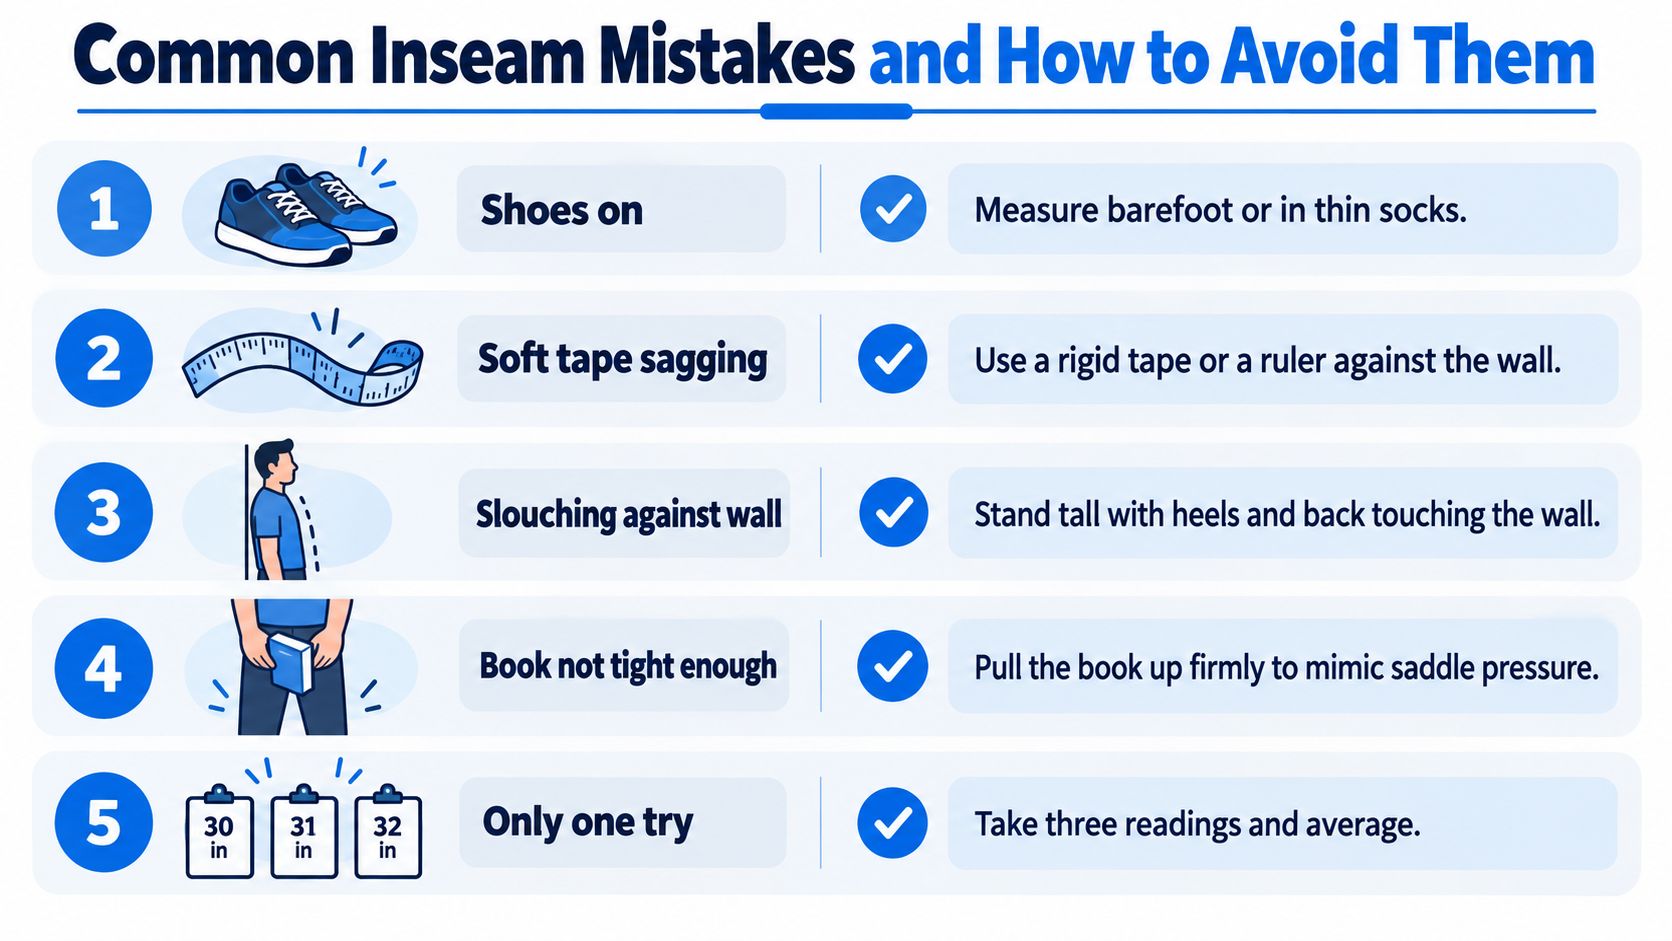
Fix the measurement before judging the bike
-
Shoes on: Soles make the result larger. Measure barefoot or in thin socks.
-
Soft or tilted contact point: Use a rigid book and keep it level.
-
Inconsistent pressure: Use firm, consistent contact each time.
-
Angled measurement: Measure vertically from floor to book height.
-
Rushed setup: Repeat the process several times and reset if readings drift.
-
Clothing confusion: Do not substitute trouser inseam for cycling inseam.
The most useful inseam number is the one you can reproduce consistently. If the setup changes, the result changes too.
Using Inseam With SYCLR
Your inseam becomes more useful when it is connected to the rest of the comparison. Save it as one fit signal, then evaluate it alongside geometry signals, model-year context, price context, listing quality, condition signals where available, and confidence signals.
SYCLR is designed to help organize road and gravel listings around practical buying context. It does not perform a professional bike fit, physically inspect bikes, authenticate listings, verify ownership or seller claims, or guarantee fit or condition.
Build a shortlist around fit context
Start with height, bike type, and budget if you want a quick comparison. Add inseam through the advanced fit entry when you have it, then review candidate bikes using:
-
Fit signals
-
Geometry signals
-
Model-year context
-
Price context
-
Listing quality
-
Condition signals where available
-
Confidence signals
For a used bike, keep the comparison simple and specific. Check the exact model, year, size, manufacturer geometry, and the bike's current cockpit and saddle setup. That gives you enough context to judge whether the listing is worth a closer look.
The important workflow is not "inseam equals frame size." Inseam supports the shortlist, then the exact bike geometry determines whether it deserves closer review.
Use SYCLR to compare road and gravel listings using fit signals, geometry signals, model-year context, price context, listing quality, condition signals where available, and confidence signals. If you want to add more detailed fit context, use Advanced Fit at https://app.syclr.com/?entry=fitdetails.
How to Measure Inseam for a Bike FAQs
What is a cycling inseam?
A cycling inseam is a floor-to-crotch measurement used as basic sizing and clearance context. It is different from a trouser inseam.
Should I measure my inseam barefoot?
Yes. Measuring barefoot, or in thin socks, avoids adding shoe height that can distort the result.
What should I use to measure inseam at home?
Use a hard, level floor, a wall, a rigid book, and a tape measure. The book should be level and pressed firmly upward with consistent contact.
How many times should I measure my inseam?
Measure several times until you get a repeatable result. If the readings differ meaningfully, reset your stance and book position and measure again.
Does inseam tell me my bike size?
No. Inseam helps with initial manufacturer size-chart context and practical clearance context, but it does not determine frame size by itself.
Can I use inseam to choose between road and gravel bikes?
Only as supporting context. Do not assume road or gravel categories fit in a predictable way. Compare the exact model, year, size, geometry, cockpit, and adjustment range.
Does inseam determine saddle height?
No. Inseam can support saddle-position context, but it does not produce a universal saddle-height answer.
Is standover clearance based on one universal number?
No. Standover is practical clearance context only. There is no single universal target that works for every rider and every bike.
What matters more than inseam if I already have a bike that fits?
A known-good current-bike position, or a professional-fit reference, is usually stronger context than inseam alone when comparing another bike.
What should I compare after measuring inseam?
Compare the exact model, model year, size, stack, reach, standover, cockpit, and adjustment range. Those details are more informative than inseam by itself.