
What Size Road Bike Do I Need: 2026 Guide
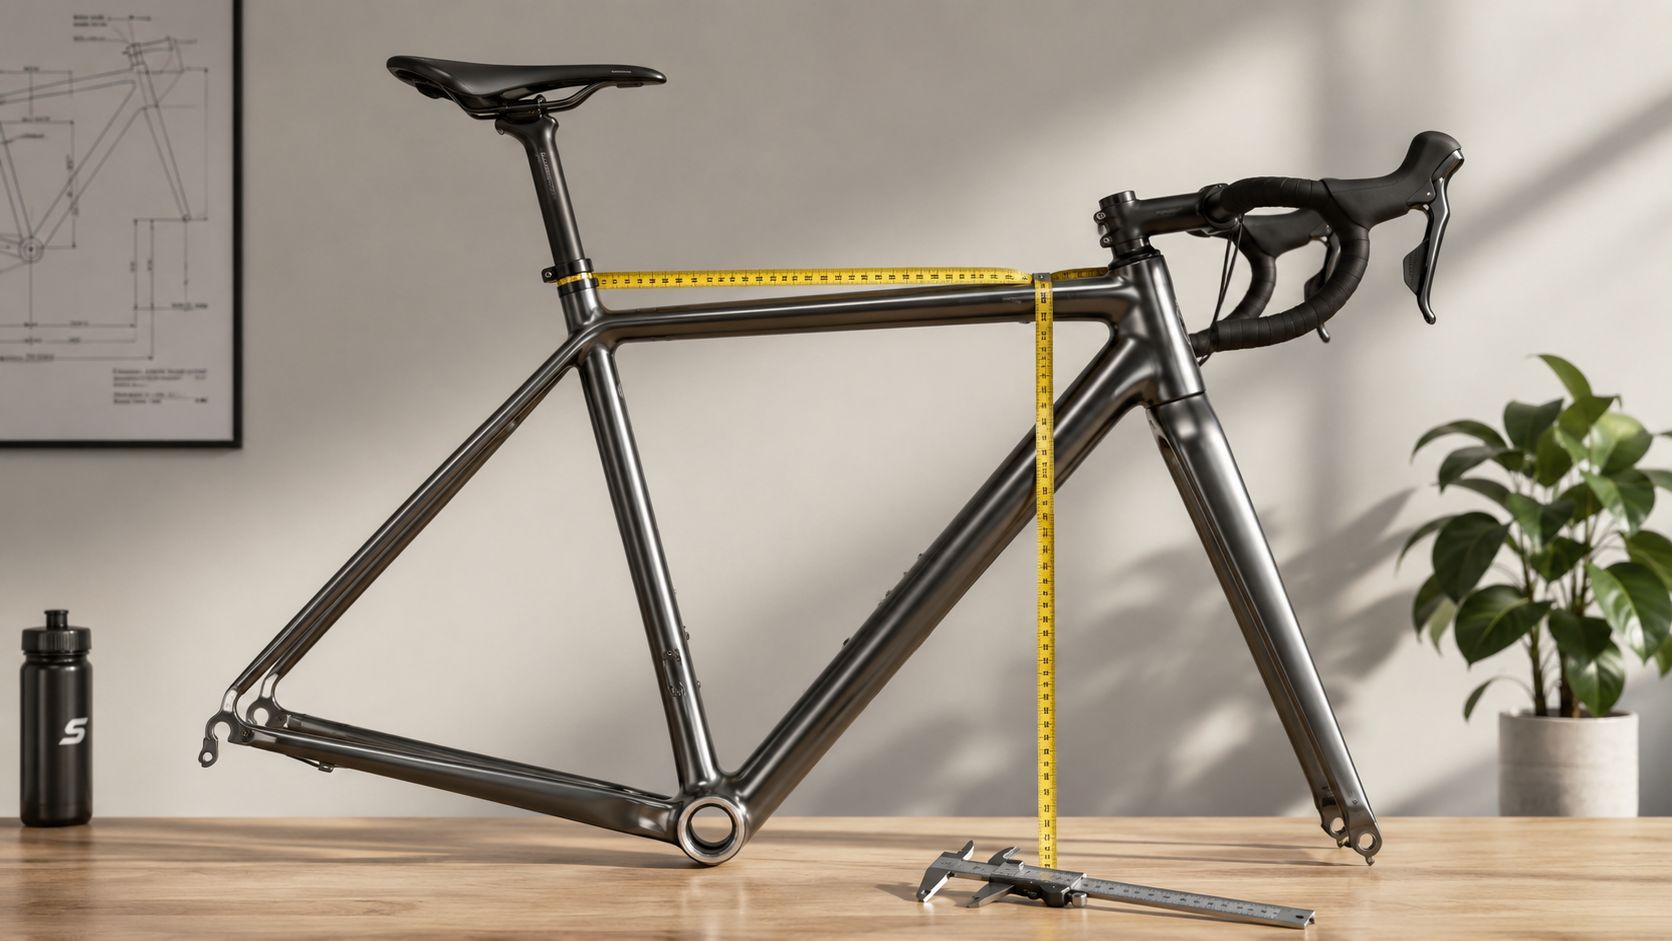
To find your road bike size, you must go beyond height charts by measuring your inseam for standover clearance and then comparing the stack and reach of potential bikes to find a frame that matches your body proportions and desired riding position. As a starting point, a rider who is 168 cm to 175 cm tall with an 78 cm to 82 cm inseam usually falls into a Medium 54 cm to 55 cm road bike range, while a rider who is 175 cm to 183 cm tall with an 81 cm to 85 cm inseam typically lands in a Large 56 cm to 58 cm range, but those labels only become useful after you check geometry.
That’s where most buyers get stuck. They’re staring at a new bike page or a used listing, they see 54, 56, or Medium, and they want a simple answer to “What size road bike do I need?” The problem is that road bikes don’t fit by sticker size alone. A bike can look right on a chart and still feel too long, too low, or too tall once you’re on the hoods.
A practical sizing decision starts with your body, then moves to the bike’s geometry chart, then to the actual listing you’re considering. That process works for new bikes, used bikes, race bikes, endurance bikes, and even when you’re comparing different brands and model years.
If you want to narrow the field faster, start with your height, bike type, and budget in the SYCLR app. It helps you compare road bike listings by fit signals, geometry context, price, and listing quality before you commit.
Table of Contents
Why Height Charts Are Only a Starting Point
Height charts are useful. They’re just not precise enough to make the final call on a road bike.
A height-based chart can narrow your search to something like 54 cm to 56 cm or Medium to Large, but it can’t tell you how the bike will place your hands, how much room you’ll have over the top tube, or whether the front end will feel natural on longer rides. That’s why two riders of the same height can need different sizes, or even different geometry categories.
Two riders, same height, different answer
Take two riders around the same height. One has longer legs and a shorter torso. The other has shorter legs and a longer torso. They may both land in the same broad height range, but they won’t necessarily fit the same road bike the same way.
The rider with longer legs may clear the frame well but feel stretched if the bike’s reach is long. The rider with shorter legs may run into standover issues on a taller frame, even if the size chart says it’s plausible.
Practical rule: Height gets you into the right aisle. Inseam and geometry decide which bike on the shelf actually fits.
That distinction matters even more in road bikes because position sensitivity is high. The handling and posture are more responsive to fit changes than many first-time buyers expect. Road bikes also tend to use steeper front-end geometry than off-road categories. The average road bike head tube angle is 72.62 degrees, compared with 67.79 degrees for mountain bikes and 71.57 degrees for gravel/CX bikes, which helps explain why road bikes tend to feel quicker and more direct at the bars when the fit is right or wrong (road, mountain, and gravel geometry comparison).
What works and what doesn’t
What works is using height as an early filter, then checking inseam and geometry before you buy.
What doesn’t work is assuming every rider around your height should ride the same nominal size. That mistake is common with used bikes. A marketplace listing says 56 cm, the seller says “fits most riders around this height,” and the buyer treats that as enough information. It isn’t.
Manufacturer size charts can also be broad. A brand may place you in one bucket, but the buying decision is more specific than that. If you’re between sizes, comparing race and endurance road bikes, or shopping across several brands and model years, the chart should guide your shortlist, not choose the bike for you.
How to Take Your Key Body Measurements
A rider can be the right height for a 56 on paper and still buy a bike that feels too tall, too long, or both. The first check that prevents that mistake is a proper cycling inseam measurement.
Measure cycling inseam, not pant inseam
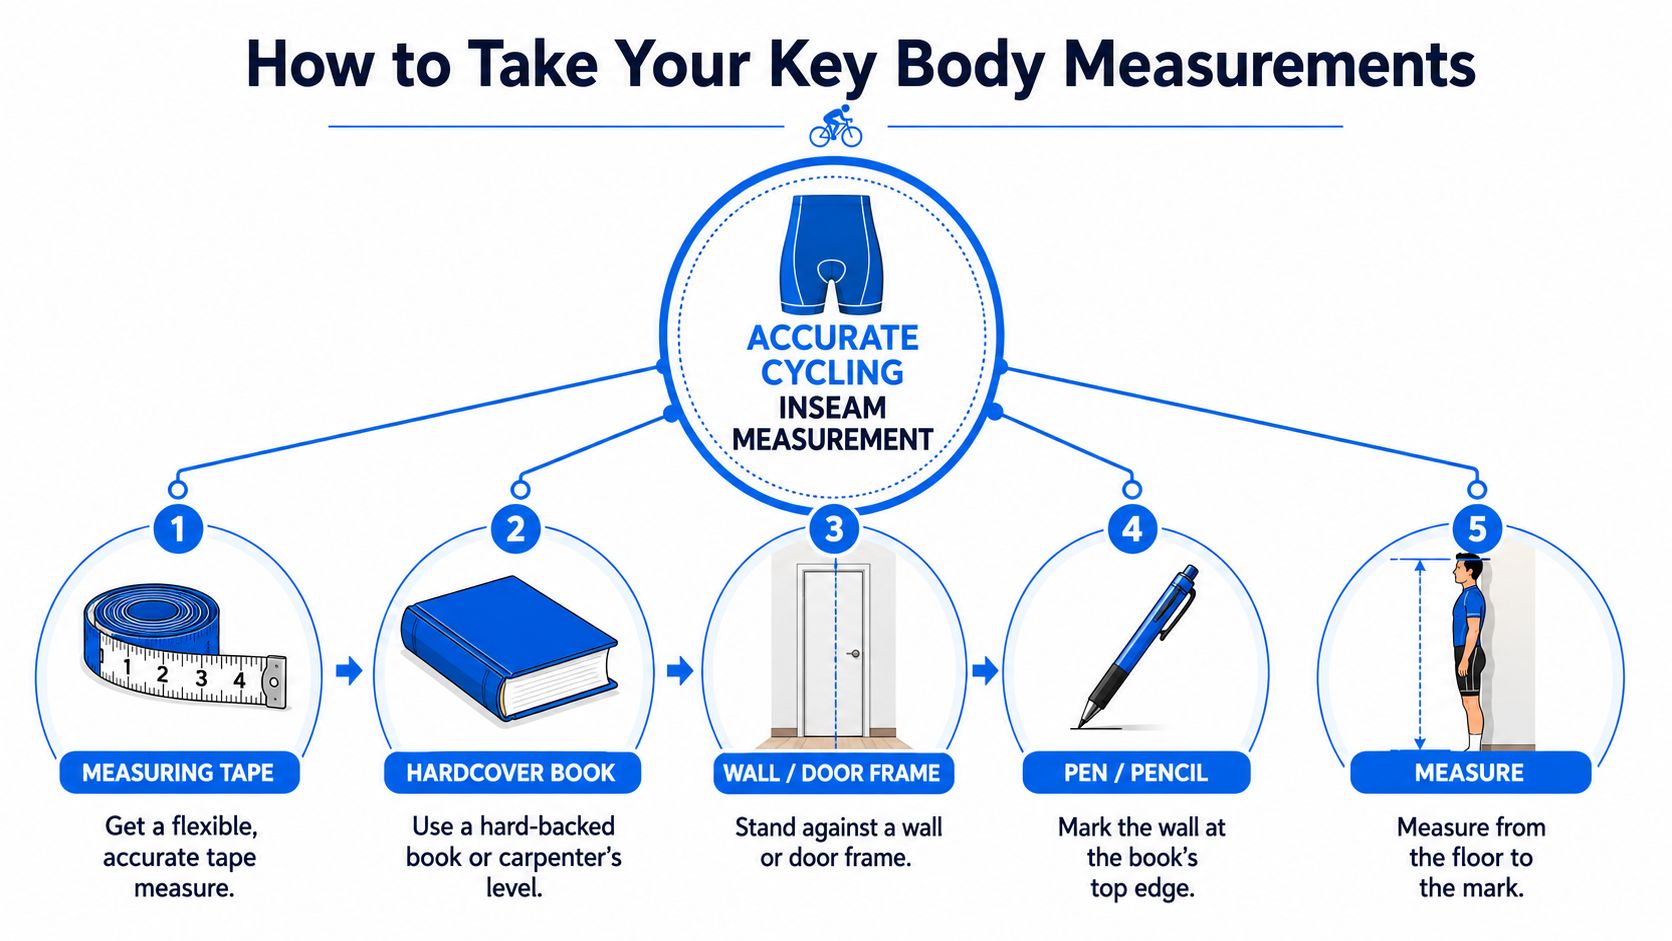
Use the same method a careful shop fitter or experienced buyer would use at home:
-
Wear cycling shoes if that’s what you’ll ride in.
-
Stand against a wall with your back straight.
-
Straddle a hardcover book spine-up so it presses up like a saddle would.
-
Mark the wall at the top edge of the book.
-
Measure from the floor to the mark.
That method is shown clearly in this inseam measurement walkthrough.
Measure two or three times. If the numbers vary, use the average. A rushed inseam measurement can push you toward the wrong frame size, especially when you are comparing used listings with limited geometry data.
Pant inseam is too inconsistent for this job. Clothing brands measure differently, cuts sit differently on the body, and neither one reflects how high your pelvis sits when a saddle supports your weight.
A standardized size chart gives a useful reality check. A rider who is 148 cm tall with a 65 cm inseam typically needs an XX Small 47 cm to 48 cm frame, while a rider who is 183 cm tall with an 86 cm inseam typically needs an X Large 58 cm to 60 cm frame (road bike size guide with height and inseam ranges). That does not choose the bike for you, but it does tell you whether a listing is even worth checking.
Connect inseam to standover
Quick standover check:
-
Stand over the bike in the shoes you ride in.
-
Make sure you have comfortable clearance over the top tube.
-
Confirm the bike still feels manageable when stepping on and off.
-
Use standover as a safety check, then compare stack and reach for riding position.
Standover height is the distance from the ground to the top tube. It is a simple clearance check, and it matters most when you stop suddenly, step off awkwardly, or buy a bike you cannot test ride first.
Cannondale’s sizing guidance notes that manufacturers typically offer five to eight frame sizes for riders from 152 cm to over 198 cm, and that the standover target is roughly 1 inch of clearance for a traditional straight top tube and 2 inches or more for a compact or sloping top tube. It gives a simple example: a rider with a 30-inch inseam should look for a bike with a 29-inch standover height (Cannondale road bike sizing overview).
For a closer explanation of how to check that clearance on real bikes, including compact frames and sloping top tubes, see this guide to bike standover height.
Standover is only a pass or fail screen. A bike can clear your inseam and still put you too stretched out or too low at the bars.
That is why I treat inseam as the first filter, not the final answer. It rules out frames that are obviously too tall, then stack and reach do the main comparison work when you start looking at actual road bikes across brands, model years, and used listings.
Torso and arm length still matter, especially once two sizes both pass the inseam check. If you are between sizes, write down your inseam first, then keep it next to every listing you review. It gives you a fast way to eliminate bad options before you spend time comparing geometry charts.
Understanding Essential Bike Geometry
Geometry is what turns a listing from “maybe” into a useful fit comparison. Two road bikes can both be labeled 56 cm and still put your hands in very different places. That is why I treat the size sticker as a rough category and the geometry chart as the primary sizing tool.
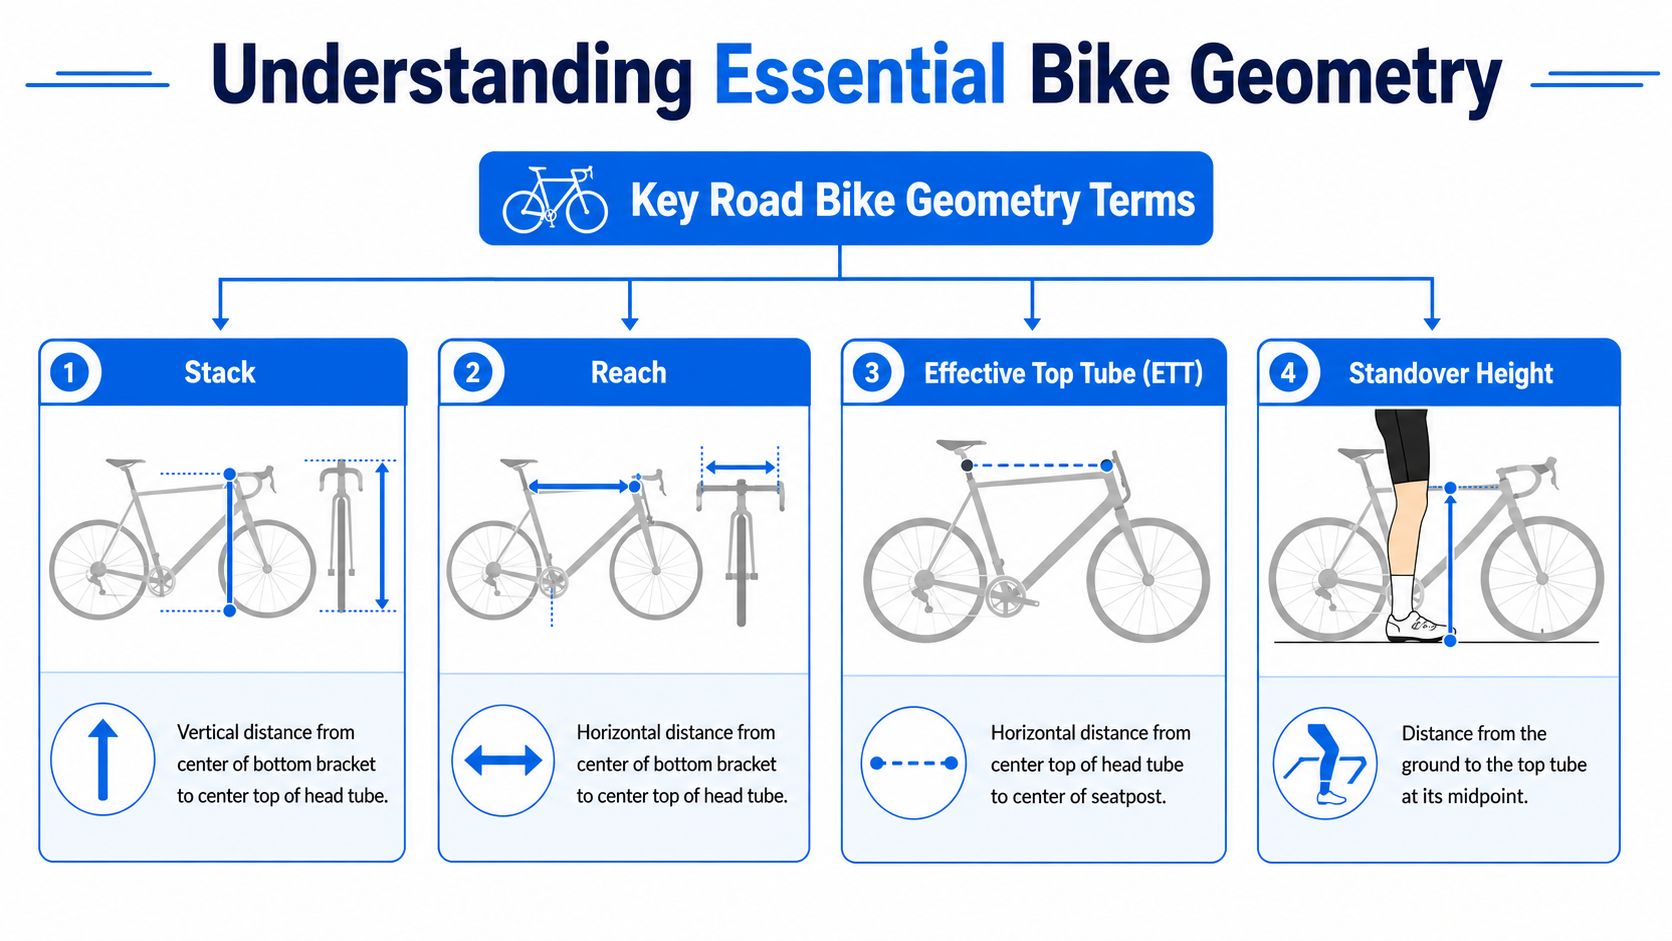
The four terms that matter most
Frame size is the label on the bike. It might be 54 cm, 56 cm, Medium, or Large. It helps you get into the right range, but brands do not measure it the same way.
Standover height tells you whether you can comfortably stand over the bike. You already used inseam to screen for that, so at this stage standover is mostly a safety check.
Effective top tube measures the horizontal length of the frame. It still shows up on many geometry charts and older listings, especially in the used market. It is useful context, but it is less reliable for cross-brand comparison because seat tube angle and frame shape can change how that number feels on the road.
Stack and reach are the measurements to prioritize. They describe where the front of the bike sits relative to the bottom bracket, which makes them far better for comparing one road bike to another. If you want a fuller explanation of how those numbers work, this guide to road bike stack and reach breaks them down clearly.
Why stack and reach matter more than the size sticker
Stack is the vertical distance from the bottom bracket to the top of the head tube. Reach is the horizontal distance from the bottom bracket to that same point. Those two numbers do a better job than frame size at predicting whether a bike will feel upright, low, compact, or stretched.
In practical terms:
-
More stack usually puts the bars higher and reduces the drop to the hoods.
-
Less stack usually puts the front end lower and asks more from your hips, back, and hamstrings.
-
More reach moves the bars farther away and lengthens the cockpit.
-
Less reach brings the bars closer and usually feels easier to settle into.
Reach causes a lot of sizing mistakes. Riders often clear the standover check, match the height chart, and still end up on a bike that feels too long once they start riding on the hoods for an hour or two. That is usually a geometry problem, not a mystery.
A simple rule helps here. If a bike feels hard to get low on, look at stack. If it feels hard to get comfortable through your hands, shoulders, and lower back, look at reach first.
Effective top tube still has value, especially on older road bikes where stack and reach are missing from the listing. I use it as a backup number, not the final call. For direct comparisons between modern road bikes, stack and reach are the cleaner way to judge fit across brands, categories, and model years.
From Frame Size to Fit Feel
A lot of buying mistakes happen because riders treat a nominal frame size as if it were universal. It isn’t. A 56 cm race bike and a 56 cm endurance bike can feel like different categories of machine.
Why one 56 cm can feel nothing like another
Canyon points out that two bikes with the same nominal size can have very different stack and reach numbers depending on the brand and model year, which is why seat tube length alone is not enough for sizing (why same-size road bikes can fit differently).
That’s the key reason used bike shopping gets tricky. A listing title gives you “56 cm.” It doesn’t tell you whether that bike is long and low like a race bike or taller and shorter like an endurance road bike.
Translate geometry into riding posture
Here’s a simple way to think about it.
| Metric | 56cm Race Bike (Example) | 56cm Endurance Bike (Example) | What It Means for the Rider |
|---|---|---|---|
| Frame size label | 56 cm | 56 cm | Same sticker size, not the same fit |
| Stack | Lower | Higher | Lower feels more aggressive, higher feels more upright |
| Reach | Longer | Shorter | Longer can feel stretched, shorter can feel more compact |
| Front-end feel | Lower handlebar position | Taller handlebar position | Affects comfort preference and riding posture |
| Best match | Rider who wants a lower, racier position | Rider who wants a more relaxed road position | Geometry category matters as much as size |
This is also where endurance geometry and race geometry diverge in practice.
-
Race geometry usually puts you lower and farther forward.
-
Endurance geometry usually puts you a bit higher and a bit shorter.
-
Gravel geometry often overlaps with endurance road ideas, but the handling priorities differ.
That doesn’t mean one is better. It means the right answer depends on how you ride and what feels sustainable for your body.
A modest cockpit adjustment can refine an already-close frame. A stem, hood position, spacers, or handlebar choice can help. But those parts don’t rescue a frame that is too long, too low, or too tall.
If a bike only seems to fit after a long list of compensating parts changes, the frame probably wasn’t the right starting point.
For related buying context, the SYCLR blog has useful guides on road bike geometry, fit, and comparison topics.
A Step-by-Step Sizing Process for New and Used Bikes
This is the workflow that holds up whether you’re buying a current-year road bike from a retailer or comparing three used listings from different sellers.
Use the chart as a filter, not a verdict
Start with your inseam and height. Use the manufacturer size chart, or a standardized chart, to narrow the likely range.
As a starting point, many riders around 168 cm to 175 cm with a 78 cm to 82 cm inseam may begin near a 54 cm to 55 cm or Medium range, while many riders around 175 cm to 183 cm with an 81 cm to 85 cm inseam may begin near a 56 cm to 58 cm or Large range. Those labels only become useful after you check geometry.
Then find the geometry chart for the exact bike, exact model, and exact model year if possible, given that brands revise geometry over time, and used listings often leave that part out.
A practical sequence looks like this:
-
Measure inseam accurately and rule out frames that fail the standover check.
-
Use height and inseam together to identify the most likely starting size.
-
Pull the geometry chart for each bike you’re considering.
-
Compare stack and reach across those bikes, not just frame labels.
-
Check adjustment range like spacers, stem length, and saddle position only after the frame itself looks close.
-
Test ride if possible, especially if you’re between sizes.
Compare listings like a fitter, not like a marketplace filter
When you’re between sizes, geometry differences become concrete very quickly. Canyon gives a useful example: a 55 cm frame might have a 540 mm stack and 375 mm reach, while a 57 cm frame could have a 555 mm stack and 385 mm reach. That changes rider position by 15 mm vertically and 10 mm horizontally (example of stack and reach changes between road bike sizes).
Those don’t look like huge numbers on paper. On the bike, they absolutely can feel different.
This is why “I’m about 5’9″, so I’ll just buy a 56” is weak buying logic. A rider around that height might fit one 56 well, fail the standover check on another, or find a neighboring size more natural once the cockpit length is considered. The geometry category can shift the answer too. Sometimes the better move isn’t a different size within the same bike. It’s a different bike with a different posture target.
When evaluating new and used listings, look for:
-
Exact model and model year so you can match the right geometry chart.
-
Frame size plus geometry data rather than frame size alone.
-
Listing quality that gives you enough information to compare with confidence.
-
Fit feel clues based on stack and reach, not just seller opinion.
-
Condition and fit together, because a clean used bike still isn’t a smart buy if the size or geometry is wrong.
General marketplaces usually show inventory. They usually don’t interpret geometry, compare fit signals across brands, or help you weigh price context against fit relevance. That’s where buyers often waste time on attractive but low-fit-probability listings.
How SYCLR Helps You Compare Better-Fit Options
You find two used bikes that look right on paper. Same nominal size, similar price, both described as a good fit for your height. One will probably feel close to your position. The other may put you too stretched out or too low before you even touch the stem.

That is the buying problem SYCLR helps solve. It gives you a way to compare listings through fit relevance, not just frame size labels and seller descriptions. For road bike shoppers, that matters most when you are cross-shopping brands, model years, and used listings with uneven detail.
The useful part is the comparison process. Instead of treating a 54, 56, or Medium as meaningful by itself, SYCLR helps you sort options by the details that affect ride feel: geometry signals, fit clues, price context, and listing quality. That makes it easier to spot the difference between a bike that is probably workable with normal adjustments and one that starts from the wrong base shape.
This is especially helpful if you already know a few numbers from your current bike or a past fit. Stack and reach are far more useful than height alone when you are comparing real listings, and SYCLR is built around that kind of shopping logic rather than broad marketplace filters.
A professional fit still has its place. Riders chasing a specific position, managing discomfort, or translating fit coordinates from one bike to another will still benefit from one. SYCLR helps earlier in the decision. It narrows the field so you spend time on bikes with a real chance of fitting well.
If you want a practical refresher before comparing listings, read SYCLR’s bike fit guide for choosing bikes with better geometry matches.
Already know your fit details, current-bike geometry, or stack and reach targets? Use the fit-details path to improve your recommendations.
Frequently Asked Questions About Road Bike Sizing
Should I size up or down if I’m between two road bike sizes?
Start with the geometry chart, not the size label. Compare stack and reach between the two options, then judge which one gets you closer to your current fit or the riding position you want. A slightly smaller frame is often easier to fine-tune with spacers and stem choice, but that only helps if the base reach and stack are already close.
Is inseam more important than height?
For a first pass, yes. Inseam does a better job of checking standover and setting a realistic frame-size range. Height still helps, but it is too blunt to predict fit on its own, especially across different brands and model years.
What matters more, frame size or reach?
Reach usually tells you more about how the bike will feel on the road. Two bikes with the same stated size can put you in very different positions if one has a longer front end or lower stack. That is why generic size charts get you in the ballpark, while geometry numbers help you choose the right bike.
Can a shorter stem fix the wrong frame size?
It can help on a bike that is close. It usually does not rescue a frame that starts too long, too low, or too tall. Contact-point adjustments work best as refinements, not as a way to force the wrong chassis to fit.
Do road bikes and gravel bikes size the same way?
The sizing process is similar, but the fit target often is not. Gravel bikes commonly have taller front ends and slightly different handling priorities, so a size that works in one category may not feel the same in the other. Check the geometry every time.
Is a used bike worth buying if the size is close?
Only if “close” holds up on paper. A good deal still becomes an expensive mistake when the stack is too low, the reach is too long, or standover is marginal. Used-bike shopping rewards riders who compare geometry numbers before they compare paint, groupset, or price.
Do I still need a professional bike fit?
Sometimes, yes. A professional fit is worth it if you have persistent discomfort, unusual proportions, injury history, or a very specific performance position in mind. For everyone else, a careful sizing process based on inseam, stack, reach, and your current bike can rule out bad options before you spend money.
The short answer to “what size road bike do I need” is this: use height charts to narrow the range, then make the final decision with geometry. Stack and reach give you a much clearer picture of fit than a 54, 56, or Medium sticker ever will.
That matters most when you are comparing actual bikes for sale. New and used listings often leave out fit context, and brand sizing is rarely consistent. Riders who know how to read the numbers make better buying decisions, waste less time on bad candidates, and end up with a bike that needs normal setup adjustments instead of major compromises.
If you are comparing actual bikes for sale, use SYCLR to start with your height, bike type, and budget, then compare listings by fit signals, geometry context, price, and listing quality before you chase a deal.