
Bike Fit Guide for Road & Gravel Bikes
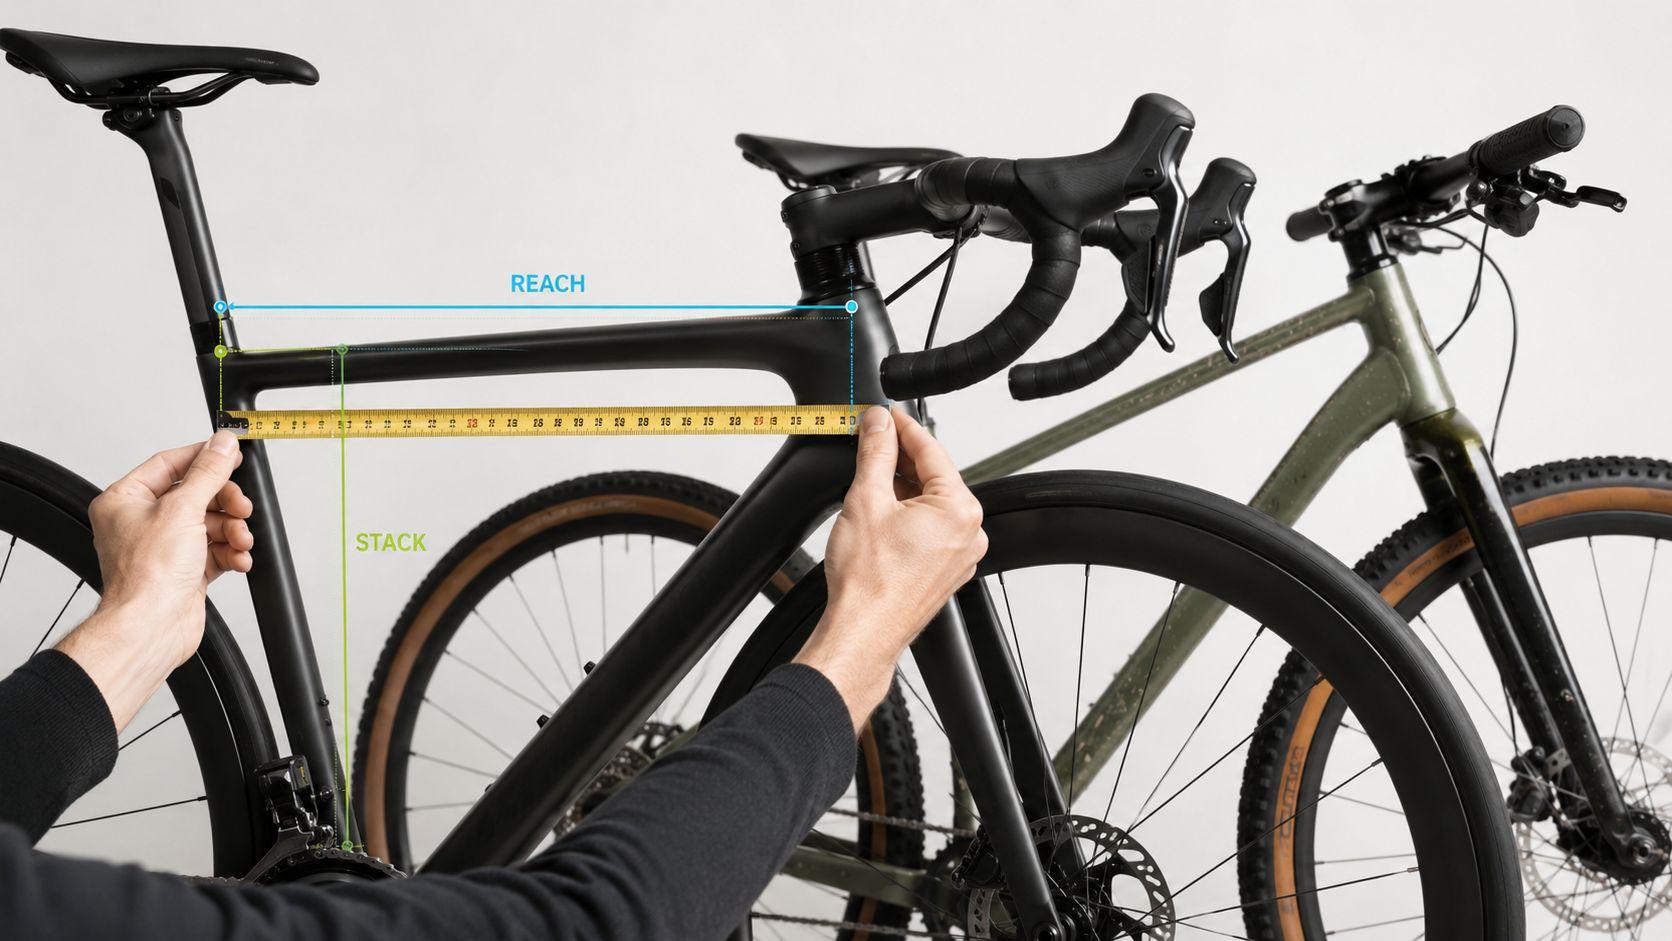
Bike Fit Guide: How to Choose the Right Road or Gravel Bike
A proper bike fit starts with understanding your body measurements, your riding goals, and the bike’s geometry. Cycling inseam is one of the best first measurements to take, while stack and reach help explain how a frame will feel once you are actually riding. Standover, saddle height, cockpit length, and bar position all matter, but no single number guarantees the right fit.
Quick answer: A bike fit guide can help you narrow the right road or gravel bike before you buy by combining body measurements, cycling inseam, stack, reach, standover, riding style, and current-bike reference points. Height and frame size are useful starting points, but the actual geometry of the bike determines whether a listing is worth considering.
If you're shopping for a road or gravel bike right now, you're probably looking at listings that say 54, 56, M, or L and wondering whether any of those labels mean the bike will fit. Sometimes they help. Often they are only rough sorting tools.
A good bike fit guide should help you avoid buying the wrong frame before you contact a seller, arrange a test ride, or click through to a listing. That matters even more when you're comparing used bikes, mixed-quality listings, and geometry charts that make very different bikes look interchangeable.
Table of Contents
Why Your Bike Fit Starts Before You Buy
The biggest sizing mistake often happens before the first ride. Riders pick a frame from a height chart, trust the size label, and assume any remaining issues can be fixed later.
That approach breaks down when the frame is not even close to the right range. Many riders end up on poor-fit bikes because height charts cannot account for individual proportions, flexibility, riding goals, and geometry differences between brands. That is why a pre-purchase fit process should combine body measurements with frame geometry instead of relying on size labels alone.
Height is a starting point, not a fit decision
Height helps narrow the field. It does not tell you enough to choose between two bikes with different front-end heights, different cockpit lengths, or different ride intentions.
Two riders with the same height can need different bikes because their inseam, torso length, arm length, flexibility, and comfort preference are not the same. One rider may be comfortable on a lower, longer race-oriented setup. Another may need a shorter cockpit and taller front end for long days on rough roads.
Practical rule: Use height to begin the search. Use inseam, stack, reach, standover, riding style, and current-bike references to decide which listings deserve your attention.
This matters even more with used bikes. A good price on the wrong frame is still the wrong bike. Buyers often focus on groupset, wheels, or model year before they have confirmed whether the geometry is even realistic for their body and riding goals.
What a pre-purchase fit process changes
A fit-aware shopping process is simpler than most riders expect. It just asks better questions earlier.
First: Is the frame in a believable range for your inseam, body proportions, and intended riding style?
Next: Does the bike's geometry support the posture you want, not just the size label it carries?
Then: Are the contact-point adjustments likely to fine-tune the bike, or are you trying to rescue the wrong frame?
That last question matters. Small adjustments can do a lot, but they cannot turn a fundamentally too-long, too-low frame into a sensible endurance or gravel bike for most riders.
If you're early in the process and only know your height, bike type, and budget, you can start with your height, bike type, and budget and begin narrowing road and gravel options before getting deeper into geometry.
Taking Key Body Measurements at Home
You do not need a studio fit session to start shopping more intelligently. A few home measurements can eliminate a lot of bad options before you compare listings.

Start with cycling inseam
If I could only ask a rider for one home measurement before shopping, I would ask for cycling inseam. It is easy to measure, often more useful than raw height for pre-purchase screening, and immediately relevant to standover and saddle-height starting points.
Take it like this:
Wear cycling shorts or thin clothing.
Stand barefoot with your back against a wall.
Place a book firmly between your legs so it presses upward like a saddle.
Keep your feet flat and roughly shoulder-width apart.
Measure from the floor to the top edge of the book.
Do it a few times. Use the most consistent number.
Many riders use standover clearance, saddle height, and cockpit position as practical checks, but the right setup depends on frame design, rider proportions, flexibility, riding style, and the position the rider can comfortably hold. Standover can help you screen out obviously poor options, but it should be treated as part of the bigger fit picture rather than a universal pass-fail rule. For a deeper explanation of the concept, the dedicated guide to bike standover height is worth reviewing before you shortlist anything with an unusual top tube shape.
Cycling inseam often explains why two riders of the same height end up on different frame sizes, or on the same size with very different setups.
Add torso and arm length as secondary inputs
Inseam is the first gate. Torso and arm length help explain cockpit needs.
A rider with a relatively long torso may feel balanced on a bike that would overstretch someone else of the same height. A rider with shorter arms may need a more compact cockpit even if standover looks fine. These are not usually the first filters for a beginner, but they help explain why one 56 cm bike feels manageable and another feels long and harsh.
A simple home method works well enough:
Torso length: Measure from the top of the book in your inseam position to the notch at the base of your throat.
Arm length: Measure from the shoulder point to the center of your palm or wrist crease, depending on the method you're using. The goal is consistency, not false precision.
This visual walkthrough helps if you want to see the process before measuring yourself.
For a broader sizing perspective beyond raw height charts, the SYCLR blog hub includes related buying guides such as Road Bike Size Chart, Why Height Alone Is Not Enough and other fit-focused articles for road and gravel riders.
Decoding Bike Geometry Stack and Reach
Once your body measurements are in place, geometry becomes the most useful language for comparing listings. This is where many buyers get stuck, because frame labels sound simple while geometry charts look technical.
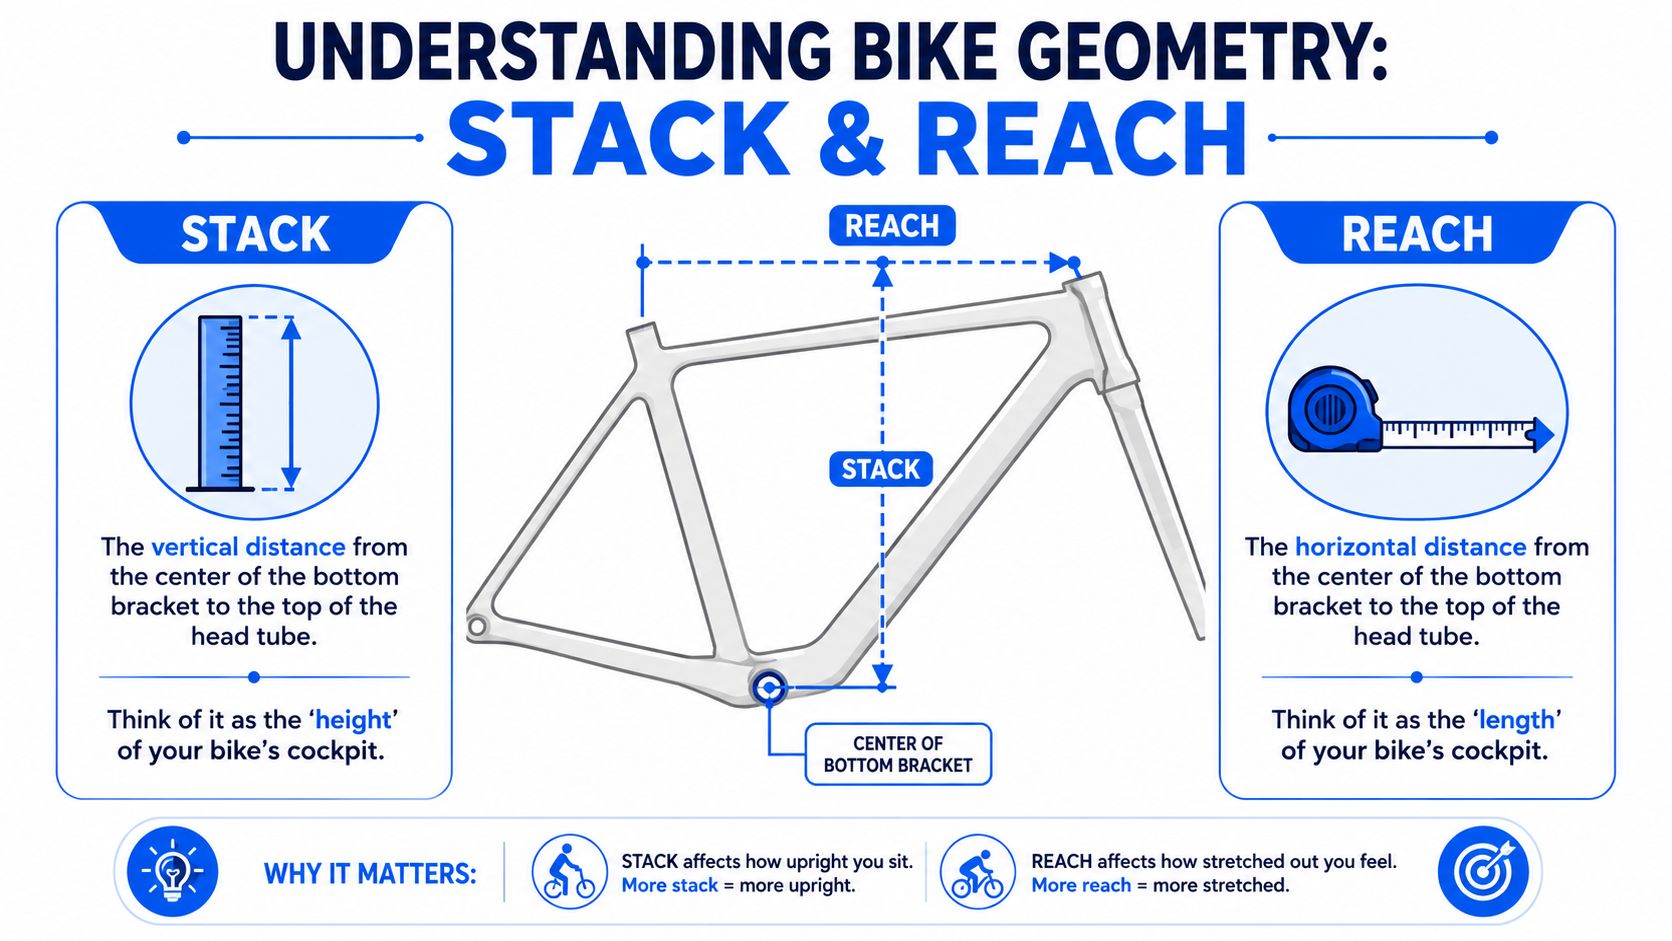
The two numbers that matter most when you compare frames across brands are stack and reach. They are among the most consistent geometry numbers because they describe how tall and how long a frame is without relying on a brand's size label. Both Canyon and road.cc emphasize stack and reach as key reference points for understanding real fit differences between bikes.
What stack and reach actually tell you
Stack is the vertical distance from the center of the bottom bracket to the top of the head tube. Think of it as a frame's front-end height.
Reach is the horizontal distance from the center of the bottom bracket to the top of the head tube. Think of it as a frame's front-end length.
Those two numbers tell you much more than a frame label like 54 or 56. They also help you predict posture. More stack often supports a more upright position. More reach often creates a longer, more stretched position.
A closely related concept matters in real shopping too. Some fitters prefer effective stack and effective reach, or contact-point-based measurements, because they better reflect where the rider's hands actually land once stem and handlebar dimensions are involved. Canyon and MyVeloFit both point out that those real-world contact points can be more useful than frame numbers alone when you already know how your current bike fits.
Why frame size labels mislead buyers
A 56 cm from one brand can feel taller or longer than a 56 cm from another. That is normal. Seat tube naming conventions vary, model intent varies, and geometry priorities vary.
Reach is the metric riders often overlook. Standover is easy to notice in a parking lot. Reach is what helps determine whether you feel naturally supported or permanently overextended once you are on the bike. Stack matters too, especially for endurance and gravel riders, but many common comfort complaints start with a cockpit that is too long or a front end that is too low.
A frame size is a label. Stack and reach are the fit signal.
There is some adjustment room after purchase, but not unlimited room. The Pro's Closet notes that stem changes usually work best as small corrections, not as a way to rescue a fundamentally wrong frame.
For a dedicated comparison tool and explanation, see SYCLR's guide to bike stack and reach.
Typical geometry by bike category
stack-to-reach ratio guidance for endurance comfort
The fastest way to make geometry practical is to connect it to intended use.
| Bike Category | Primary Use | Geometry Trend | Riding Posture |
|---|---|---|---|
| Endurance road | Long rides, all-day comfort, mixed pace | Typically more stack relative to reach than race-focused bikes | More upright, comfort-focused |
| Race road | Fast group rides, aggressive road position | Typically lower stack and longer reach for the size | Lower, longer, more aggressive |
| Gravel | Mixed surfaces, control, long rough rides | Often aims for stability and comfort, with many models favoring a taller front end than race road bikes | Upright to moderately athletic, with more control |
Stack-to-reach ratio can help describe whether a frame trends more upright or more aggressive, but it should not be used as a universal fit rule. Endurance bikes often have relatively taller front ends than race bikes, while race bikes often place the rider lower and longer. Use the ratio as a directional clue, then compare the actual stack, reach, standover, bike category, and your current bike position.
For more fit-aware sizing and geometry reading, the SYCLR blog is the right next stop for topics like Stack and Reach Explained, Why Two 56 cm Bikes Can Fit Differently, and How to Compare Bike Geometry.
Troubleshooting Common Fit Problems
Most fit complaints are not mysterious. They usually point to a few common causes. The key is separating a setup issue from a frame issue, especially when you're deciding whether a listing is worth pursuing.

When the cockpit is the problem
If your hands carry too much weight, your neck gets overloaded, or your shoulders feel tense, look hard at cockpit length and front-end height.
A rider often assumes the whole bike is the wrong size when the first meaningful improvement comes from a smaller change. A slightly shorter stem, a few spacers under the stem, hood rotation, or a more compact handlebar can reduce how stretched the rider feels and make the same bike much easier to ride for longer.
Common patterns look like this:
Hands carrying too much weight: The cockpit may be too long, the bar too low, or both.
Neck and shoulders always tight: The front end may be lower than your flexibility and riding goals support.
Bike feels twitchy after trying to fix reach with extreme parts choices: You may be compensating for a frame that was never close enough to begin with.
Small cockpit changes can transform comfort. They work best when the frame is already in the right range.
When the frame is close but the setup is wrong
Lower-back discomfort, unstable weight distribution, or awkward pedaling can come from saddle position and bar setup rather than the frame alone. Saddle height, saddle setback, and bar relationship all interact.
Many riders use standover clearance, saddle height, and cockpit position as practical checks, but the right setup depends on frame design, rider proportions, flexibility, riding style, and the position the rider can comfortably hold.
That said, do not overdiagnose from one symptom. A bike that feels wrong may need only contact-point work. Or it may be telling you the geometry never matched your body or your riding style. A pre-purchase bike fit guide is most useful when it helps you tell the difference before you buy.
A Practical Workflow for Comparing Bike Listings
Shopping gets easier when you stop asking, "What size should I ride?" and start asking, "Which available listings are even worth comparing?"
That is the difference between sizing theory and a buying workflow.

Build your shortlist in the right order
Use this sequence when you're comparing road or gravel bikes online.
Start with body data
Use height as a rough opener, but anchor the search with cycling inseam first. Then add comfort preference, riding goals, and any current-bike fit notes you trust.Choose the right bike category
A race road bike, endurance road bike, and gravel bike can all share a similar size label while delivering very different positions. Buy the category that matches how you ride, not the one with the nicest paint or deepest discount.Screen listings by geometry
Compare stack and reach before you get distracted by drivetrain details. If a frame looks much lower or longer than what suits your body and goals, it probably does not belong on your shortlist.Use standover and setup plausibility as filters
Standover, saddle-height range, and cockpit adjustability can help you eliminate listings that look unrealistic before you go further.Ignore bikes that need heroic fixes
If a listing would require extreme stem length, a tower of spacers, or obvious compromises just to get close, move on.Shortlist a small set of realistic options
A short list beats an endless list. Two or three bikes that fit the geometry window are easier to compare well than twenty random maybes.
If you're actively browsing and want a dedicated search environment built around this process, explore the bike search experience before you jump between disconnected marketplace tabs.
What to compare once a bike passes the fit screen
Once a bike is fit-plausible, compare the rest of the listing.
| What matters | Why it matters |
|---|---|
| Model year | Geometry and spec can change even when the model name stays the same |
| Condition | A correct size does not offset frame damage, worn consumables, or neglected maintenance |
| Price context | A fair listing should make sense relative to age, spec, and condition |
| Source quality | Clear photos, accurate details, and complete geometry information reduce guesswork |
| Confidence signals | Better listings make it easier to trust what you're actually buying |
This is also where used-bike discipline matters. A used road bike or used gravel bike can be great value, but only if the fit and the condition both check out. If you need more listing-specific buying help, the SYCLR blog covers topics like How to Know If a Used Bike Fits Before You Buy, How to Compare Bike Listings Across Marketplaces, and How to Avoid Buying the Wrong Bike Online.
Already know your fit details? Use them to improve your recommendations.
How SYCLR Helps You Shortlist Smarter
The manual process works. It just takes time.
SYCLR is built for riders who want fit-aware recommendations instead of generic marketplace browsing. It helps you compare road and gravel listings using rider details, bike type, budget, available geometry data, price context, listing quality, and confidence signals. That makes it easier to shortlist smarter, compare better-fit options, and reduce guesswork before you click through to a seller.
If you're ready to apply this bike fit guide to real shopping, compare road and gravel bike listings with SYCLR.
Frequently Asked Questions About Bike Fit
Is height enough to choose a road or gravel bike?
No. Height is a useful starting point, but stronger pre-purchase sizing decisions come from inseam, stack, reach, standover, current bike geometry, comfort preference, and riding goals.
What is stack on a bike?
Stack is the vertical distance from the center of the bottom bracket to the top of the head tube. It helps describe how tall the front of the frame is and strongly affects riding posture.
What is reach on a bike?
Reach is the horizontal distance from the center of the bottom bracket to the top of the head tube. It helps describe how long the frame feels in the cockpit and is one of the most important fit numbers when comparing bikes.
Can a professional bike fit still help if I'm shopping online?
Yes. A professional fit can be valuable, especially if it gives you a reliable reference from your current bike. Fitters often recommend dialing in your current setup first and recording your fit coordinates before choosing a new frame, because that gives you a stronger basis for comparing the next bike. Canyon explains why current-bike fit data can be more useful than a size label alone.
Does frame size matter if I already know stack and reach?
Yes, but less than many riders think. Frame size is still useful as a label and rough sorting tool. Stack and reach are usually more reliable when you need to compare frames across brands.
Is gravel bike fit different from road bike fit?
Usually, yes. Gravel riders often prefer a slightly more upright position for comfort and control on rough surfaces, while road setups can range from endurance-oriented to more aggressive race positions.
Can a used bike be a good deal if the size is slightly off?
Usually not. A good used bike deal can still be a poor buy if the frame or geometry is wrong for you. Minor adjustments can help, but they do not replace a sensible starting frame.
If you want to turn fit theory into a practical buying decision, SYCLR helps you compare listings by fit signals, geometry signals, price context, listing quality, and confidence signals. Start with your height, bike type, and budget at the SYCLR app, or if you already know your numbers, use your fit details to improve your recommendations.