
Bicycle Saddle Sizing Chart: Sit-Bone Width Guide
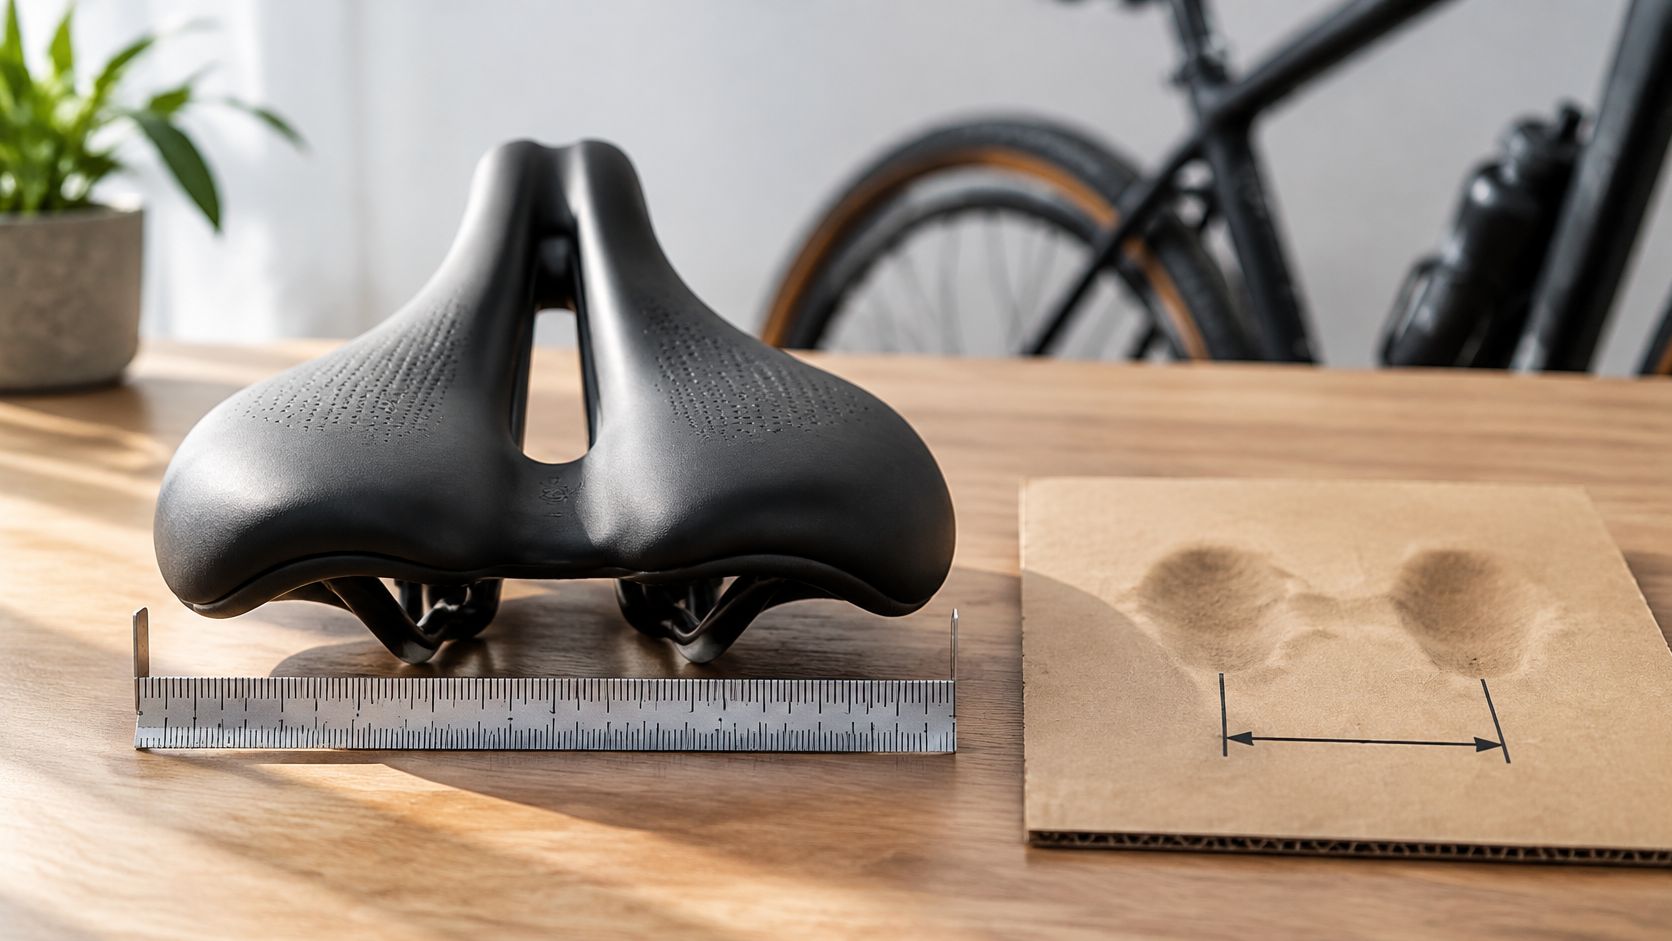
Measure sit-bone width in millimetres, then use the proposed 10 to 20 mm allowance to build an initial shortlist. This is a screening heuristic, not a validated fit standard or a substitute for a manufacturer's own guidance. Saddle shape, riding position, and the way a brand reports width still matter.
A published width may describe the saddle's widest point without telling you how much usable support it provides. Compare the chart's heuristic separately from brand-specific recommendations, and check the actual saddle before buying.
For road and gravel buyers, this is a separate fit question from frame size. Height alone can't establish saddle width, just as a saddle-width band can't confirm that a particular frame or saddle will fit. The useful result is a narrower, better-informed shortlist.
Table of Contents
- Bicycle Saddle Sizing Chart by Sit-Bone Width
- How to Measure Your Sit-Bone Width at Home
- Converting a Measurement Into a Width Band
- How Riding Position Shifts the Width Band
- Checking Shape, Nose Width and Cutout Within a Band
- Telling Width Problems From Setup Problems
- Saddle Rails, Clamps and Used-Bike Swaps
- How SYCLR Helps With Bike Fit Before the Saddle
- Common Questions About Saddle Sizing Charts
- Confirm Your Width Band Before You Buy
Bicycle Saddle Sizing Chart by Sit-Bone Width
This chart presents two different ways to shortlist saddles, not interchangeable sizing rules. First, the proposed +10 to +20 mm allowance is a rough screening heuristic: add 10 mm and 20 mm to your measured sit-bone spacing to get a range to investigate. It is not a universally validated standard. Second, Alpensattel publishes its own recommendations for specific sit-bone categories; use those only as guidance for that brand. Neither approach establishes the usable supportive area or guarantees fit.
| Sit-bone width you measured | Proposed +10 to +20 mm starting range | Alpensattel's published category and saddle-width recommendation |
|---|---|---|
| Any measurement | Add 10 mm and 20 mm to your reading; for example, 105 mm suggests investigating 115 to 125 mm | Consult the exact published categories below; no recommendation is supplied for gaps between them |
| 9-10 cm (90-100 mm) | Calculate from your individual measurement | 130-140 mm |
| 11-12 cm (110-120 mm) | Calculate from your individual measurement | 143-155 mm |
| 13-14 cm (130-140 mm) | Calculate from your individual measurement | 155-165 mm |
| 15 cm or more (150 mm or more) | Calculate from your individual measurement | 165 mm or more |
Alpensattel publishes these categories in centimetres in its sit-bone measurement and saddle-width chart. Converting the category labels to millimetres does not fill the gaps between them: for example, 105 mm and 125 mm have no published Alpensattel category. The heuristic and brand recommendations may differ because one is a simple addition to a body measurement and the other is guidance for particular saddles and riding positions. A nominal maximum saddle width also does not tell you where its usable support falls.
Use the margin as a starting point
Adding 10 mm and 20 mm gives two comparison points, not a prescribed saddle size. A 2023 saddle-width study tested 10 healthy female participants under specific stationary-cycling conditions using a limited selection of saddle designs. Its results suggest that exploring a saddle about 10 mm wider than measured ischial spacing can be useful for the participants and conditions studied. They do not validate a universal +10 to +20 mm rule or predict long-ride comfort for other riders.
The 20 mm end is another shortlist comparison point, not a research-backed upper limit. Check saddle geometry and support through a test fit wherever possible.
Read brand references as brand-specific
Alpensattel publishes 9-10 cm: 130-140 mm, 11-12 cm: 143-155 mm, 13-14 cm: 155-165 mm, and 15 cm or more: 165 mm or more (Alpensattel's sit-bone measurement and saddle-width chart). These recommendations can be wider than the proposed +10 to +20 mm comparison range. Do not treat the difference as an error or apply the brand's values to unlisted measurements.
Alpensattel generally points riders toward the wider end of its ranges for an upright position and the narrower end for sporty riding, within its own guidance. That does not make posture alone a reliable width selector for another manufacturer's saddle. Check what a published width measures and where the shell actually supports you.
How to Measure Your Sit-Bone Width at Home
A home measurement can give you a useful starting figure if you keep the surface, posture, and measuring method consistent. Gather firm corrugated cardboard, a hard chair, a ruler marked in millimetres, a pen, and a helper if possible. Soft cushioning blurs the impressions; slouching or measuring from mark edge to mark edge can distort the result.
Set out firm materials. Place the cardboard on a hard chair and have your ruler and pen ready. A helper can mark the impressions while you stand up, which makes it easier to keep the marks centered.
Sit with a consistent posture. Sit upright with your feet flat and your hips roughly at a right angle. A soft cushion can flatten or blur the dents, while slouching can change the reading.
Settle and stay still. Settle into the upright position, then remain still while the impressions form. Do not rock forward and back to make the dents deeper.
Mark the deepest impressions. Stand carefully and mark the center of each distinct sit-bone dent. If either impression is unclear, reset with fresh cardboard and take another reading rather than guessing at its center.
Measure the distance. Measure from the center of one mark to the center of the other in millimetres. Measuring edge to edge instead of center to center inflates the result.
Repeat independently. Take at least two more readings on fresh areas of cardboard, using the same posture and method. Compare the separate center-to-center measurements; if they differ substantially, reset and repeat before using the chart.
Record the context. Write down the measurement and whether you took it upright. Posture matters when you interpret the band, so the number is more useful when you know how you sat.
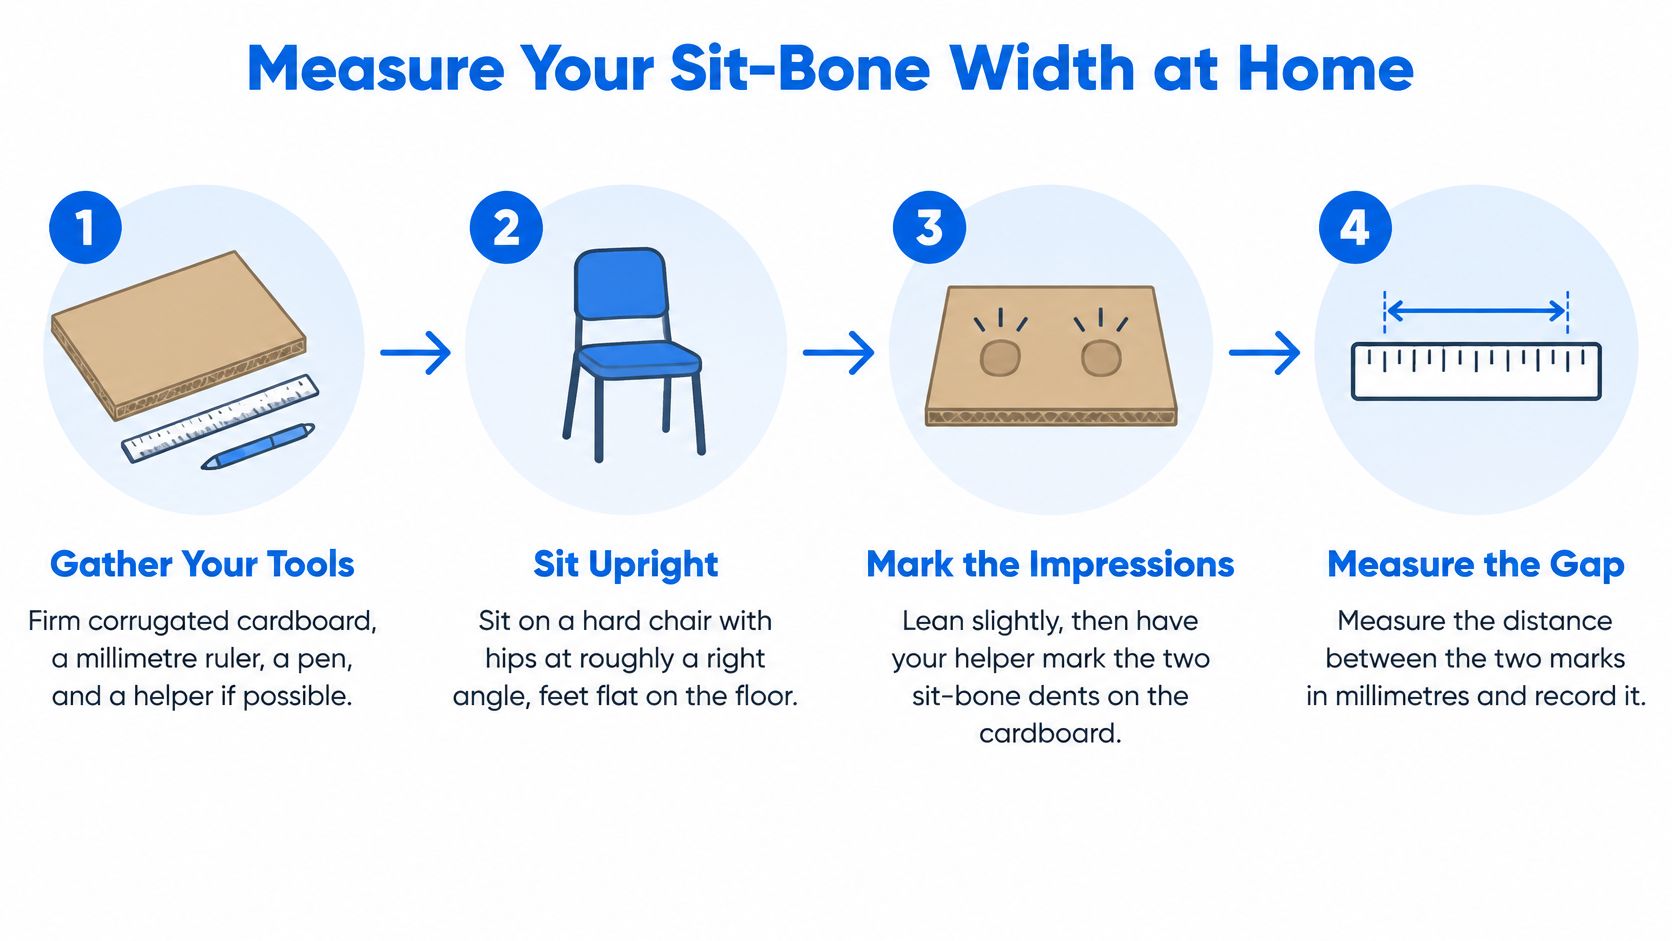
A consistent result means separate readings land close together using the same setup. If the dents are unclear or readings vary substantially, start again rather than averaging uncertain marks. Recheck your reference measurement when your setup or riding position changes; the home reading alone cannot predict pressure on the bike.
Converting a Measurement Into a Width Band
For a provisional comparison range, add 10 mm and 20 mm to your own sit-bone measurement. For example, 105 mm produces a 115 to 125 mm heuristic range, not a manufacturer's recommendation for that reading. Consult brand-specific charts separately, without assigning their guidance to unpublished measurements. Position, shape, and the definition of published width determine whether candidates are worth testing.
Check where the listed width is measured
Check the product specification or diagram for the published width and its measurement point. A number measured at the saddle's widest point describes its maximum overall width, not necessarily the width of the surface that supports your sit bones. Even when two manufacturers publish the same maximum width, shell shape, curvature, padding, and nose geometry can leave different usable support areas.
Check the exact model and version; a related model's dimensions may not apply. If the listing omits the measurement method, ask the seller or manufacturer and mark the figure as uncertain if you cannot confirm it. Record the width definition alongside each candidate rather than treating identical numbers from different makers as evidence of identical fit.
How Riding Position Shifts the Width Band
As the pelvis rotates forward, contact may shift toward the front of the saddle and the pubic-bone branches. An upright sit-bone measurement therefore cannot predict pressure in every riding position. The cycling ergonomics review provides broader context; the table below identifies what to examine, not which end of a width range to buy.
| Riding position | Contact consideration | What to check on a candidate saddle |
|---|---|---|
| Upright, touring or city | Rear support may matter more when the pelvis is relatively upright | Whether the rear platform supports the sit bones without edge pressure or interference with pedaling |
| Endurance road, moderate lean | Contact can involve both rear support and more forward tissues | Rear support, nose shape, and whether pressure changes as you move between hand positions |
| Aggressive road or race, forward pelvis | Forward rotation can change the location of pressure | Nose width, central relief, inner-thigh clearance, and comfort in the actual riding position |
| Gravel, seated for long climbs | Sustained seated effort can make stability and pressure changes more noticeable | Support while climbing, fore-aft stability, and clearance during pedaling |
| Mostly out of the saddle | The saddle is contacted less during efforts, but still matters when seated | Comfort during the seated portions of a representative ride |
Alpensattel generally suggests the wider end for upright and narrower end for sporty riding within its own published ranges (Alpensattel's sit-bone measurement and saddle-width chart). Do not reverse that advice into a universal rule or infer a suitable width from posture alone. Compare support and pressure on the actual models you are considering. If handlebar position changes reach and forward rotation, the bike handlebar reach guide can help assess the broader contact-position question.

Checking Shape, Nose Width and Cutout Within a Band
The widest saddle isn't automatically the best compromise. Width interacts with nose geometry, cutout design, pelvic contact, and where pressure lands. In a study of saddle nose width and cutout, 19 female cyclists rode an ergometer for 20 minutes on each of three specific saddle designs. Total mean pressure was similar across designs, while the wide design increased anterior pressure and decreased posterior pressure compared with the standard and medium designs. The novel designs increased sit-bone discomfort, and the researchers identified the medium design as the best compromise in that experiment.
These short laboratory trials with particular saddles cannot establish a best width or cutout for other riders or longer rides. They do show why a larger published width does not guarantee better pressure distribution or comfort.
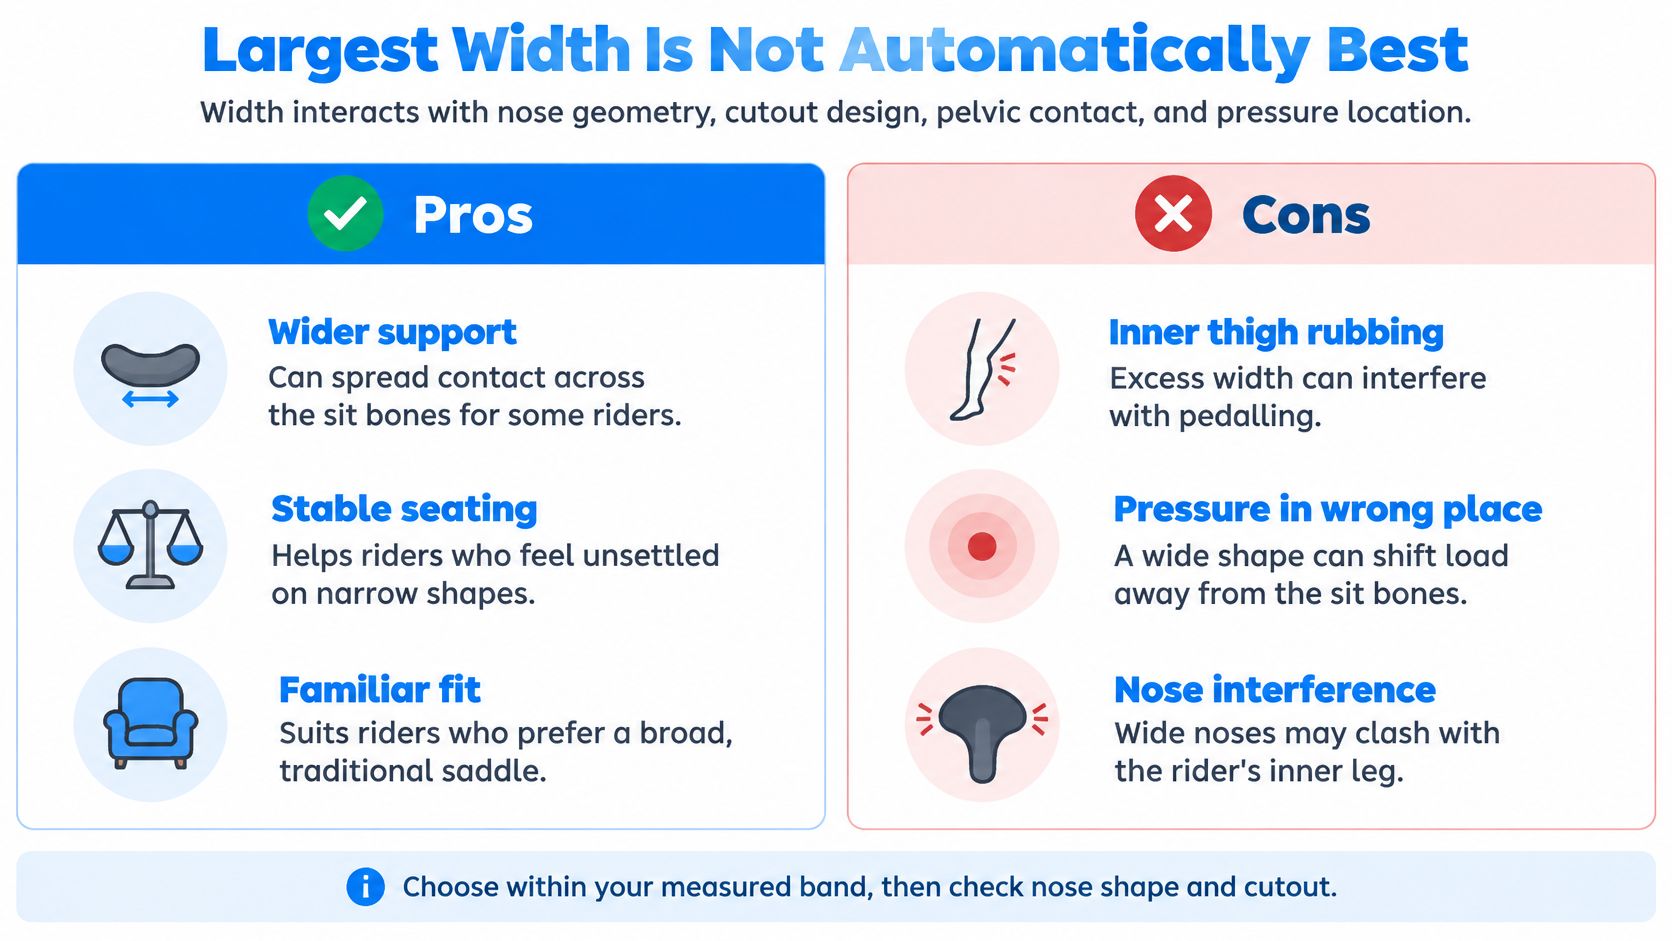
| Design choice | Potential advantage | Trade-off to check |
|---|---|---|
| Wider nose | May provide a broader front support surface | Can interfere with the inner thigh while pedaling |
| Medium nose | May balance pressure distribution and leg movement | May not provide enough support for every rider or position |
| Cutout | Changes pressure distribution through the saddle's center | Doesn't guarantee lower pressure for every rider |
| Solid surface | Provides continuous support across the shell | May not suit every rider's contact pattern |
Before choosing between candidates, check that the saddle is level and that its rails allow enough fore-aft adjustment. Notice whether the nose clears your inner thigh while pedaling and whether the padding edge compresses beneath your sit bones. Compare nearby available widths when possible, then assess nose shape, cutout, and support in your riding position before deciding. The widest option need not be the best fit.
Telling Width Problems From Setup Problems
Width is one variable among several. Saddle pressure can also change with sitting time, pedaling intensity, trunk and hand position, handlebar position, saddle height, and padding. The symptom pairings below are representative, not diagnostic.
| Symptom | Possible width-related cause | Possible setup or other cause | First check |
|---|---|---|---|
| Pressure at both sit bones from the start of the ride | Rear support or shell shape may not suit the rider | Saddle tilted nose-up or set too far back | Re-measure, check saddle level, and assess where the sit bones contact the shell |
| Pressure in the central soft-tissue area | Nose too wide or no cutout for the riding position | Forward pelvis or low handlebar | Check nose width and bar height |
| Discomfort that starts late in long rides | Support or padding may not suit prolonged contact | Fatigue, sitting time, and hand position | Note when discomfort starts across comparable rides |
| Discomfort only on steep or hard efforts | Width less likely the main cause | Saddle slides forward or back under load | Check fore-aft position and clamp torque |
| One side feels heavier than the other | Band and shape may be asymmetrical in use | Rail clamp or tilt pushes weight to one side | Check level from the rear |
Separate possible causes by noting when discomfort starts, changing one variable at a time, and repeating a similar ride. You might check saddle tilt, fore-aft position, or bar height one at a time rather than changing several adjustments together. The saddle setback and bike fit guide covers how saddle position relates to the rest of the bike setup.
If discomfort grows late in a long ride or appears mainly during hard efforts, fatigue, posture changes, or pedaling load may be involved alongside width. Swapping saddles for a symptom caused by setup can cost money without changing the cause. Persistent symptoms warrant advice from a qualified bike fitter or medical professional.
Saddle Rails, Clamps and Used-Bike Swaps
Used bikes often come with a replacement saddle, so the model named in a listing may not match the saddle that is really installed. That matters because the saddle's width band, rail setup, and price may all differ from what you expect.
Ask whether the saddle is original. Request a clear photo of its underside, rails, and model markings so you can identify what's installed.
Compare the rails with the description. Check whether the stated rail material and shape match the seller's details; rail dimensions and shape can affect clamp fit and fore-aft adjustment.
Check clamp compatibility rather than assuming it. Confirm the installed rail profile fits the seatpost clamp; if you plan to swap saddles, check the replacement rails against that clamp too.
Include replacement cost in your comparison. If the installed saddle is unsuitable, account for another saddle and any required compatible clamp hardware when assessing the bike's price.
Serviceability is also part of the mechanical inspection. Check that the rails are straight and the shell isn't damaged. A listing that says only “saddle included” doesn't confirm its width, model, or rail type, so treat those details as unverified.
A saddle swap can change both the width band and rail setup. Check the saddle before comparing the bike's price with other listings, especially when the seller hasn't identified the installed model.
How SYCLR Helps With Bike Fit Before the Saddle
SYCLR supports fit-aware road and gravel bike discovery and comparison. It is not a saddle-shopping or saddle-recommendation service, and it does not verify whether a particular saddle and seatpost clamp are compatible.
Riders can compare road and gravel listings using available fit and geometry signals, value and listing context, alongside their riding needs and budget. Riders who already know stack, reach, current-bike geometry, or fit-report details can use the advanced fit entry for a more detailed comparison. Bike geometry can inform your overall riding position; saddle measurement, component checks, and a test fit remain separate responsibilities.
For background on how rider details fit into a broader pre-purchase decision, see the bike fit guide. No frame comparison replaces a saddle-width measurement or a professional fit.
Common Questions About Saddle Sizing Charts
Is sit-bone width the same as saddle width?
No. Sit-bone width is a body measurement; published saddle width is a product dimension, often its maximum width rather than its usable support area. The chart's added allowance is a shortlist heuristic, not an exact fit rule.
Can I measure at home?
Yes. Repeat the measurement and keep your posture consistent. Use the result as a starting point, since a home measurement does not confirm saddle fit.
Does a wider saddle always mean more comfort?
No. Width alone cannot predict pressure distribution or comfort. Rear-platform shape, nose width, and cutout design also affect where pressure falls.
Do men and women use the same chart?
The same center-to-center measurement method can be used by any rider. The cited 2023 study tested only 10 healthy female participants under specific conditions, so it does not establish a sex-specific or universal saddle-width rule. Check your own measurement, riding position, and candidate saddle.
Why do brands disagree on the same width?
Brands may measure or report width differently, and the same maximum width can conceal different supportive shapes. Compare measurement methods and the actual contact area rather than assuming equal numbers mean equal fit.
What if I fall between two bands?
Keep nearby candidate widths in consideration rather than forcing a borderline measurement into a category. Recheck the measurement, consult each brand's actual published categories, and compare support, nose shape, and pressure on the saddle. Do not assign an unpublished brand recommendation to the gap between its categories.
Confirm Your Width Band Before You Buy
Use the heuristic range to identify candidates, then check the actual saddle and listing:
Confirm your repeatable center-to-center measurement; use brand recommendations only where your reading fits a published category.
Identify the exact saddle model and version, its published width, and where that width was measured. Check the shape and usable support rather than relying on the maximum dimension alone.
Compare rear support, nose clearance, and pressure in your usual riding position, ideally on a representative test ride.
On a used bike, inspect the installed saddle and rails, confirm seatpost-clamp compatibility for any proposed swap, and budget for a replacement if needed.
Check return or fit-trial terms before buying. Seek a qualified fitter or medical professional for persistent discomfort.
For the bike search, use SYCLR's road and gravel listing comparison to assess available geometry, fit, and buying context. Choosing and test-fitting the saddle remain separate buyer responsibilities.