
Bike Trail Geometry Explained for Road and Gravel Riders
You're comparing two bikes that look similar on paper. One costs less, has familiar components, and carries a road label. The other has wider clearance and a different front-end layout. Then you notice a geometry number called trail, and the buying decision gets harder.
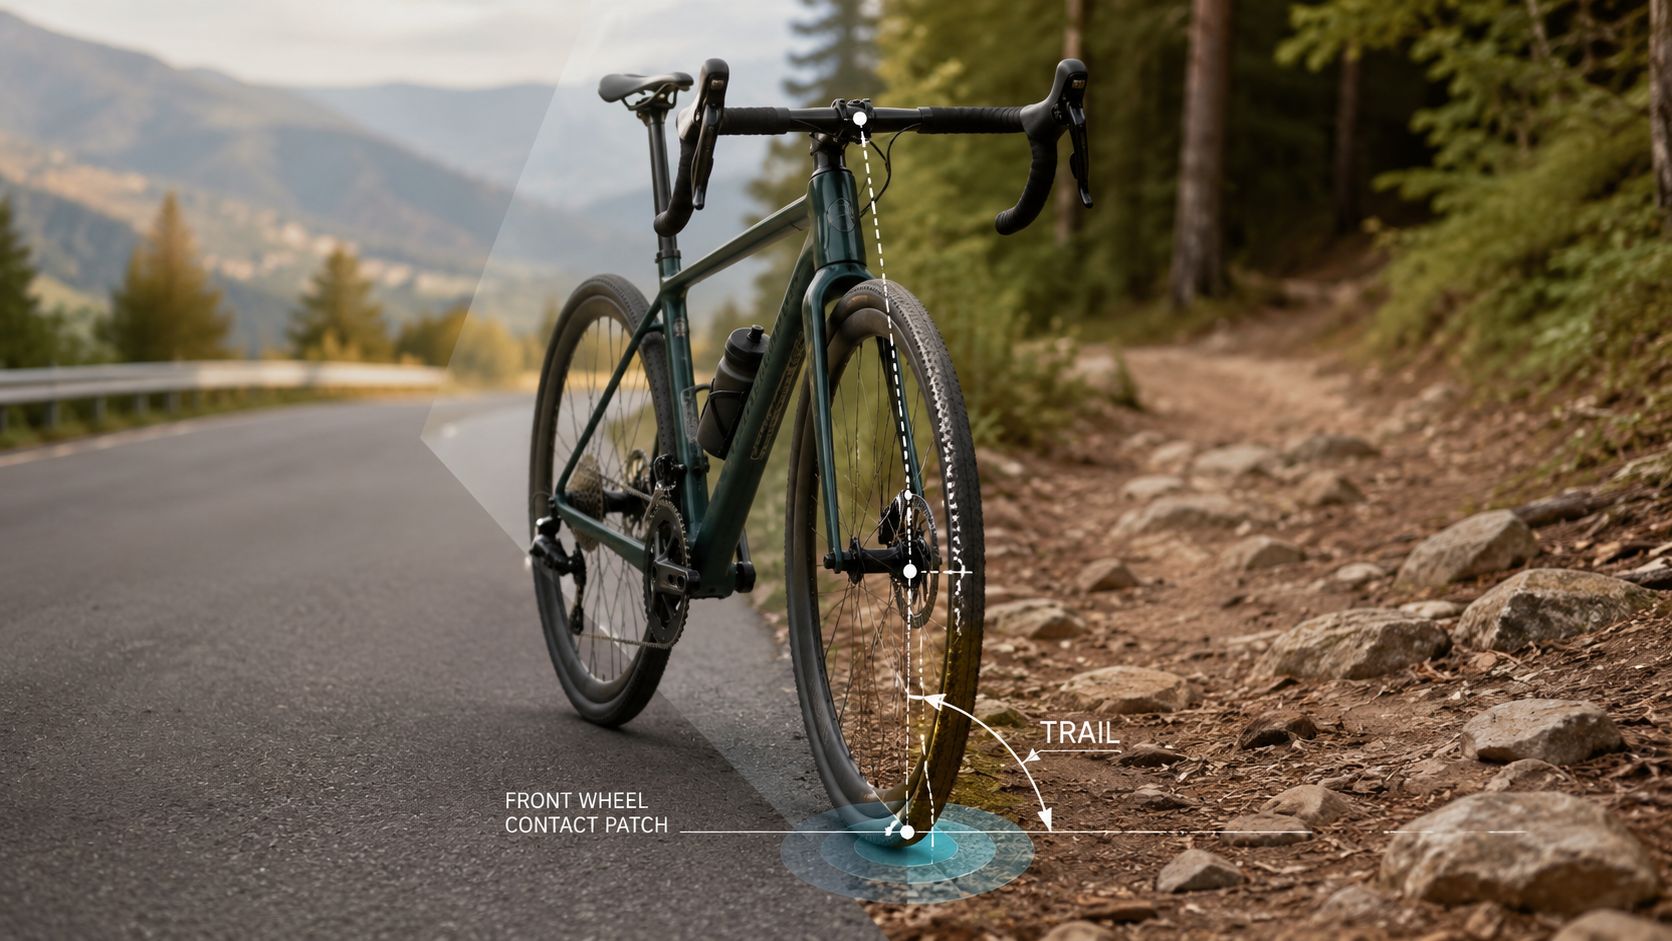
Bike trail geometry explained: trail is the horizontal distance between the steering axis where it meets the ground and the front tire's contact patch. It is one steering-geometry signal among several, not a complete handling verdict. The trail value comes from the relationship between head angle, fork offset, and the wheel-and-tire radius assumed for the geometry calculation. For road and gravel bikes, category labels alone do not tell you much because trail values can overlap and the number only becomes useful when read with the rest of the geometry chart.
Table of Contents
- What Bike Trail Geometry Means
- Understanding Trail as a Steering Measurement
- How Head Angle Fork Offset and Wheel Size Create Trail
- How to Interpret Trail Without Overclaiming
- Road and Gravel Trail Numbers Compared
- Using Trail When Comparing Bike Listings
- How SYCLR Helps You Compare Listings
- Bike Trail Geometry FAQs
- What is bicycle trail?
- Is trail a handling target?
- What formula is used to calculate trail?
- Why can't I compare head angle alone?
- Does fork offset really matter?
- Does wheel size alone tell me enough?
- Can road and gravel bikes have similar trail?
- Does trail determine fit?
- What should I compare first between two listings?
What Bike Trail Geometry Means
The word "trail" causes an easy mix-up. It can mean the path beneath your wheels. It can also mean a measurable steering property built into the frame and fork. In this article, trail means the geometry number.
Trail is useful because it condenses several front-end dimensions into one published figure. But it is only one signal. It does not summarize fit, comfort, confidence, tire behavior, wheelbase, front-center, bar setup, fork stiffness, rider position, or the condition of a used bike. It also does not work as a universal score where more is better or less is better.
That makes trail most useful during comparison. When two listings share a similar frame size but use different head angles, fork offsets, or wheel and tire setups, the trail number can help explain why the front ends are not actually the same. It is a comparison field, not a standalone verdict.
Trail also does not determine fit. A bike can show a trail number that looks sensible on paper and still place the bars too high, too low, too far away, or too close for your body. Stack, reach, standover, frame size, and your current-bike position provide more useful fit context, especially when two listings use different size labels. SYCLR's road bike geometry comparison guide is a useful neighboring resource when the broader question is how race, endurance, aero, and all-road designs differ.
Buying rule: Treat trail as one geometry signal in a wider front-end comparison.
Understanding Trail as a Steering Measurement
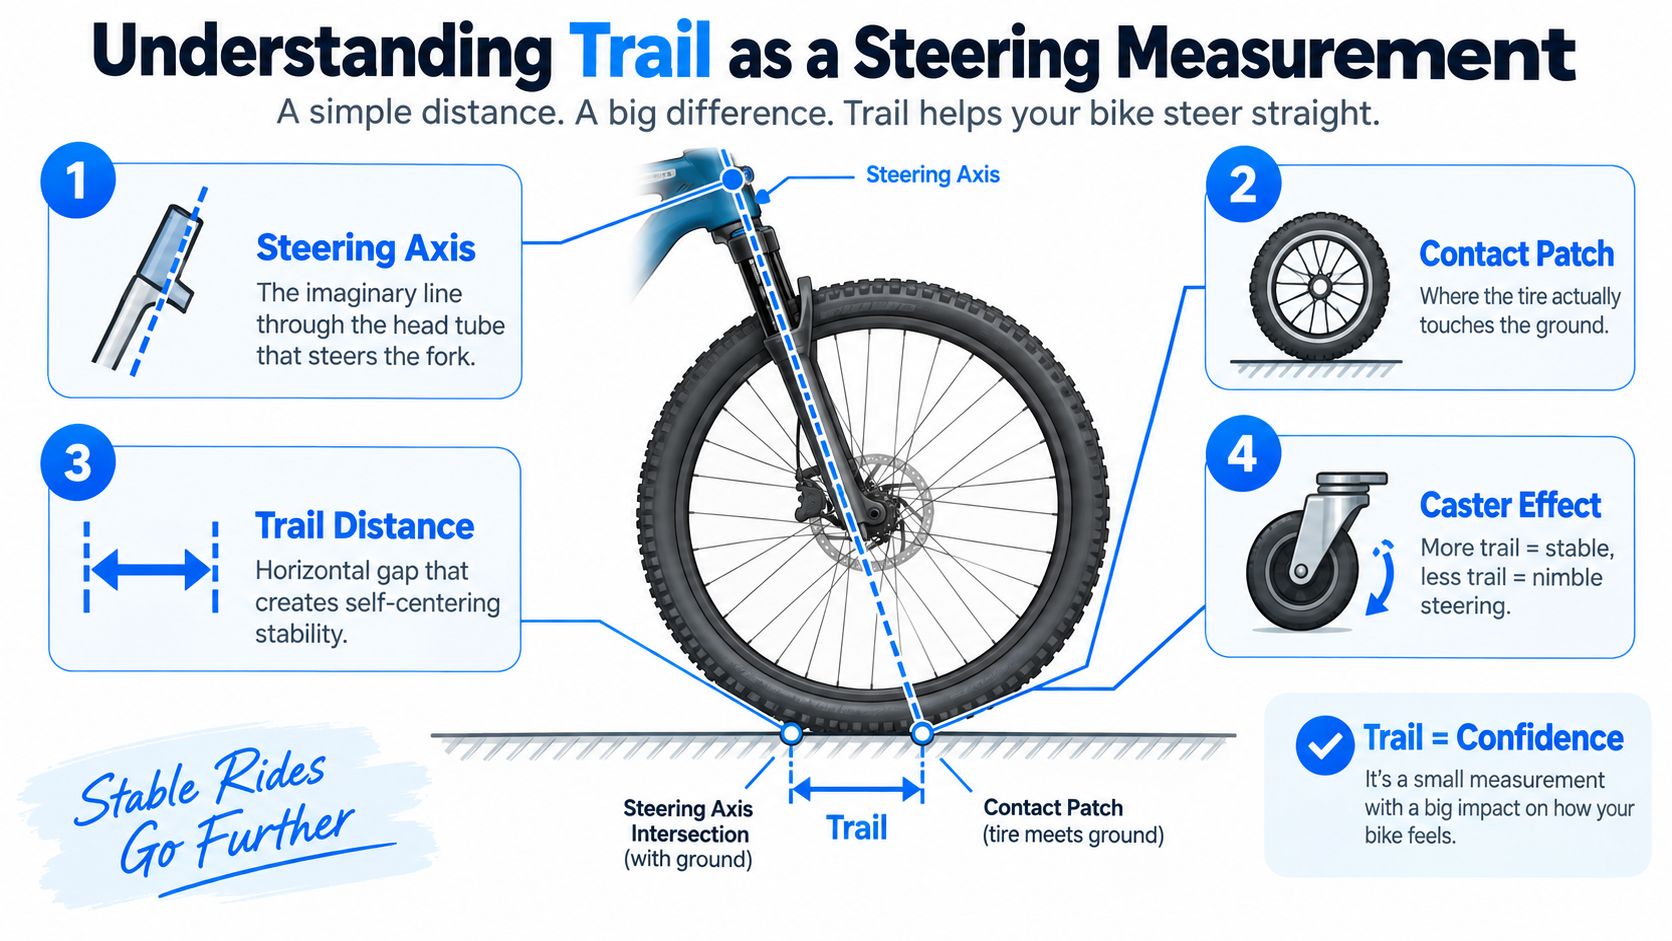
Start with the front wheel viewed from the side. Draw an imaginary line through the steering axis, which follows the head tube and fork's steering direction. Extend that line until it reaches the ground. Then locate the point where the front tire touches the ground.
The horizontal distance between those two ground points is trail. Technical references define trail using these same two points, the steering-axis ground intersection and the tire contact patch in this geometry explanation.
The shopping-cart comparison
A shopping-cart wheel gives a rough mental model because its wheel sits behind the pivot that turns the caster. As the cart moves, the wheel tends to align itself with the direction of travel. Bicycle trail is not the same arrangement, so the analogy is limited, but it helps explain why the position of the contact patch relative to the steering axis matters at all.
The point of the analogy is not to assign a simple handling label to a specific trail number. It is to show that front-end geometry creates a measurable relationship between steering axis and contact patch, and that relationship has consequences once combined with the rest of the bike.
Why trail differences need context
Trail is not a vague synonym for "good handling." It is a number that lets you compare otherwise similar bikes. A difference in published trail reflects a real geometric difference in the front-end configuration, but there is no universal meaningful trail delta that predicts the same result for every rider, speed, tire, or bike category.
That caution matters because trail never acts alone. Tire construction, tire pressure, actual mounted radius, wheelbase, front-center, fork stiffness, handlebar shape, rider position, and load all influence how a bike feels. Trail remains useful because it gives you a compact way to compare steering geometry across listings, not because it can fully predict the ride by itself.
How Head Angle Fork Offset and Wheel Size Create Trail
A geometry chart can show the same head angle on two bikes while their published trail values differ. Trail explains why, because it combines steering angle, fork position, and wheel radius into one measurable number.
The commonly used formula is:
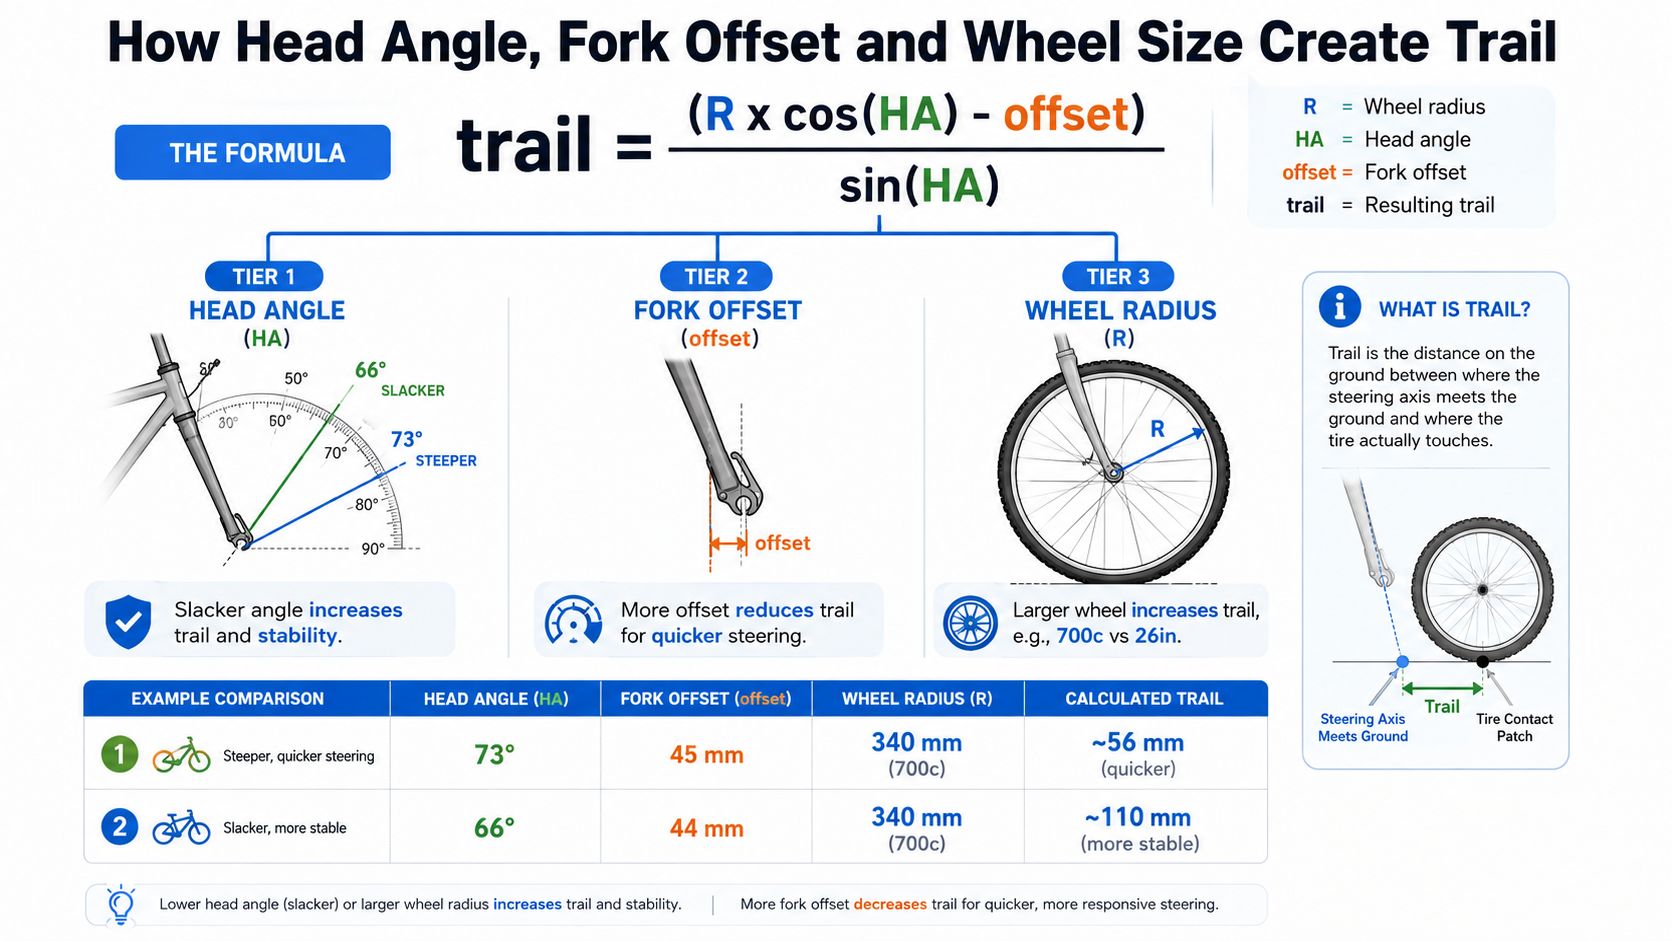
trail = (R × cos(HA) – offset) / sin(HA)
Here, R means the mounted wheel and tire radius, HA means the head angle measured from the horizontal or ground plane, which is the common geometry-chart convention, and offset means fork rake. You do not need to calculate it by hand. Use the formula to understand how head angle, fork offset, and mounted wheel-and-tire radius contribute to calculated trail.
Head-tube angle
All else equal, a steeper head angle generally reduces calculated trail. A slacker head angle generally increases calculated trail. That is the geometric relationship.
What it does not provide is a handling guarantee. The final ride experience still depends on the complete bike, including wheel and tire setup, fork offset, wheelbase, front-center, rider position, and other design choices.
Fork offset
Fork offset, also called rake, is the distance between the steering axis and the front axle. All else equal, more offset reduces calculated trail. Less offset increases calculated trail.
That relationship is one reason head angle alone is incomplete. Two bikes can share the same head angle and still show different trail values because their forks use different offsets. A geometry chart that lists trail has already combined these variables into a more useful front-end comparison.
Wheel and tire radius
Use the actual mounted outer radius of the wheel and tire, not just the nominal wheel label. A 650b or 700c label by itself is not enough because the mounted tire changes the effective radius and therefore changes the calculated trail.
That matters in listings. Two bikes can use the same nominal wheel standard while having different tire sizes, different outer diameters, and therefore different calculated trail values. If you are comparing wheel formats, use a 650b versus 700c gravel bike comparison as background, but keep the focus on the complete mounted setup rather than the nominal standard alone.
Reading the formula without overthinking it
Use the formula to understand these geometric relationships:
A steeper head angle generally reduces calculated trail.
A slacker head angle generally increases calculated trail.
More fork offset generally reduces calculated trail.
Less fork offset generally increases calculated trail.
A larger mounted wheel and tire radius generally increases calculated trail.
That is enough to interpret the trail calculation without treating it as a complete handling model. The formula helps you understand how the front end is assembled. It does not, by itself, tell you whether a bike will feel right for you.
How to Interpret Trail Without Overclaiming
The safest way to read trail is as a descriptive geometry field. It tells you something real about how the steering axis, fork offset, and mounted radius relate to each other. It does not tell the whole story, and it does not support simple universal prescriptions.
That means a single number should not be treated as a handling target. There is no ideal road value, no ideal gravel value, and no meaningful universal cutoff where one small change always translates into the same on-road difference. Category overlap is normal.
The practical use is comparative. If two listings are close in size and intended use, trail can help explain that they are not actually the same front end. But the interpretation only becomes credible when you read it together with head angle, fork offset, wheel and tire setup, wheelbase or front-center, and the rider's position on the bike.
Road and Gravel Trail Numbers Compared
Road and gravel bikes can absolutely overlap in trail. The category name on the listing does not create a universal geometry rule, and it does not tell you how to interpret one published number in isolation.
That overlap changes how you should shop. A road bike is not defined by one trail profile, and a gravel bike is not defined by another. Wider trends in design have blurred the boundaries further, which is one reason category labels alone are an incomplete guide in its 2026 coverage.
Which comparison fields matter more than the label
Instead of relying on a universal road-versus-gravel table, compare these fields across listings:
| Comparison Field | What to Check | Why It Matters |
|---|---|---|
| Trail | The published trail figure for the exact size and setup | Summarizes one part of the front-end steering geometry |
| Head angle | The geometry-chart value for that frame size | Helps explain part of the trail calculation |
| Fork offset | The fork rake or offset listed for the build | Can change trail even when head angle stays the same |
| Wheel and tire setup | The manufacturer-specified setup or current mounted dimensions, depending on what you are evaluating | Changes effective radius, which changes calculated trail |
| Stack and reach | The actual frame dimensions, not the category label | Gives more useful fit context than road or gravel branding |
| Wheelbase and front-center | The bike's overall longitudinal layout | Adds context that trail alone cannot provide |
This is also why stack and reach remain essential across brands. They provide more useful frame-level fit context than category labels do, which makes them more useful for fit screening as explained in this geometry-chart guide.
Using Trail When Comparing Bike Listings
When you compare listings, use trail as one steering-geometry signal and keep fit separate. Trail does not determine whether the bike fits you.
A better process is:
Confirm the listing identifies the exact model, model year, frame size, and wheel setup.
Read the published trail, head angle, fork offset, and wheel or tire information together.
Compare stack, reach, and your current-bike position before drawing conclusions from the category label.
Verify the geometry against manufacturer documentation for the exact model, model year, and frame size where possible.
Height can help narrow an initial size range, but it does not determine whether a specific frame will fit. For a deeper fit workflow, use the bike fit guide and, if you already know them, record stack, reach, standover, and current-bike details before comparing listings.
How SYCLR Helps You Compare Listings
Bike trail geometry becomes most useful when it is read with the rest of the listing. SYCLR helps riders compare road and gravel listings using fit signals, geometry signals, model-year context, price context, listing quality, condition signals where available, and confidence signals.
Start with height, preferred bike type, and budget, then compare the available fit and geometry information rather than relying on a frame-size label alone. Riders who already know stack, reach, current-bike geometry, or fit-report details can use the advanced fit details entry to provide more context.
SYCLR does not perform a professional fit, inspect bikes, authenticate listings, verify ownership or seller claims, or guarantee fit or condition. It is a comparison and shortlisting tool.
For a practical starting point, compare road and gravel listings in the SYCLR app, then use the available fit and geometry signals together to narrow the field more intelligently.
Bike Trail Geometry FAQs
What is bicycle trail?
Bicycle trail is the horizontal distance between the point where the steering axis meets the ground and the front tire's contact patch. It is a steering-geometry measurement, not a complete description of handling.
Is trail a handling target?
No. Trail is better treated as one geometry signal. It can help compare front-end layouts, but it does not function as a universal target and it does not predict the full ride on its own.
What formula is used to calculate trail?
A commonly used formula is trail = (R × cos(HA) – offset) / sin(HA). In that expression, HA is the head angle measured from the horizontal or ground plane, R is the mounted wheel and tire radius, and offset is the fork offset.
Why can't I compare head angle alone?
Because head angle is only one input. Fork offset and the actual mounted wheel and tire radius also affect the final trail value. Two bikes can share the same head angle and still produce different trail numbers.
Does fork offset really matter?
Yes. All else equal, more fork offset reduces calculated trail and less offset increases it. That is why fork offset belongs in any serious listing comparison.
Does wheel size alone tell me enough?
No. A nominal 650b or 700c label does not tell you the actual mounted outer radius. Tire size changes that radius, so wheel label alone is insufficient if you want to understand calculated trail.
Can road and gravel bikes have similar trail?
Yes. Category values may overlap. A road label and a gravel label do not create universal trail bands, so it is better to compare the actual geometry chart than rely on the bike category alone.
Does trail determine fit?
No. Trail describes one part of steering geometry. Fit also depends on stack, reach, standover, cockpit setup, current-bike position, and other rider-specific fit context.
What should I compare first between two listings?
Start with the exact model, model year, frame size, and wheel setup. Then compare trail, head angle, fork offset, wheel-and-tire setup, stack, reach, wheelbase or front-center, and the other factors relevant to the buying decision.
Use SYCLR to compare road and gravel listings using fit signals, geometry signals, model-year context, price context, listing quality, condition signals where available, and confidence signals. If you already know your current-bike geometry or fit details, add them through Advanced Fit.