
Hydraulic vs Mechanical Disc Brakes: A Buyer’s Guide
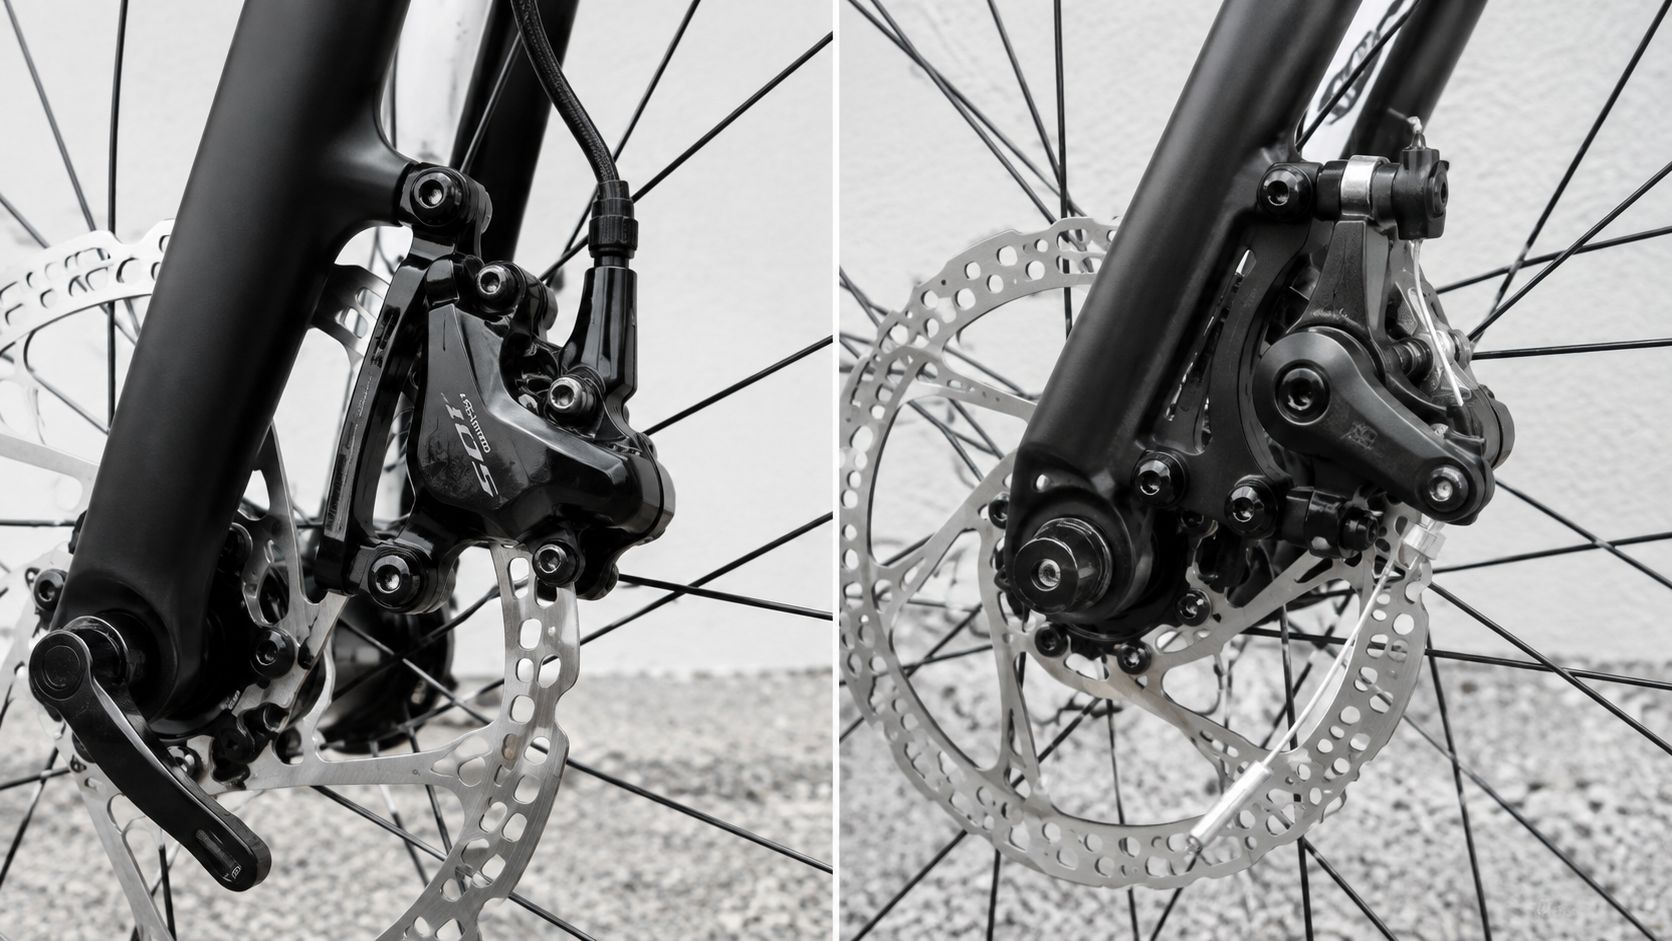
The popular advice is simple: hydraulic disc brakes are better, so mechanical brakes are only a compromise. For a road or gravel bike buyer, that is too simplistic. Hydraulic systems use fluid actuation. Mechanical systems use cable actuation. Beyond that, the buying decision depends on the exact brake model, lever and caliper design, installation quality, rotor and pad condition, wheel and tire setup, service history, and how the complete bike fits your needs.
For a new bike, compare the complete build. For a used bike, treat brake type as one inspection category alongside model year, condition, component compatibility, listing quality, fit, and price context. A brake-system advantage should not outweigh a clearly better-fitting or better-condition complete bike.
Table of Contents
- Hydraulic vs Mechanical Disc Brakes at a Glance
- How Each Brake System Actually Works
- Lever Feel and Braking Control on the Road and Gravel
- Maintenance and Servicing Requirements Over Time
- Total Ownership Cost and Budget Considerations
- Used Bike Brake Inspection Checklist
- Which Brake System Fits Your Riding and Buying Context
- Frequently Asked Questions About Disc Brake Choice
Hydraulic vs Mechanical Disc Brakes at a Glance
Hydraulic and mechanical disc brakes use the same basic stopping principle: a caliper presses pads against a rotor attached to the wheel. The difference is how force travels from your hand to the caliper. Hydraulic brakes use sealed fluid pressure. Mechanical brakes use a steel cable and housing.
That distinction affects setup, adjustment, service procedure, replacement parts, and the feel of a given system. It does not create a universal winner. A well-set-up mechanical system can work very well, and a poorly maintained hydraulic system can perform badly.
Hydraulic vs Mechanical Disc Brakes Comparison
| Attribute | Hydraulic Disc Brakes | Mechanical Disc Brakes |
|---|---|---|
| Actuation | Sealed fluid circuit moves caliper pistons | Steel cable and housing pull a caliper actuator |
| Adjustment | Setup and pad clearance depend on the system design and condition | Setup and pad clearance depend on the caliper design, cable path, and adjustment |
| Common service tasks | Pads, rotors, hose inspection, piston or caliper care, bleed procedures when required | Pads, rotors, cable and housing service, tension adjustment, caliper adjustment |
| Fluid or cable requirements | Must use the manufacturer-specified fluid and procedure | Must use compatible cables, housing, and hardware in good condition |
| Home-service considerations | Often requires brand-specific bleed tools and procedures | Often involves cable routing, tension, and caliper setup |
| Used-bike checks | Lever behavior, leaks, hose condition, caliper function, pad and rotor wear, service history | Cable and housing condition, lever travel, caliper actuation, corrosion, pad and rotor wear |
| Main trade-off | Fluid-based system with model-specific service requirements | Cable-based system with setup quality and cable condition playing a large role |
The practical conclusion is simple: compare the exact brake system, not the label alone. If you are choosing between two bikes, assess the brake model, installation, condition, service history, and the rest of the build before deciding what is actually the better purchase.
How Each Brake System Actually Works
A disc brake has a lever, an actuation path, a caliper, pads, and a rotor. Your hand moves the lever, the caliper pushes the pads toward the rotor, and friction slows the wheel. The engineering difference lies in the actuation path and how the caliper applies force.
Hydraulic actuation
In a hydraulic system, the lever pressurizes fluid inside a sealed circuit. That pressure travels through a hose to pistons in the caliper, which move the pads toward the rotor. Shimano road and gravel hydraulic systems require the manufacturer-specified Shimano mineral oil and model-specific service procedures. SRAM road hydraulic systems should likewise be serviced according to the exact model documentation, including the specified brake fluid and bleed procedure. In both cases, the correct fluid, fittings, bleed steps, and service manual matter. See Shimano service documentation and dealer manuals at si.shimano.com and SRAM service documentation at sram.com/en/service.
A used-bike buyer should never assume that one hydraulic fluid, one bleed kit, or one procedure works across all systems. The lever, hose, caliper, seals, and service method need to match the manufacturer documentation for that exact brake.
Mechanical actuation
Mechanical disc brakes use a steel inner cable sliding through housing. Pulling the lever tensions the cable, and that tension moves an actuator arm on the caliper. Depending on the caliper design, that movement may drive one pad more directly than the other, or use a linkage that changes how pad force is applied.
The force path is simpler in one sense, but cable condition and routing matter. Friction in the housing, corrosion, poor routing, contamination, or incorrect adjustment can change lever travel and caliper response. Mechanical disc brakes also vary by caliper design, so it makes more sense to judge the exact model and setup than to generalize from the category name.
Workshop principle: Identify the exact caliper and lever before judging the brake type. “Mechanical” and “hydraulic” describe the actuation method, not the complete quality of the system.
Lever Feel and Braking Control on the Road and Gravel
The most noticeable difference during a test ride is often not absolute stopping power but how the system responds through the lever. Some hydraulic systems feel very direct and easy to control. Some mechanical systems also feel precise when cable condition, routing, and caliper setup are good. The opposite is also true. Poor setup or wear can make either system feel vague, abrupt, noisy, or inconsistent.
This is why broad rankings are not especially useful for buyers. Lever design, caliper design, pad compound, rotor size, contamination, wheel and tire grip, and setup quality can change what you feel far more than the hydraulic or mechanical label by itself.
What to feel during a test ride
Use the lever as a diagnostic tool rather than squeezing it once and assuming the brakes are fine.
Consistent engagement: The lever should engage at a repeatable point.
Controlled travel: Excessive movement toward the handlebar can indicate wear, poor adjustment, air in a hydraulic system, cable issues, or another service problem.
Progressive response: Braking force should build in a controlled way, not suddenly spike or fade.
Clean release: The brake should release without persistent rubbing or a slow return.
Front and rear balance: Compare both ends, while remembering that they do not do identical jobs under braking.
Maintenance and Servicing Requirements Over Time
Neither system is maintenance-free. The difference is what kind of work the system may require, and how specific that work is to the brake model.
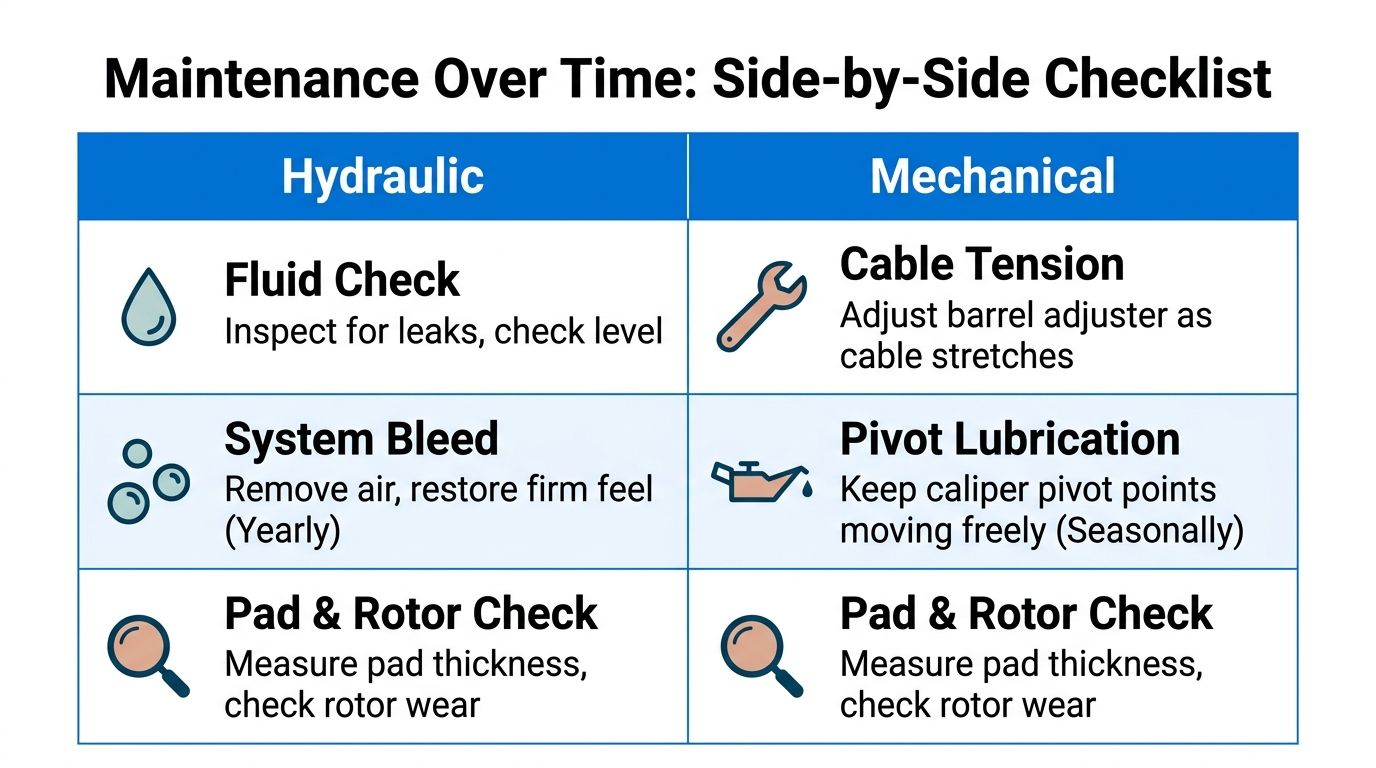
Hydraulic brakes may require bleeding, hose inspection, piston or caliper service, pad replacement, rotor inspection, and the correct manufacturer-specified fluid. Mechanical brakes may require cable and housing replacement, tension adjustment, caliper adjustment, pad replacement, and rotor inspection. Exact maintenance frequency depends on the system, use, environment, setup, and condition.
Hydraulic service
Hydraulic service is system-specific. Shimano publishes brake manuals, exploded views, and bleed procedures through its technical documentation platform, and SRAM publishes service manuals for its hydraulic road and gravel systems. Those documents should guide fluid choice, bleed method, fitting requirements, and service steps for the exact brake in question. See si.shimano.com and sram.com/en/service.
Typical owner checks include:
Lever behavior: Look for consistent engagement and normal lever travel.
Hose condition: Check for abrasion, kinks, damaged fittings, or visible leakage.
Caliper condition: Inspect for contamination, sticking pistons, or poor pad movement.
Wear items: Check pad thickness and rotor condition before assuming a bleed is the fix.
Hydraulic systems are not all serviced the same way. Exact requirements depend on the brake model, fluid type, wear state, and service history.
Mechanical service
Mechanical systems need attention to the cable path and caliper setup. A barrel adjuster may help fine-tune lever feel, but adjustment alone will not fix worn housing, cable corrosion, pad contamination, bent rotors, or a poor caliper setup.
Typical owner checks include:
Cable and housing condition: Look for rust, fraying, crushing, contamination, or sharp bends.
Caliper movement: Make sure the actuator moves smoothly and returns cleanly.
Pad and rotor wear: Inspect pad thickness, rotor condition, and signs of contamination.
Adjustment quality: Check that lever travel and pad clearance make sense for the system.
Mechanical systems are not automatically simpler in every case. Some are straightforward to work on, while others are sensitive to setup quality and cable-path friction.
Total Ownership Cost and Budget Considerations
The lowest purchase price does not always mean the lowest ownership cost. Hydraulic brakes can add complexity through fluid-specific service and proprietary parts. Mechanical brakes can add cost through cable and housing replacement, setup time, or caliper limitations on a given bike. The exact ownership equation depends on the brake model, parts availability, your local shop situation, and whether the system is already in good condition.
For buyers comparing road or gravel bikes, the useful question is not which category is always cheaper. It is whether the exact brake system on the exact bike is complete, compatible, maintainable, and in sound condition.
A better used-bike cost equation
For a used listing, think beyond the asking price:
Comparable value minus condition risk minus fit uncertainty minus compatibility risk minus listing uncertainty equals a more realistic offer range.
Brake service belongs inside condition risk, not as a shortcut for accepting or rejecting a bike. A hydraulic bike may need fluid service, hose work, pads, or rotors. A mechanical bike may need cables, housing, adjustment, pads, or rotors. The right estimate comes from inspection and model-specific parts, not from the brake category alone.
Use SYCLR's used bicycle value guide to keep price context separate from assumptions about component labels. A low price may reflect age, wear, unclear photos, or uncertain history. A high price does not confirm brake condition or service quality.
What changes the ownership equation
Brake model: Some systems have easier parts access and clearer service documentation than others.
Condition today: A neglected brake of either type can erase any category-level assumption about value.
DIY ability: Your comfort with cable work or model-specific hydraulic service changes the practical cost.
Shop access: Local support and parts availability matter.
Compatibility: Pads, rotors, hoses, fittings, cables, and housing should all be considered for the exact build.
Used Bike Brake Inspection Checklist
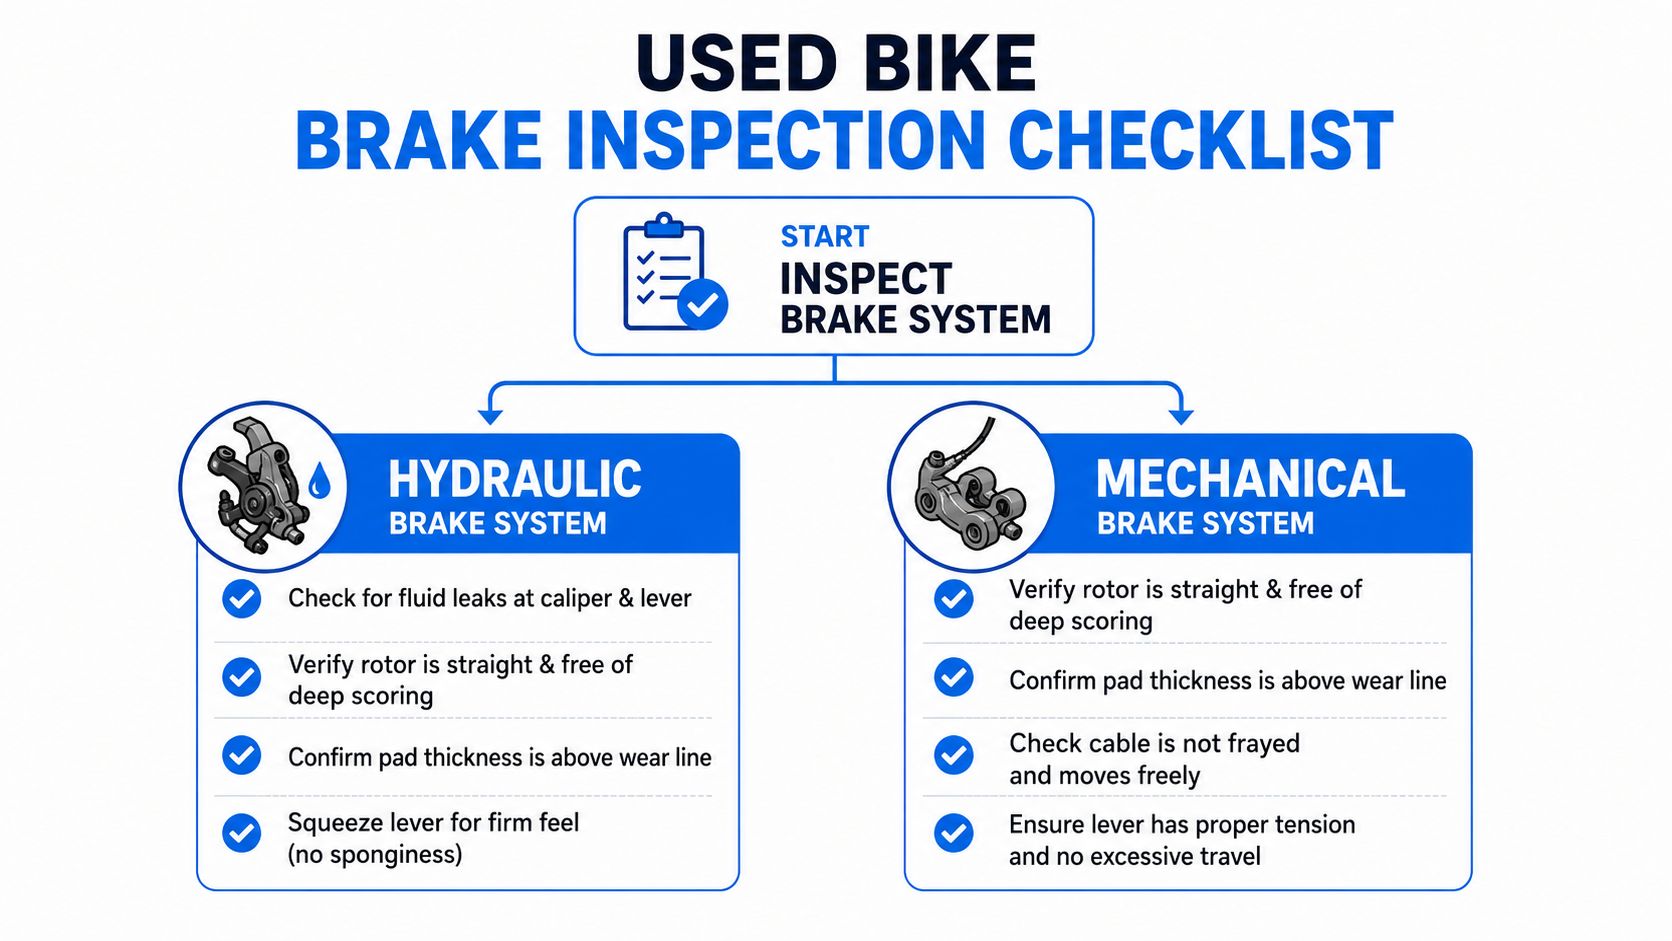
A listing photo rarely proves that a brake system is healthy. Ask for clear images of the levers, hoses or cable housing, calipers, rotors, and pad area. If you can inspect the bike in person, test each brake separately and confirm that the seller can identify the exact brake model.
Use these checks to spot obvious issues and better questions to ask. They do not certify safety, condition, or service quality.
Hydraulic inspection points
Lever behavior: Squeeze firmly and check for consistent engagement.
Visible leaks: Inspect the lever, hose connections, and caliper for residue or seepage.
Hose condition: Look for abrasion, kinks, or damaged fittings.
Pad and rotor condition: Check for wear, contamination, scoring, or obvious warping.
Caliper function: Confirm that the brake applies and releases cleanly.
Service history: Ask whether the system has been serviced and what fluid it uses.
Exact brake model: Verify the specific lever and caliper if possible.
Mechanical inspection points
Cable and housing condition: Look for rust, fraying, crushing, sharp bends, or poor routing.
Lever travel: Excessive travel can point to wear, poor adjustment, or cable-path issues.
Caliper actuation: Watch the actuator while squeezing the lever and check for smooth return.
Pad and rotor condition: Check for wear, contamination, scoring, or obvious damage.
Corrosion: Inspect cable ends, housing openings, hardware, and adjusters.
Exact brake model: Confirm the specific caliper and lever where possible.
Use SYCLR's used bike checklist alongside brake-specific questions, but keep expectations realistic. It helps organize what to inspect. It does not verify brake condition, mechanical safety, or service history.
Which Brake System Fits Your Riding and Buying Context
Hydraulic and mechanical disc brakes can both make sense on road and gravel bikes. The right choice depends on your priorities, the exact system, and the condition of the complete bike in front of you.
If you value one brake system over the other, make sure that preference survives contact with the full buying picture. A more appealing brake label does not fix poor setup, uncertain service history, or a bike that is wrong for your fit and riding needs.
Match the brake to the complete bike
Evaluate these questions together:
Brake model: What exact lever and caliper are fitted, and can you get the correct service parts?
Condition: Are the pads, rotors, hoses, cables, and adjustment in ready-to-ride shape?
Fit: Does the bike suit your position and sizing needs?
Use case: Is this for road miles, mixed terrain, commuting, or gravel riding?
Listing quality: Are the photos, parts details, and seller answers good enough to trust?
Price context: Does the asking price reflect model year, wear, and service needs?
For fit-aware comparison, SYCLR helps compare available road and gravel listings using fit signals, geometry signals, model-year context, price context, listing quality, condition signals where available, and confidence signals. Riders who already know stack, reach, current-bike geometry, or fit-report details can use the advanced fit entry.
Frequently Asked Questions About Disc Brake Choice
Do hydraulic disc brakes stop faster than mechanical disc brakes?
Not as a universal rule. Stopping performance depends on the full system, including the brake model, lever and caliper setup, rotor size, pad compound, tire grip, surface, and condition. Hydraulic and mechanical systems can both perform well or poorly depending on those factors.
Are hydraulic disc brakes worth the extra cost?
Sometimes, but not automatically. They may be worth paying for if the exact system offers the feel, parts support, and service path you want. In other cases, a well-sorted mechanical setup on a better bike can be the smarter buy.
Which system needs more maintenance?
Neither category has a universal answer. Hydraulic systems and mechanical systems ask for different service tasks. Frequency depends on the specific brake, installation, riding conditions, maintenance quality, and current condition.
Are hydraulic brakes more reliable?
Not by default. Reliability depends on design, condition, installation quality, service quality, and parts compatibility. A well-maintained system of either type can be dependable, and a neglected system of either type can cause problems.
What should I check on a used bike?
Check lever behavior, inspect pads and rotors, examine hoses or cables, and confirm the exact brake model and any known service history. For broader listing context, use a used road bike buying guide or used gravel bike buying guide, depending on the bike category.
Which brake type should a first-time road or gravel buyer choose?
Choose the system that best fits your budget, maintenance preferences, and the complete bike you are actually buying. Do not treat hydraulic as an automatic upgrade or mechanical as an automatic compromise. Compare the exact system, the bike's condition, and the overall value.
Use SYCLR to compare available road and gravel listings using fit signals, geometry signals, model-year context, price context, listing quality, condition signals where available, and confidence signals. Then verify the exact brake system, component compatibility, and condition before making a purchase decision.