
Seat Tube Angle Explained for Better Bike Fit
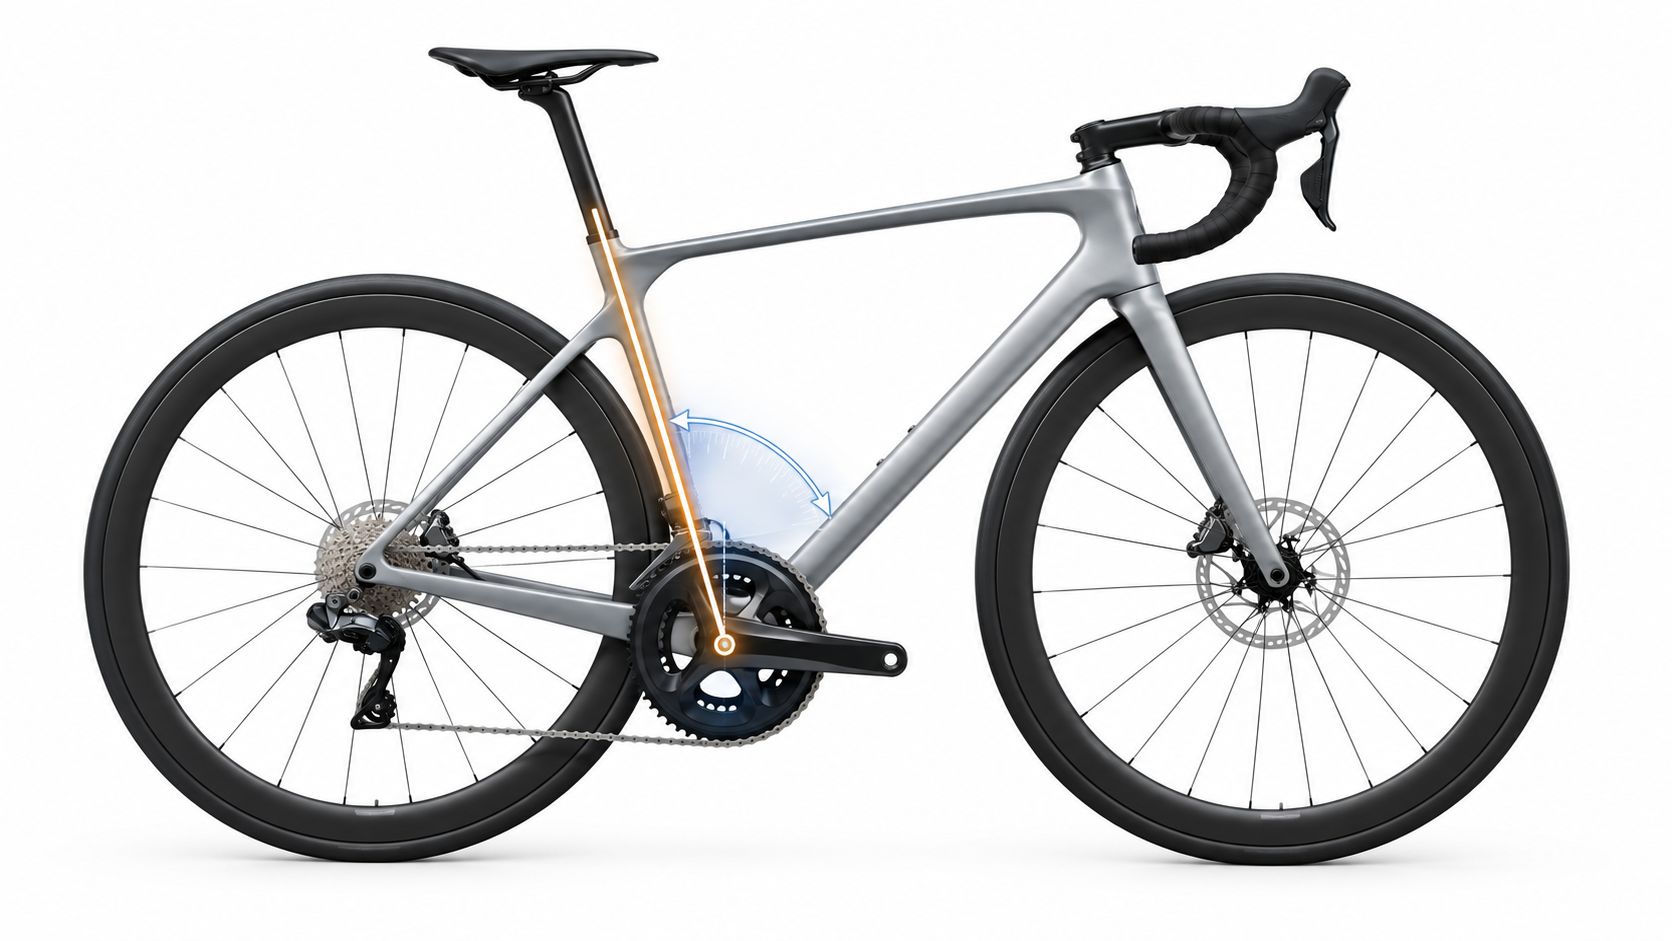
Seat tube angle is the angle of the seat-tube axis relative to horizontal through the bottom bracket. Manufacturers may publish actual or effective seat tube angle depending on the frame design and the convention used for that geometry chart (road.cc, BikeExchange). The number matters because it changes saddle-position geometry, not because it's a standalone fit score.
If you're comparing bikes, the key question isn't “what angle is best,” it's “what saddle-position range does this frame and seatpost arrangement make achievable, and how does that compare with the position the rider is trying to preserve or establish?” That's where buyers get tripped up, because the same label can hide different geometry, and the same angle can mean different things once saddle height, setback, and seatpost setup enter the picture.
Table of Contents
- What Seat Tube Angle Means for Your Bike
- How Seat Tube Angle Is Measured
- Actual vs Effective Seat Tube Angle
- Why Saddle Height and Setup Change the Context
- Why Seat Tube Angle Varies by Frame Size and Model Year
- How to Compare Seat Tube Angle When Buying a Bike
- How SYCLR Uses Seat Tube Angle and FAQs
What Seat Tube Angle Means for Your Bike
What does a seat tube angle tell you about a bike? Mainly, it shows how the frame references saddle-position geometry relative to the bottom bracket, the point the crankset turns around.
With other variables held constant, a steeper seat-tube reference places the nominal saddle line farther forward relative to the bottom bracket, while a slacker one places it farther rearward. Actual saddle position still depends on saddle height, seatpost offset, rail position, and measurement convention.
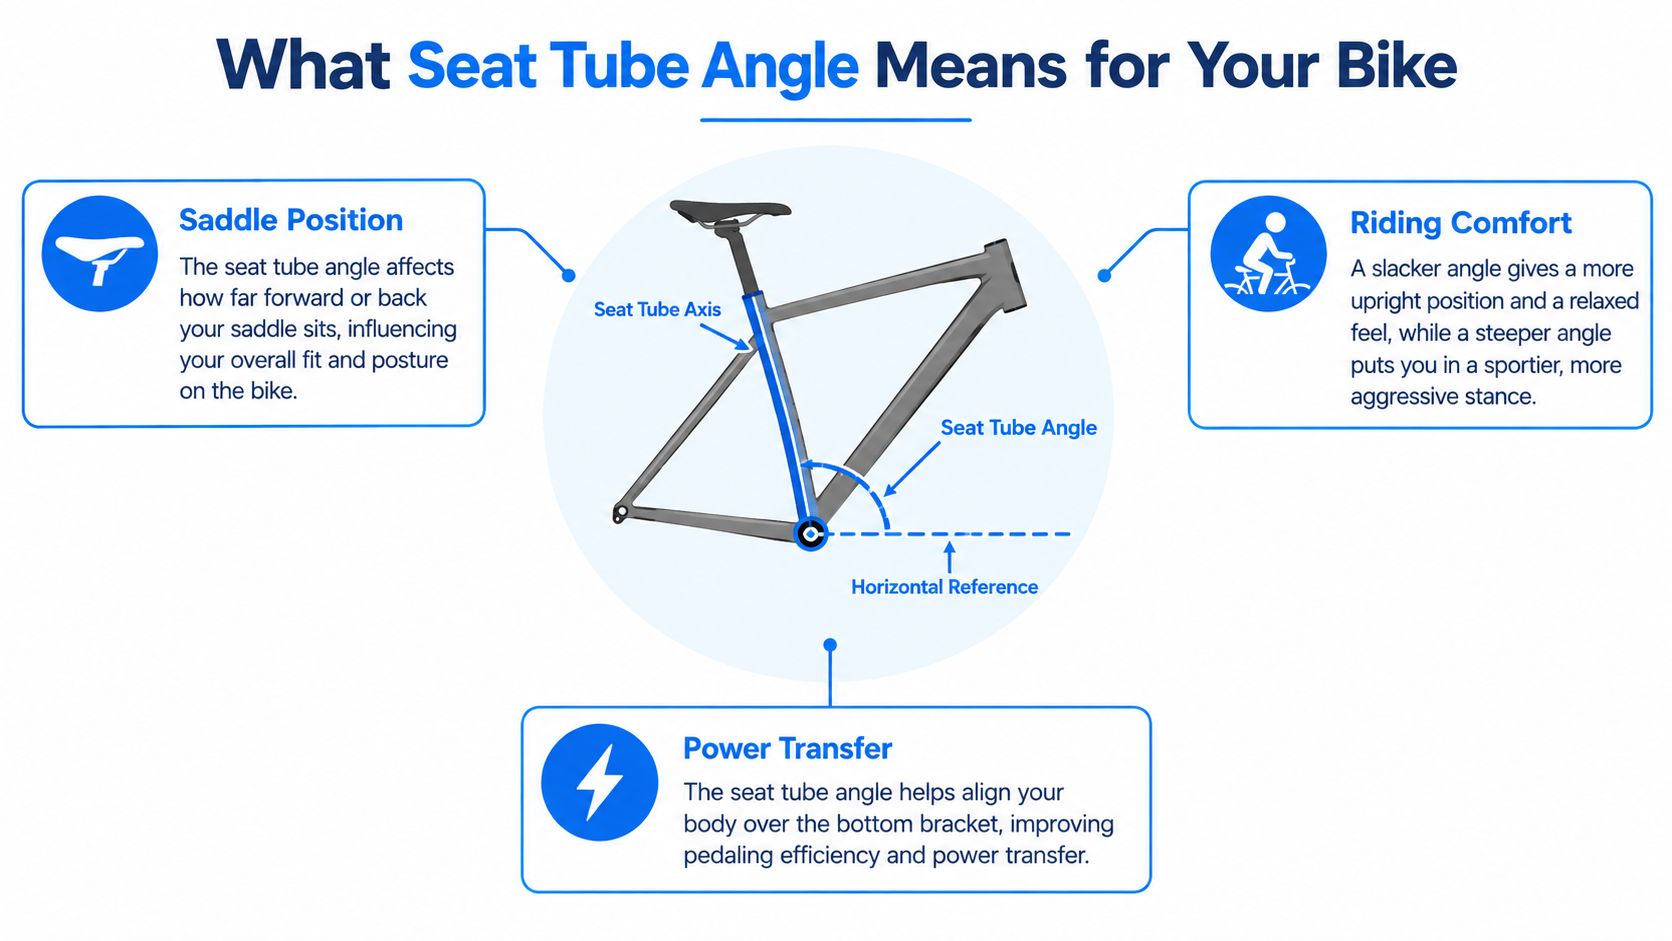
Read the number as part of saddle-position geometry, not as a comfort score or a power score. A bike size, stack, reach, saddle height, and the brand's own measurement notes all shape what that angle means on the road. The same angle can be interpreted differently once the saddle is raised, lowered, or set back on the rails.
That is why a careful buyer should ask a narrower question. What saddle-position range does this frame and seatpost arrangement make achievable, and how does that compare with the position the rider is trying to preserve or establish? A number on its own cannot answer that.
Practical rule: seat tube angle describes one part of the frame's saddle-position geometry; it does not prescribe where your body should end up.
A bike only works well if the saddle position fits your body and riding style. SYCLR uses that same fit-aware lens for road and gravel listings.
How Seat Tube Angle Is Measured
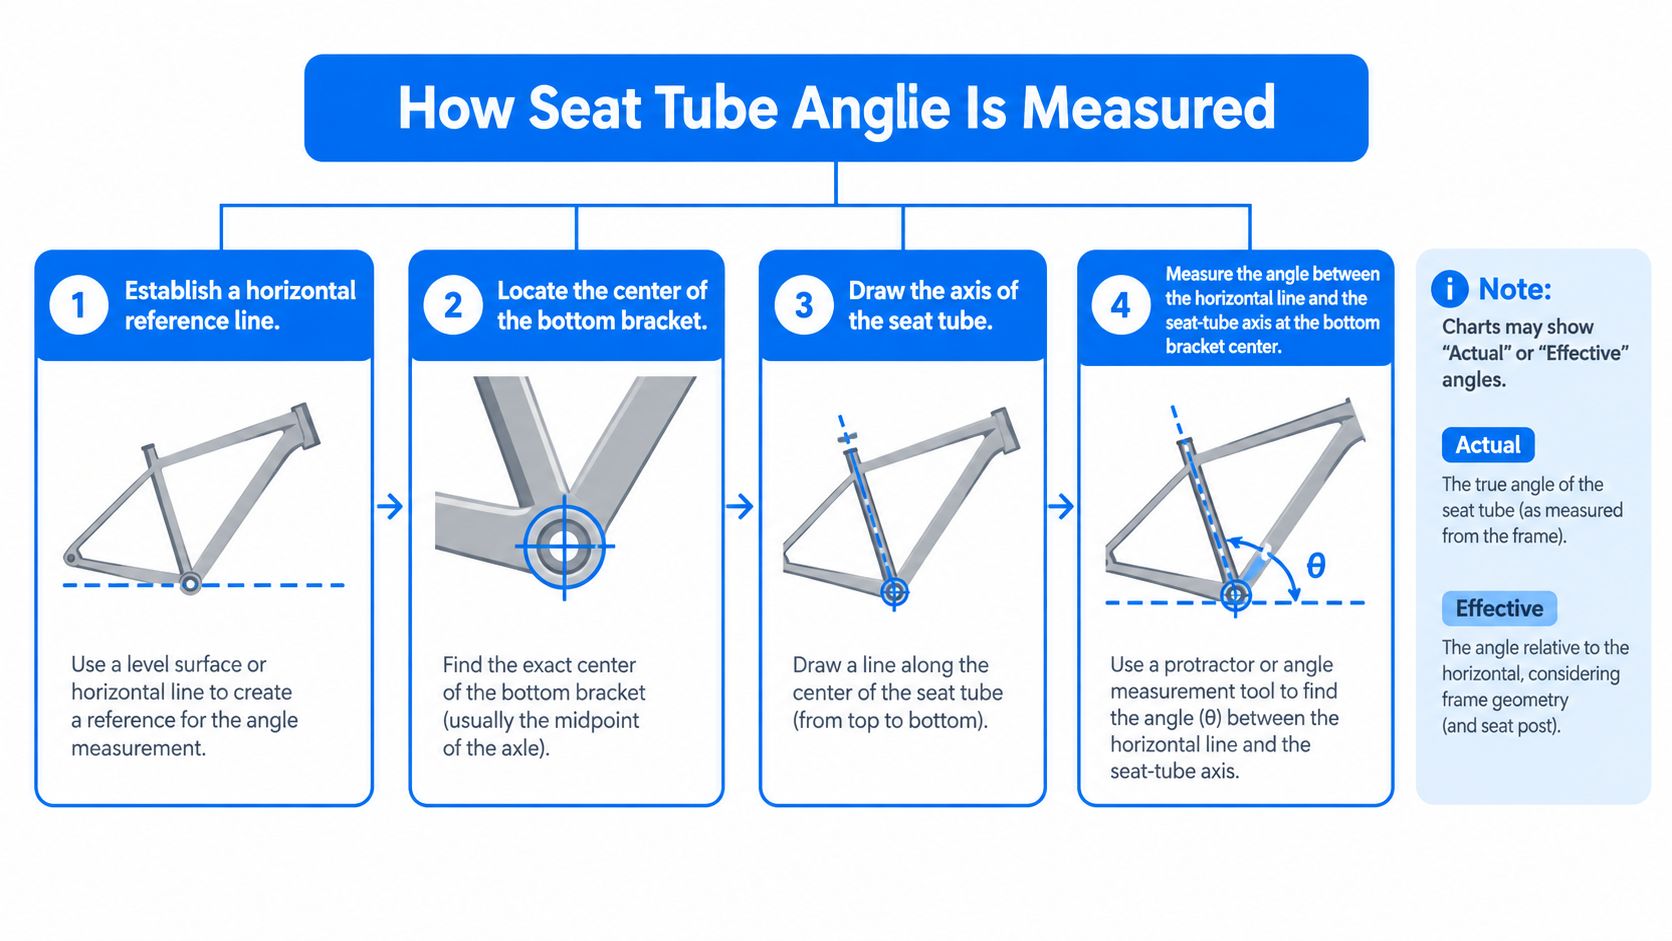
Where does the number come from? It starts at the bottom bracket, then measures the seat-tube axis against a horizontal line passing through that same center point. That is why geometry charts show an angle, not a length.
The basic measurement path
Start with the bottom bracket center. From there, trace the seat tube's axis upward and measure the angle between that line and the horizontal reference. That is the standard geometry-chart convention, which is why this figure belongs with frame-geometry interpretation, not with parts selection.
The point that often confuses buyers is that brands do not always use the same method. Some publish actual seat tube angle, some publish effective seat tube angle, and frame shapes with sloping, offset, curved, or interrupted seat tubes can make the difference matter more (Pinkbike). A chart is only half the story if the brand does not explain how the angle was measured.
Why the chart can still mislead
A published angle does not include every saddle setup change. Seatpost layback and saddle rail position still move the rider's final fore-aft position, so the number is only one part of saddle-position geometry. A steep-looking chart can still land differently once the saddle is set higher, lower, or farther back on the rails.
For that reason, read the geometry notes, not just the headline figure.
Buyer caution: if a chart does not say whether the number is actual or effective, do not assume the same method across brands.
The practical saddle position relative to the bottom bracket can change as saddle height changes, so the number should be read as a setup reference, not as a fixed riding position. SYCLR uses that fit-aware view for road and gravel listings.
Actual vs Effective Seat Tube Angle
Actual seat tube angle follows the physical line of the seat tube itself. Effective seat tube angle is a comparison or reference line for saddle-position geometry whose meaning depends on reference height, saddle height, seatpost offset, and manufacturer convention. Those are related ideas, but they're not always the same thing.
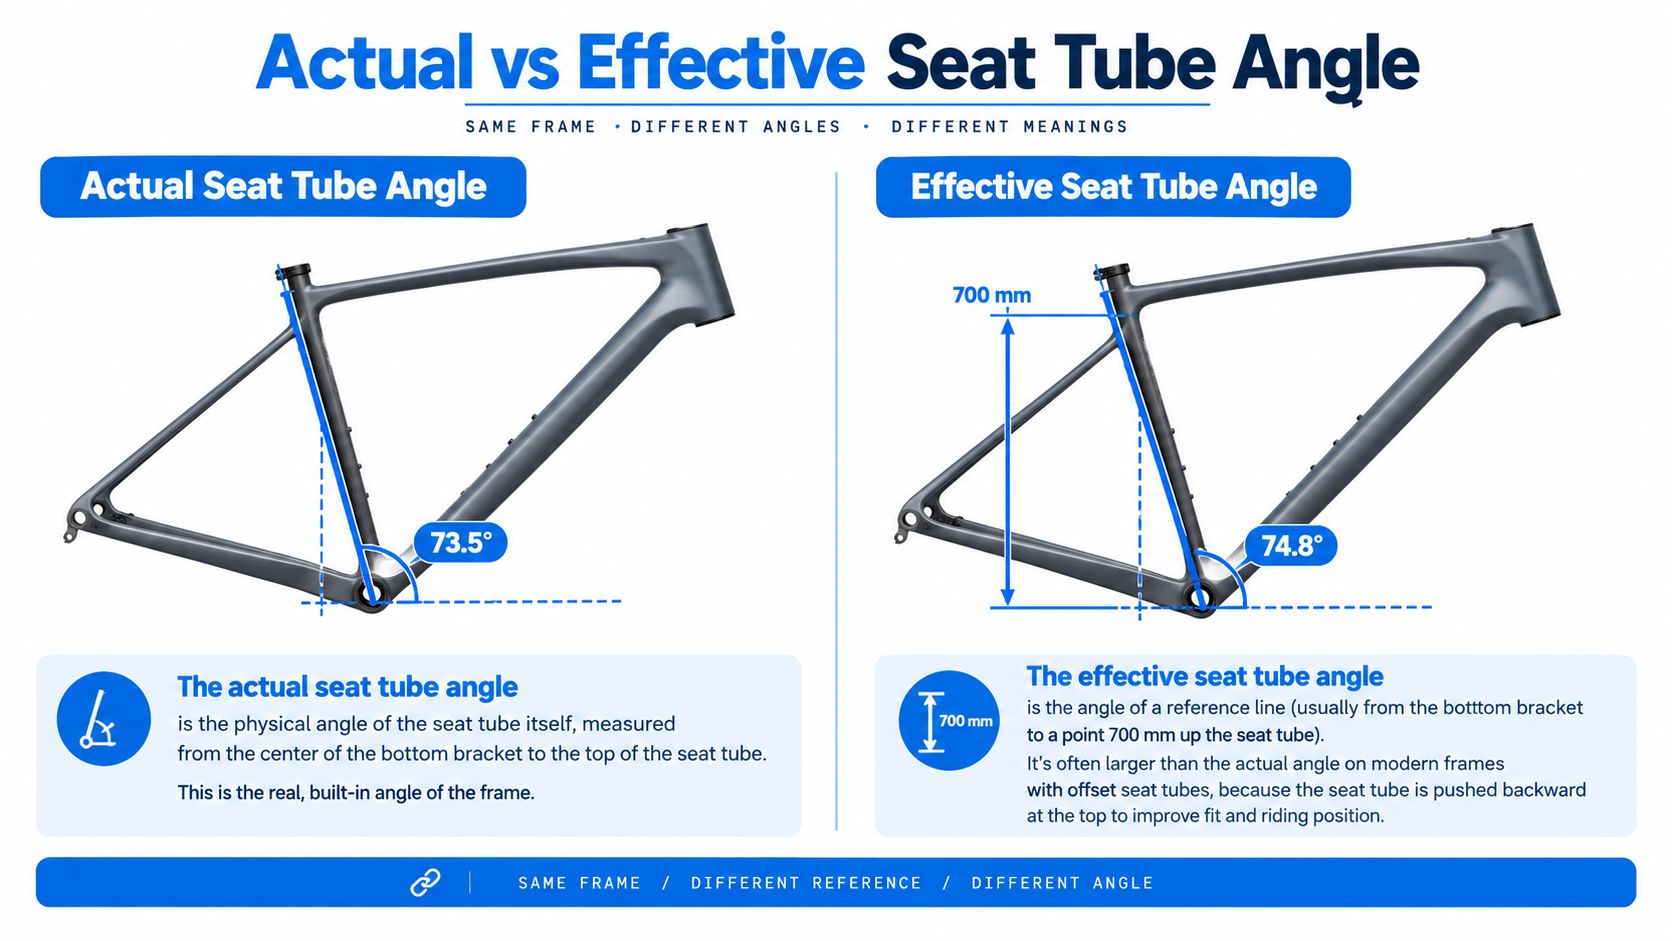
On frames with straight, uninterrupted seat tubes, the two numbers may look close enough that buyers don't notice the distinction. On frames with sloping or curved seat tubes, they can diverge enough to change how you interpret saddle location and setback. That's why the safest comparison is always the manufacturer's published convention for that exact model and generation.
Why the distinction matters
A steep-looking tube on the frame picture doesn't automatically mean the bike positions the rider the same way as another bike with a similar-looking tube. The effective number may be designed to compare frames using a defined reference height or line, while the actual number describes the physical tube line itself. If you mix those up, you can think two bikes are more similar than they really are.
Stack and reach become the better primary frame coordinates for front-end comparison, with seat tube angle acting as supporting context. For a broader look at that relationship, bike stack and reach is the cleaner starting point.
The short version is this. Actual seat tube angle describes the physical seat-tube axis. Effective seat tube angle is a reference intended to make saddle-position geometry easier to compare, but its real-world meaning still depends on the reference height, saddle height, seatpost offset, and manufacturer convention. Always verify which one the chart uses before comparing listings.
Why Saddle Height and Setup Change the Context
A published seat tube angle doesn't create one fixed saddle position. The same frame can present a different practical saddle location once saddle height, seatpost setback or offset, saddle rail adjustment, and crank length enter the setup. That's why angle alone never tells the whole story.
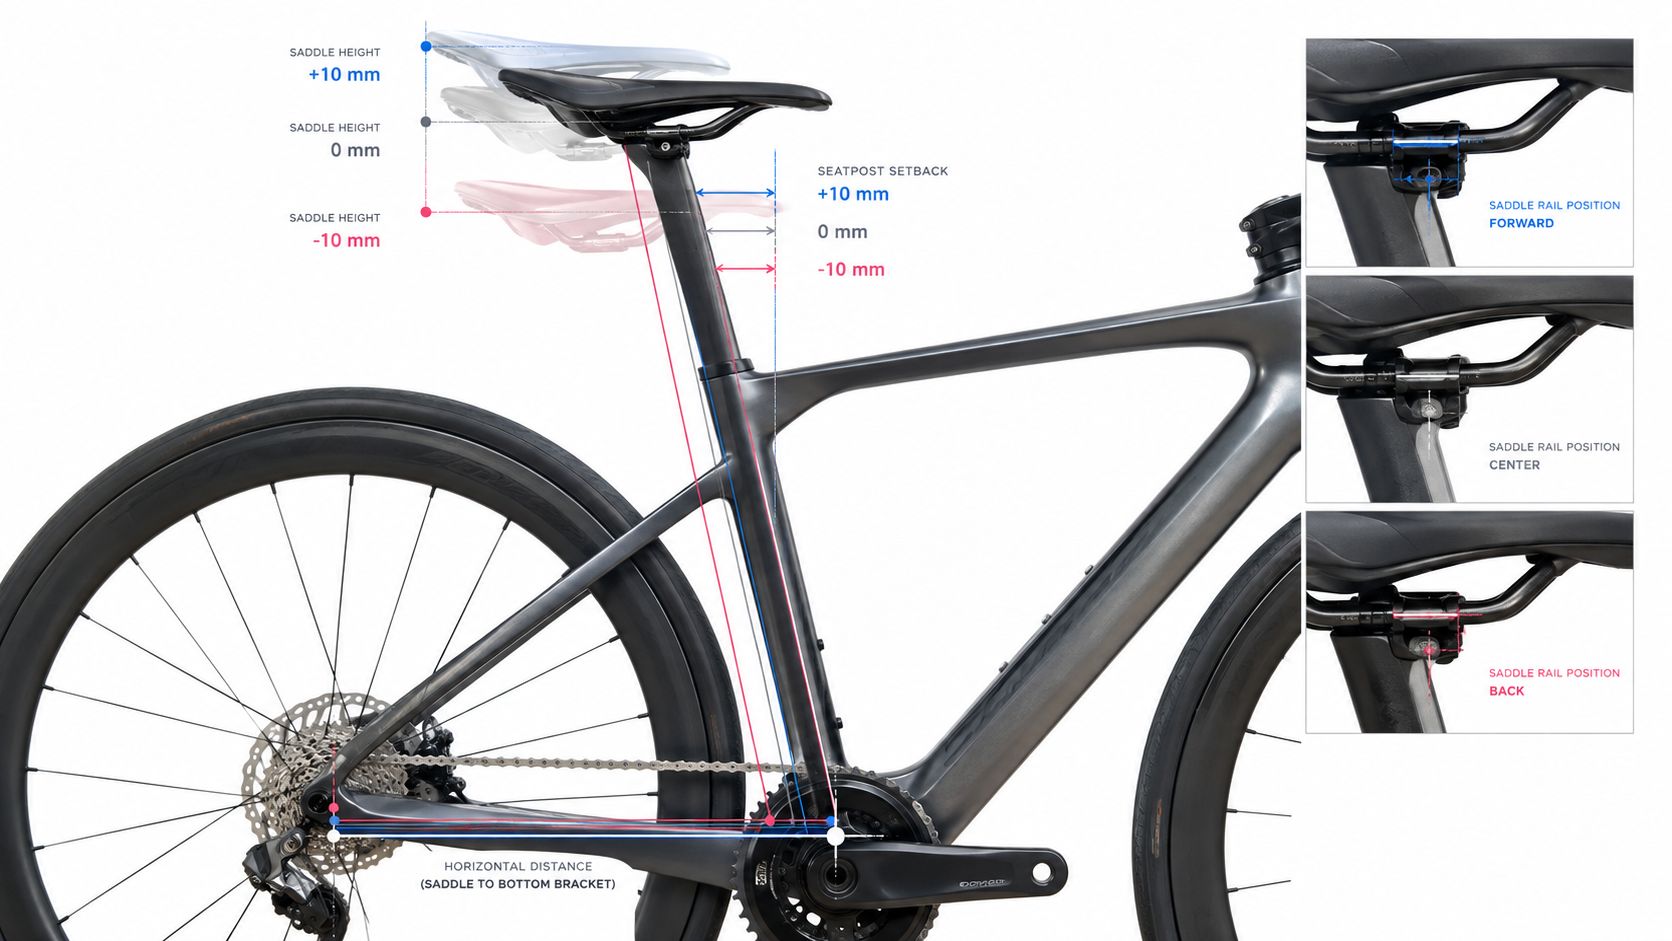
On a frame where the effective saddle line does not remain constant with height, raising the saddle can change its horizontal position relative to the bottom bracket. A setback post or a saddle slid rearward on the rails changes it again. Even crank length matters as secondary context, because it is relevant to the overall pedaling setup, but not a substitute for evaluating saddle position and frame geometry directly.
Practical rule: use saddle fore-aft to support pedaling position, not to patch a frame that's too long or too short in the cockpit.
That's also why reach complaints shouldn't be “fixed” by chasing saddle position first. Handlebar reach is better solved with the frame, stem, spacers, and cockpit choice, while seat tube angle stays in the background as part of the bike's saddle geometry. If you're trying to understand how your current saddle height interacts with frame numbers, a basic measurement reference like how to measure inseam for a bike can help frame the discussion without pretending it's a full fit.
Stack and reach do more of the heavy lifting
For buying decisions, stack and reach usually tell you more about the front of the bike than seat tube angle does. Seat tube angle adds context about where the saddle sits relative to the bottom bracket, but it doesn't replace the front-end picture.
The same logic shows up in bike-fit language more broadly. You can compare saddle position, but you still need the whole contact-point setup before you can judge whether a frame is a sensible match. Bike fit guide is the better companion page when you're moving from geometry reading to practical buy decisions.
Why Seat Tube Angle Varies by Frame Size and Model Year
Seat tube angle is not always constant across sizes of the same bike. Manufacturers may change it alongside stack, reach, head angle, front-center, wheel size, and seat-tube length, which means a small frame and a large frame from the same model can behave differently on paper and on the road.
That's why buyers should compare the exact model, model year, and frame size instead of assuming one number represents the whole family. A chart for one size can be a poor proxy for another size, especially when the frame's proportions change to preserve fit and handling across the range.
Size specific geometry comparison checklist
| Geometry Field | Why It Matters for Comparison |
|---|---|
| Frame size | Confirms you're comparing the exact size, not a nearby label |
| Model year or generation | Geometry updates can change the dimensions and setup context you are comparing |
| Seat tube angle | Shows how the saddle line relates to the bottom bracket |
| Stack | Helps compare front-end height |
| Reach | Helps compare cockpit length |
| Head angle | Adds handling context that seat tube angle can't provide alone |
| Front-center | Adds context about front-axle placement and overall chassis layout. |
| Wheel size | Can affect geometry and fit interpretation on some frames |
| Seat-tube length | Matters for saddle insertion and sizing limits |
Category labels can mislead here too. Road and gravel bikes can overlap more than buyers expect, and the same is true for different versions within a single brand's lineup. That's why you shouldn't treat category labels as a shortcut for interpreting saddle-position geometry.
A careful comparison starts with the current geometry chart, then checks the exact frame size, then asks whether the saddle and cockpit setup can realistically land where you need it. If you need a broader side-by-side frame comparison, compare bike geometry is the right next step.
How to Compare Seat Tube Angle When Buying a Bike
Start by treating seat tube angle as one clue, not the answer. If two bikes differ by one degree, that tells you the nominal relationship between the bottom bracket and the seat-tube line is different, but it does not tell you how the bike will feel until you account for the rest of the setup.
The buyer workflow is straightforward. Check the exact frame size first, then compare stack, reach, seatpost offset, saddle rail position, and crank length. After that, look at the seat tube angle and ask whether the saddle can land in a sensible place without forcing the cockpit into a compromise.
What to check before you care about the angle
- Exact frame size: the same model can use different geometry across sizes, so don't compare a medium to a large as if they were equivalent.
- Current saddle height: a different height can change the practical horizontal saddle position on the same frame.
- Seatpost setback or offset: more or less offset changes where the saddle sits behind the bottom bracket.
- Saddle rail room: rail position can move the saddle fore or aft within a limited range.
- Stack and reach: these are often better front-end fit signals than seat tube angle.
- Cockpit pieces: stem length, bar shape, and spacer setup can make a bike feel longer or shorter.
- Crank length: relevant to the overall pedaling setup, but not a substitute for evaluating saddle position and frame geometry directly.
A representative geometry example can be useful, but only if the saddle height is stated clearly and the example is understood as illustration, not proof. Without that setup context, a 1° difference is just a chart difference, not a reliable claim about power, comfort, or riding feel.
Buyer rule: compare the frame, then compare the setup, then interpret the complete position.
That's the part most listing pages skip. They show a geometry chart, but they don't interpret the interaction between the frame and the rider. A comparison tool that brings those signals together is much more useful than a raw chart dump, especially when you're trying to shortlist a used bike instead of browsing at random.
How SYCLR Uses Seat Tube Angle and FAQs
Seat tube angle works best as a supporting geometry signal inside a broader fit-aware comparison. It helps explain differences in saddle-position geometry between exact models and sizes when read alongside fit signals, geometry signals, model-year context, price context, listing quality, condition signals where available, and confidence signals.
SYCLR doesn't perform professional bike fitting, physically inspect bikes, authenticate listings, or guarantee fit or condition. It also doesn't treat seat tube angle as a standalone fit score. The platform's more useful frame-level comparison still starts with stack and reach, then layers in the other geometry and listing details that reduce guesswork.
Seat Tube Angle FAQs
What is seat tube angle on a bike?
It's the angle of the seat-tube axis relative to horizontal through the bottom bracket.
How is seat tube angle measured?
Manufacturers measure it from a horizontal line through the bottom bracket center to the seat-tube axis, though conventions can vary.
What is effective seat tube angle?
It's a comparison or reference line for saddle-position geometry, and its meaning depends on reference height, saddle height, seatpost offset, and manufacturer convention.
What is the difference between actual and effective seat tube angle?
Actual follows the physical seat tube, while effective is a comparison reference for saddle-position geometry. They can differ on sloping or offset frames.
Does seat tube angle affect saddle setback?
Yes, but only as part of the full setup. Seatpost offset and saddle rail position also matter.
Does seat tube angle affect bike fit?
It affects fit context, not fit by itself. Compare it with stack, reach, saddle height, and cockpit setup.
Should I compare seat tube angle when buying a bike?
Yes, but only as one supporting geometry signal. It's most useful when you compare the exact model, size, and manufacturer chart.
If you're comparing road or gravel listings and don't want to guess from the frame label alone, start with your height, bike type, and budget, then compare fit and geometry signals side by side on SYCLR. If you already know your stack, reach, or current-bike setup, use the advanced fit entry at https://app.syclr.com/?entry=fitdetails to narrow the shortlist and compare model-year and price context with less noise.