
Bike Cockpit Length Explained: A Fit Guide
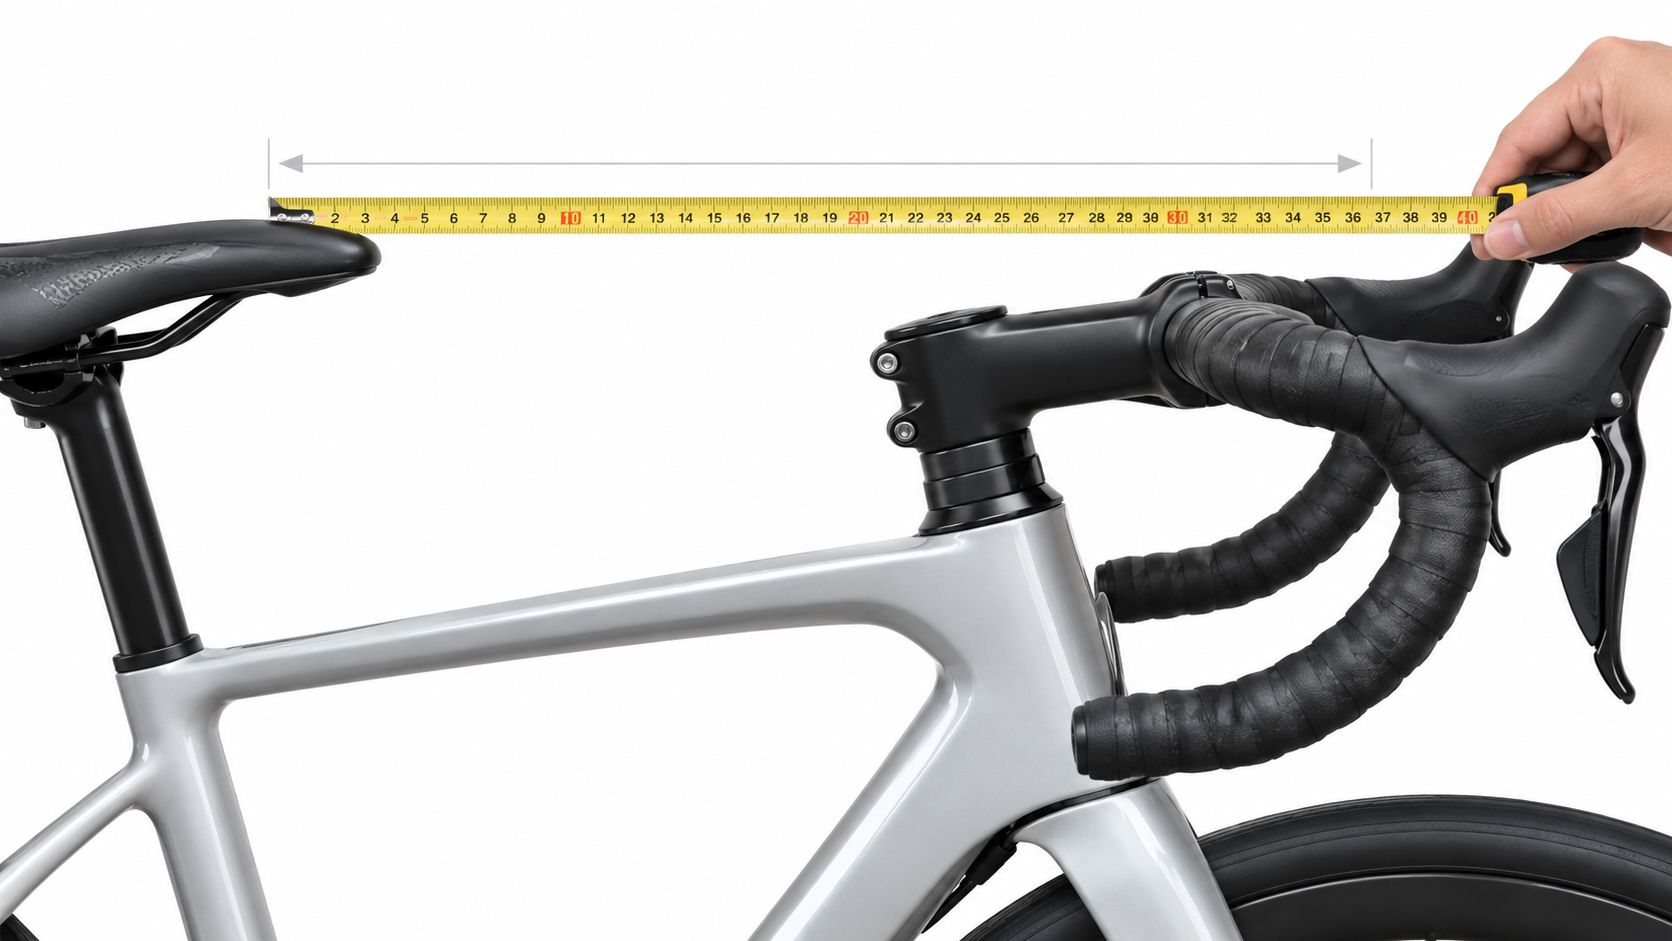
You're comparing two bikes with the same nominal size, yet one feels notably different at the bars. That isn't unusual. A size label says very little about the finished distance and height relationship between the saddle and your hands.
Bike cockpit length is best understood as a practical, finished-bike concept. Cockpit length is a practical way to describe the horizontal relationship between a defined saddle reference and a defined hand/contact-point reference on the finished bike. For a road or gravel buyer, understanding that relationship can prevent an attractive listing from becoming an uncertain fit gamble.
Table of Contents
- What Bike Cockpit Length Actually Means
- How Stack and Reach Set the Starting Coordinates
- What Shapes Finished Cockpit Length
- How to Measure Cockpit Length in Practice
- Common Buyer Pitfalls When Comparing Listings
- How SYCLR Helps You Compare Cockpit Context
- Bike Cockpit Length Frequently Asked Questions
- Is cockpit length the same as stem length?
- Can two bikes with the same reach feel different?
- Does a longer stem always mean a longer cockpit?
- Should a gravel bike have a shorter cockpit than a road bike?
- Can spacers fix a cockpit that feels too long?
- What should I ask about a used bike's cockpit?
- Is height enough to choose cockpit length?
What Bike Cockpit Length Actually Means
A bike's cockpit is the working area between the saddle and the bars. In practical buying and fit terms, cockpit length is a practical way to describe the horizontal relationship between a defined saddle reference and a defined hand/contact-point reference on the finished bike. It is not the number printed on the stem, and it is not determined by frame size alone.
Two bikes can share the same size label and still place the bars and hoods in meaningfully different positions. Frames may differ in stack and reach. Stems may differ in length, angle, and orientation. Handlebars may differ in shape, rotation, and hood placement. Saddle position and the chosen saddle reference also affect what you are actually comparing.
Why the finished bike matters
A cockpit comparison is only useful when the reference points are clearly defined. If one bike is measured from one saddle point to the hoods, and another is judged visually from saddle to bar tops, the comparison is already inconsistent.
That is why cockpit length works best as a repeatable finished-bike relationship, not as a single catalog number. It depends on where the frame starts, how the front end is configured, where the hoods are installed, and which saddle reference you use.
Practical rule: Compare the complete installed cockpit using the same reference points every time.
How Stack and Reach Set the Starting Coordinates
Stack and reach are the frame measurements that set the starting coordinates for a cockpit comparison. Using the bottom bracket as the frame reference, stack is the vertical distance to the frame’s published upper head-tube reference point, while reach is the horizontal distance to that same reference, according to the manufacturer’s geometry convention. This frame-level baseline is independent of the finished bar, hood, and saddle setup, as explained in this stack and reach guide.
Stack and reach do not tell you the final hand position. They tell you where the frame places the front end before stem, spacers, handlebar shape, hood placement, and saddle setup are considered.
Why the size label isn't enough
A size label such as 54, 56, or medium is only a range marker inside a brand's lineup. It is not a universal fit coordinate. Two bikes with the same nominal size may have different stack and reach values, and even identical frame coordinates can still produce different finished cockpit positions once components and setup are considered.
| Bike type | Size | Reach | Stack | Comparison note |
|---|---|---|---|---|
| Road frame, representative geometry | Listed model size | Check manufacturer chart | Check manufacturer chart | Use the exact model, year, and size |
| Gravel frame, representative geometry | Listed model size | Check manufacturer chart | Check manufacturer chart | Use the exact model, year, and size |
The important point is that the table should contain the exact geometry for the exact model, year, and size. A generic size chart cannot replace the manufacturer's geometry page, especially when you're comparing used bikes or different model years.
What Shapes Finished Cockpit Length
Think of cockpit length as a finished setup relationship, built from several parts that need to be read together.
Frame stack and reach
Frame stack and reach are the starting coordinates. They describe where the frame places the top of the head tube relative to the bottom bracket. They do not describe the final bar or hood contact point.
Frame reach is also not the same as effective top tube length. Effective top tube depends on other frame relationships, while stack and reach use a bottom-bracket-based reference that is more useful for comparing different frame designs.
Stem configuration
The stem changes where the bar clamp sits relative to the steerer. Stem changes move the bar clamp. Exact horizontal and vertical displacement depends on stem length, angle, steerer/head angle, spacers, orientation, handlebar geometry and hood position.
That is why stem length alone is not enough to describe the finished cockpit. Two bikes can use different stems yet place the final hand position in a similar area, while two bikes with the same stem length can still end up feeling different once the rest of the front end is considered.
Handlebar and hood setup
The handlebar contributes its own geometry, but published bar reach is not the same as installed hand or hood reach. Manufacturer conventions vary, and the installed position depends on bar rotation, hood placement, hood shape, and the contact point you choose to compare.
This matters when reading listings. A seller may state the stem length but omit the handlebar model and hood setup, leaving the actual contact-point position uncertain.
If you are comparing two stem and bar combinations, they may produce similar approximate hand positions, but the final installed contact point still needs to be measured on the bike or verified from a known, repeatable reference.
Spacer and saddle context
Spacers and stem orientation affect where the front end sits in space. They describe the current installed setup, not a fit conclusion by themselves. The same is true for saddle setup. A cockpit comparison only becomes meaningful when the saddle reference is defined and applied consistently.
For that reason, cockpit length should always be discussed alongside:
the exact saddle reference used
the exact hand or contact-point reference used
the bike's stack and reach
the installed stem configuration
the handlebar model and hood placement
the visible spacer arrangement
How to Measure Cockpit Length in Practice
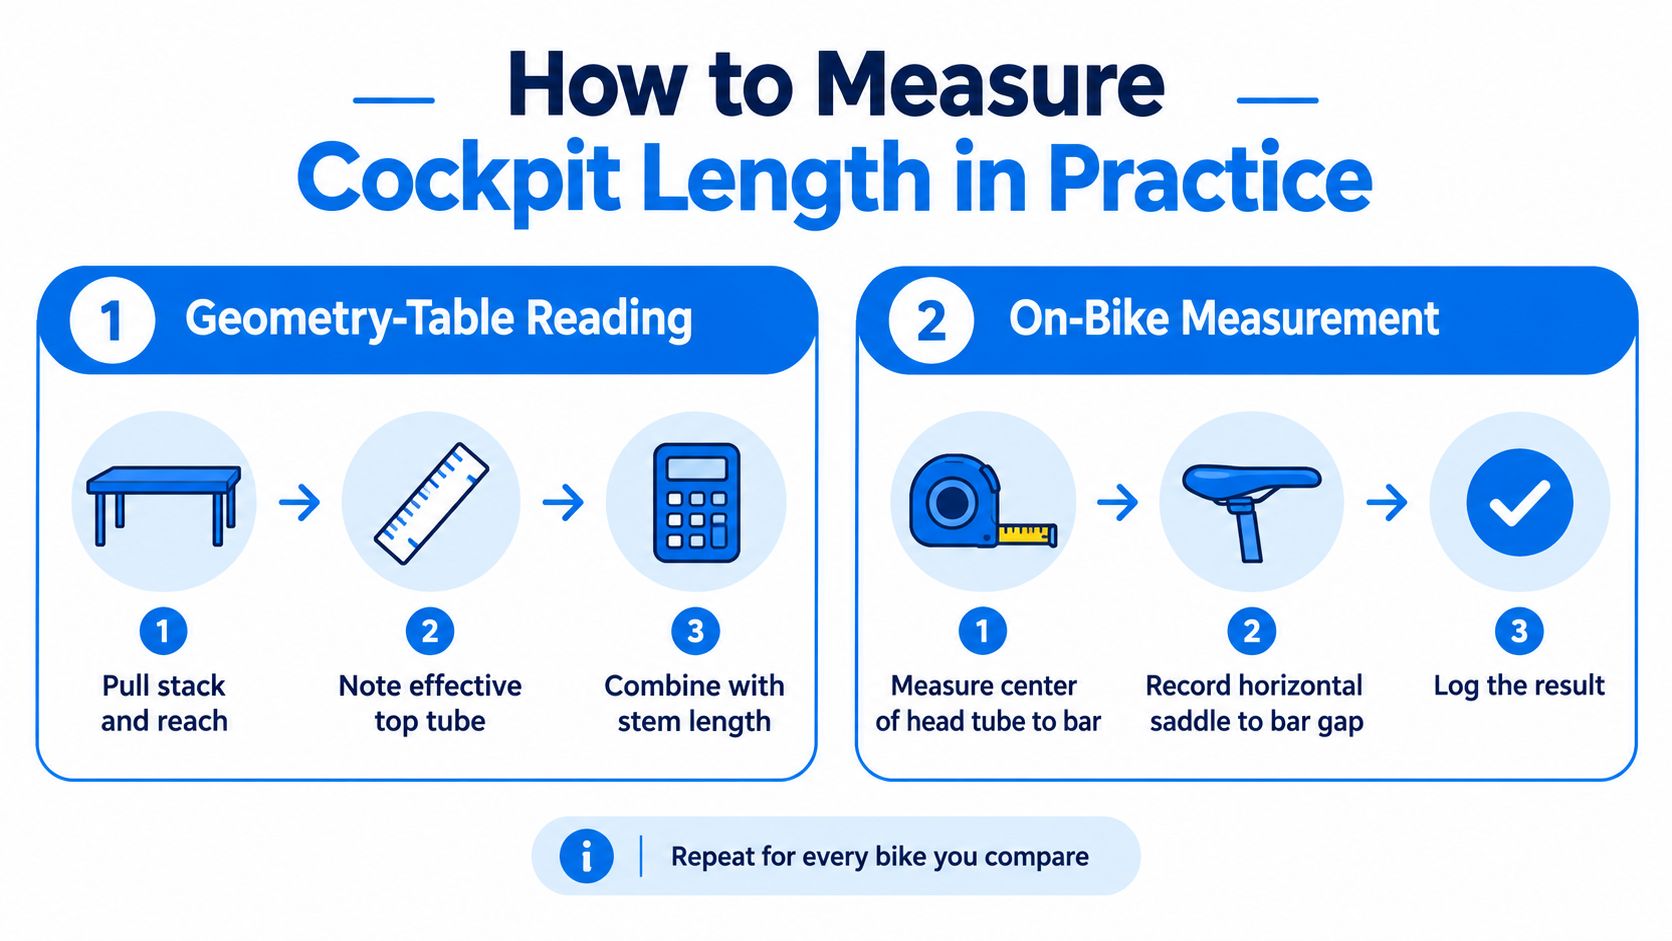
You can compare cockpit length in two useful ways. The first records the published bike and component configuration in a structured way. The second measures the finished bike directly.
Method one from the bike's published configuration
Start with the exact model, model year, and frame size. Then record the complete setup context rather than trying to reduce the cockpit to a single calculated number.
A useful comparison note should include:
Exact model, year, and size
Frame stack and reach
Stem length, angle, and orientation
Spacer arrangement
Handlebar model
Hood placement
Saddle reference used for comparison
Known-good reference bike or fit setup
The point is not to generate one exact cockpit figure from mixed geometry conventions. The point is to compare the complete configuration against a bike you already know works.
This approach is especially useful for online listings. If a seller shows the frame but not the stem, handlebar model, hood placement, or spacer setup, then cockpit comparison remains incomplete and listing uncertainty stays high.
Method two on the actual bike
Place the bicycle on a stable, level setup and use the same bike orientation every time. Then choose a clearly defined saddle reference and a clearly defined hood or bar contact-point reference. Use those same references on every bike you compare.
Record two separate measurements:
Horizontal saddle-to-contact-point distance
Vertical bottom-bracket-to-contact-point height
Those two measurements give you a repeatable finished-bike reference that can be compared across bikes more reliably than a size label or parts list alone.
The on-bike measurement does not replace geometry data. It reflects the complete installed setup, including saddle position, bar rotation, hood placement, stem orientation, and spacer arrangement.
Integrated bars need extra caution. They may combine stem dimensions, bar shape, hood placement constraints, flare, and cable routing into one assembly, which can make later fit changes more involved than replacing a conventional stem.
For a deeper explanation of the bar-side measurement, see the planned bike handlebar reach guide. Use the same reference points each time, and do not compare one bike at the hoods with another at the bar tops.
Common Buyer Pitfalls When Comparing Listings
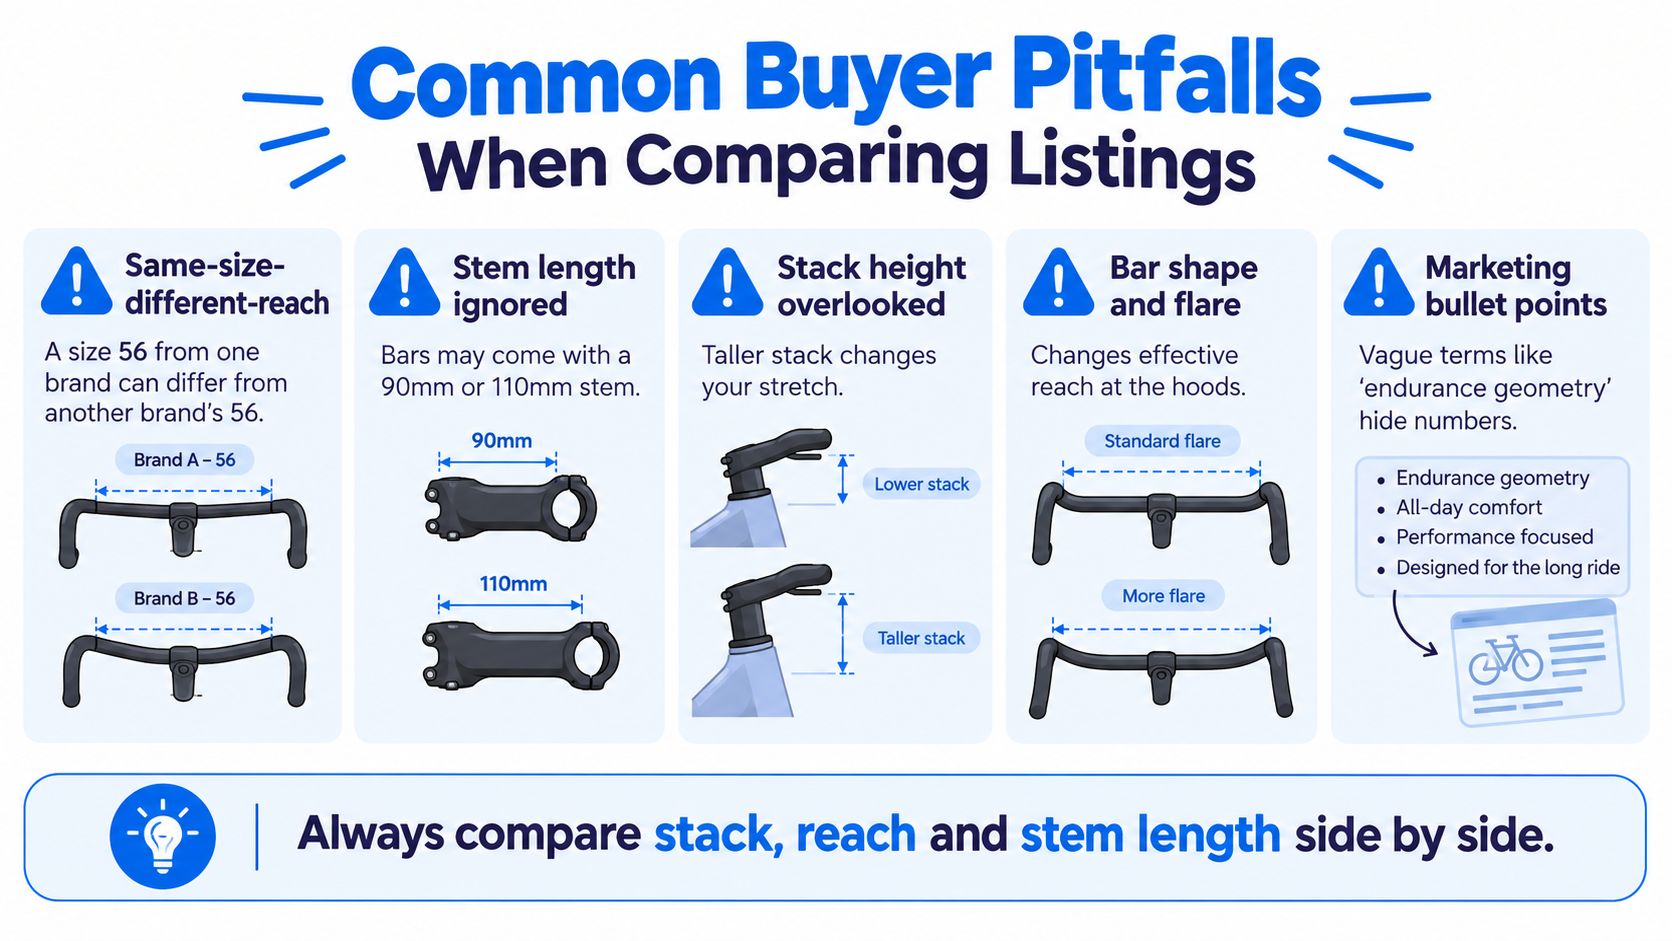
A listing can look comparable until you inspect the complete cockpit context. Same-size frames from different brands may have different stack and reach figures, and sellers may have changed stems, bars, hoods, spacers, or saddles. Comparing bikes without normalizing those details creates uncertainty that the size label cannot solve.
The common comparison errors
Same size, different frame coordinates: A size 56 from one brand may not place the front of the frame in the same position as another brand's size 56. Compare stack and reach before comparing the label.
Incomplete stem information: Stem length without angle or orientation does not fully describe the installed front end.
Spacer arrangement ignored: Spacer height and stem position describe the current setup only. They should be recorded, not overinterpreted.
Handlebar model omitted: Published bar dimensions and actual installed hood position are not the same thing.
Hood placement overlooked: Hood placement can materially change the final contact point.
Saddle reference undefined: If the saddle reference changes from one bike to the next, the cockpit comparison becomes inconsistent.
Marketing language accepted as geometry: Terms such as “endurance geometry” describe category intent, not a finished contact-point position.
Integrated cockpits create a different risk. The bar and stem may be packaged cleanly, but reach, width, flare, routing, and parts availability can become tied to one system. Before buying a used bike, confirm the cockpit model and whether replacement parts are available.
Before making an offer, ask for the exact model, year, size, frame stack and reach, installed stem details, handlebar model, hood placement, visible spacer setup, saddle reference, and clear cockpit photographs.
A structured used-bike listing comparison guide can help organize those details alongside model year, condition, seller transparency, and price context. The aim is not to produce a guaranteed fit verdict. It is to expose missing information and make listing uncertainty visible before you commit further time or money.
How SYCLR Helps You Compare Cockpit Context
Cockpit comparison becomes difficult when geometry tables, component details, model-year information, and listing photos sit in separate places. A rider may find frame geometry on one page, a stem in a listing photo, and pricing on another screen, then try to remember the differences across several bikes.
SYCLR compares road and gravel listings using fit signals, geometry signals, model-year context, price context, listing quality, condition signals where available, and confidence signals. For cockpit-related research, that means you can compare the available fit and setup information around a listing instead of relying on the size label alone.
Use your current bike as a reference
If you already have a bike that feels workable, record its exact model, year, size, stack, reach, stem configuration, handlebar model, hood placement, spacer arrangement, saddle reference, and chosen contact-point reference. Riders who know their current-bike geometry or have fit-report details can enter more detailed information through the fit-details entry.
SYCLR does not perform a professional bike fit, physically inspect bikes, authenticate listings, verify ownership or seller claims, or guarantee fit or condition.
The practical workflow is simple:
Set the buying context: enter height, bike type, and budget.
Review fit signals and geometry signals: check the available size and frame details.
Inspect the complete cockpit context: look for stem details, handlebar model, hood placement, spacers, and saddle setup.
Compare uncertainty: separate clear listing information from missing cockpit details.
Shortlist smarter: take the strongest candidates to a seller conversation, test ride, shop visit, or professional fit discussion.
Bike Cockpit Length Frequently Asked Questions
Is cockpit length the same as stem length?
No. Stem length is only one part of the finished setup. Cockpit length depends on the defined saddle reference, the defined hand or contact-point reference, frame coordinates, stem configuration, handlebar setup, hood placement, spacers, and saddle context.
Can two bikes with the same reach feel different?
Yes. The same frame reach can still lead to different finished contact-point positions when the bikes use different stems, handlebars, hood placement, spacer arrangements, or saddle setups. Compare the complete installed configuration rather than the frame figure alone.
Does a longer stem always mean a longer cockpit?
Not necessarily in a simple one-to-one way. A stem change moves the bar clamp, while final hand position also depends on stem angle, spacer arrangement, handlebar geometry, rotation, and hood placement.
Should a gravel bike have a shorter cockpit than a road bike?
No. A road or gravel category label does not determine required cockpit length. Compare the exact bike and complete cockpit against a known-good reference.
Can spacers fix a cockpit that feels too long?
Spacers primarily change the installed front-end position, especially bar height, but they do not replace a full cockpit comparison. If the bars feel too far away, evaluate the complete setup, including frame coordinates, stem configuration, handlebar geometry, hood placement, and saddle reference.
What should I ask about a used bike's cockpit?
Ask for the exact model, year, and size, frame stack and reach, stem length, angle, and orientation, handlebar model, hood placement, spacer arrangement, saddle reference, and clear cockpit photographs. Also confirm whether the cockpit parts are original to the build.
Is height enough to choose cockpit length?
No. Height is a starting input only. You still need to compare the exact bike and complete cockpit against a known reference.
Use SYCLR to compare road and gravel listings using fit signals, geometry signals, model-year context, price context, listing quality, condition signals where available, and confidence signals. Start with height, bike type, and budget, then add more detailed fit information when you know your current-bike geometry or fit-report details.