
Gravel Bike Frame Size Chart: Why Height Alone Is Not Enough
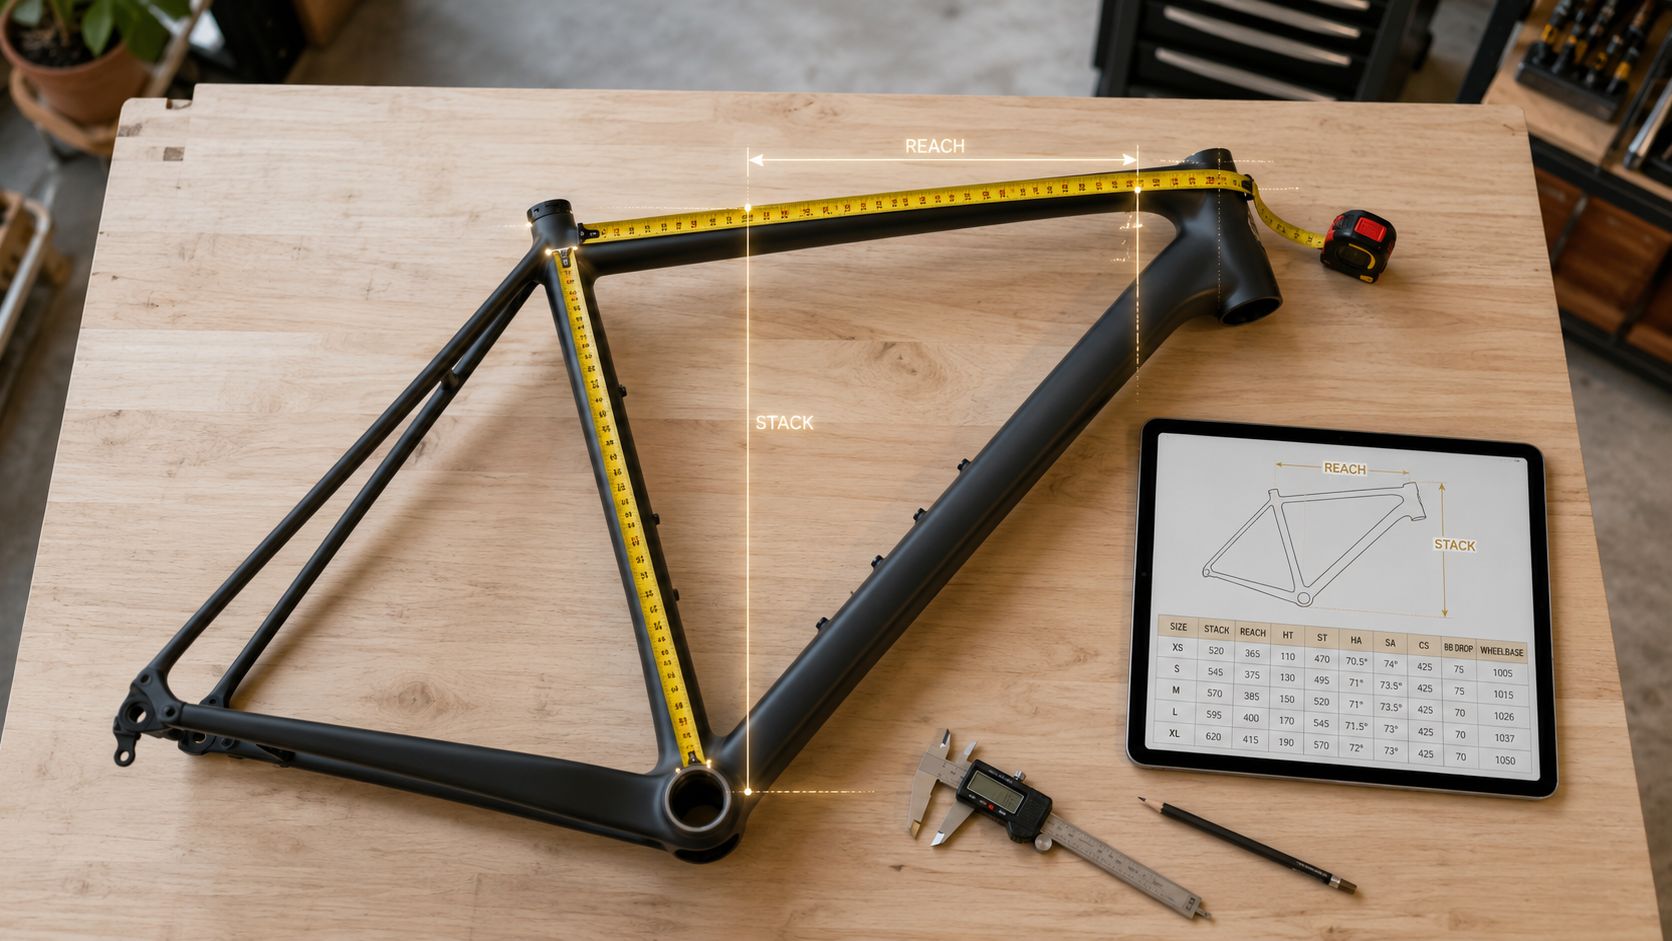
A gravel bike frame size chart is useful for narrowing your starting point, but it should not be treated as the final fit decision. Height helps you begin the search. The better buying decision usually comes from checking inseam, stack, reach, standover, terrain, riding style, comfort preference, and the exact geometry of the bike you are considering.
Quick answer: A gravel bike frame size chart can help you narrow your starting size by height and inseam, but it should not be the final decision. Stack, reach, standover height, terrain, riding style, and the actual geometry of the bike determine whether a specific gravel bike listing is worth considering.
That is where many riders get stuck. You compare a new bike, a used listing, or two gravel bikes with the same size label, and the numbers do not line up the way you expect. One seller says it fits riders your height. Another brand chart points somewhere else. That confusion is normal. Modern gravel sizing depends much less on the seat tube label than many buyers assume.
If you have already read our road bike size chart, the strategy here is similar. Use the chart to narrow the field. Then use geometry and riding context to decide which bike is actually worth your time.
Table of Contents
Your Direct Answer to Gravel Bike Sizing
A gravel bike frame size chart is a starting tool. It usually maps height to a likely frame category, then uses inseam to refine the shortlist and check basic standover clearance.
The key point is not that one height always equals one exact bike size. A rider around 168 cm may often start near a Small or Medium depending on brand and model, while a rider around 175 cm may often land near a Medium or Large. The exact answer depends on inseam, stack, reach, frame design, and the brand's sizing system.
A general chart can help you narrow the search, but it does not solve the harder buying question: which specific gravel bike geometry suits your proportions, flexibility, terrain, and riding goals?
Practical rule: Use the chart to narrow your search, then use geometry to choose between the bikes that remain.
If you want to start broad and narrow the field quickly, you can start with your height, bike type, and budget and then compare the listings that make sense before you dig deeper into geometry.
General Gravel Bike Size Chart by Height
Most riders still want a quick chart first. That makes sense. A general chart helps you rule out obviously wrong sizes and focus on realistic options.
Here is a common high-level guide based on the broad sizing ranges often used across modern gravel categories. Treat it as a starting reference, not a final answer.
Gravel Bike Frame Size by Rider Height General Guide
| Rider Height (cm) | Rider Height (ft/in) | Common Starting Frame Size (cm) | Common Starting Size |
|---|---|---|---|
| 148-152 | 4'10"-5'0" | 47-48 | XXS |
| 153-160 | 5'0"-5'3" | 49-50 | XS |
| 161-167 | 5'3"-5'6" | 51-53 | S |
| 168-172 | 5'6"-5'8" | 53-55 | S or M |
| 173-180 | 5'8"-5'11" | 55-58 | M or L |
| 181-188 | 5'11"-6'2" | 58-60 | L or XL |
| 191-196 | 6'3"-6'5" | 60+ | XL or XXL |
This kind of chart reflects common market conventions, but brand charts vary and bike categories overlap. A race-oriented gravel bike, an all-road bike, and an adventure gravel bike may all place the rider differently even when the frame label looks similar.
One example of a general online reference is WinRider’s 2026 gravel bike size chart. It is useful as a broad retailer-style reference, but not as a technical authority for final fit decisions.
How to use the chart correctly
Use a general chart to do three things first:
-
Eliminate obvious mismatches: If you are around 168 cm, you are probably not shopping random XL listings.
-
Build a shortlist: If you sit near a boundary, keep both neighboring sizes open until you compare geometry.
-
Prepare better seller questions: Ask for model year, geometry chart, actual frame size label, and clear side photos.
Generic charts work well as a filter. They work poorly as a final buying decision.
That matters even more in the used market. A listing that says “56 cm gravel bike” tells you much less than many buyers think. A 56 from one brand can feel taller, shorter, lower, or longer than another 56 from a different model line or year.
Why Height-Based Charts Are Only a Start
Height is useful because it gets you close quickly. It is not enough because riders with the same height often have different torso length, leg length, arm length, flexibility, and comfort preferences.
That is where height-only shopping breaks down. A rider with longer legs and a shorter torso may need a different front-end shape than a rider of the same height with a longer torso and shorter inseam. On a gravel bike, that difference shows up clearly in stack and reach.
If you want the broader fit framework first, our bike fit guide explains how rider position, comfort, and geometry connect.
The real cost of guessing
The consequences are easy to understand even without a statistic. If you size up from a height chart alone, the bike may feel too long, too low, or hard to control when the terrain gets rough. If you size down too far, the bike may feel cramped, twitchy, or difficult to settle into on longer rides. Gravel sizing works best when the chart is followed by a geometry check.
Those are the two mistakes many buyers make:
-
Too big: The bike feels long and low. The rider reaches for the hoods, locks the elbows, and never quite relaxes.
-
Too small: The rider clears the frame easily, but the cockpit feels compressed and the handling can feel nervous on rough surfaces.
Why brand differences change everything
Modern gravel sizing is geometry-led, not label-led. Brand charts differ. Model lines differ. Even within one brand, an all-road gravel bike and an adventure-oriented gravel bike can place the rider differently.
That is why one rider can fit one nominal size in one model and a different nominal size in another. If you are trying to understand those differences in practical terms, the best next step is to study a bike fit guide that connects rider position to geometry rather than trusting the seat tube number alone.
If you are between sizes, your body proportions matter more than the letter on the frame. See choosing between two frame sizes for the full method.
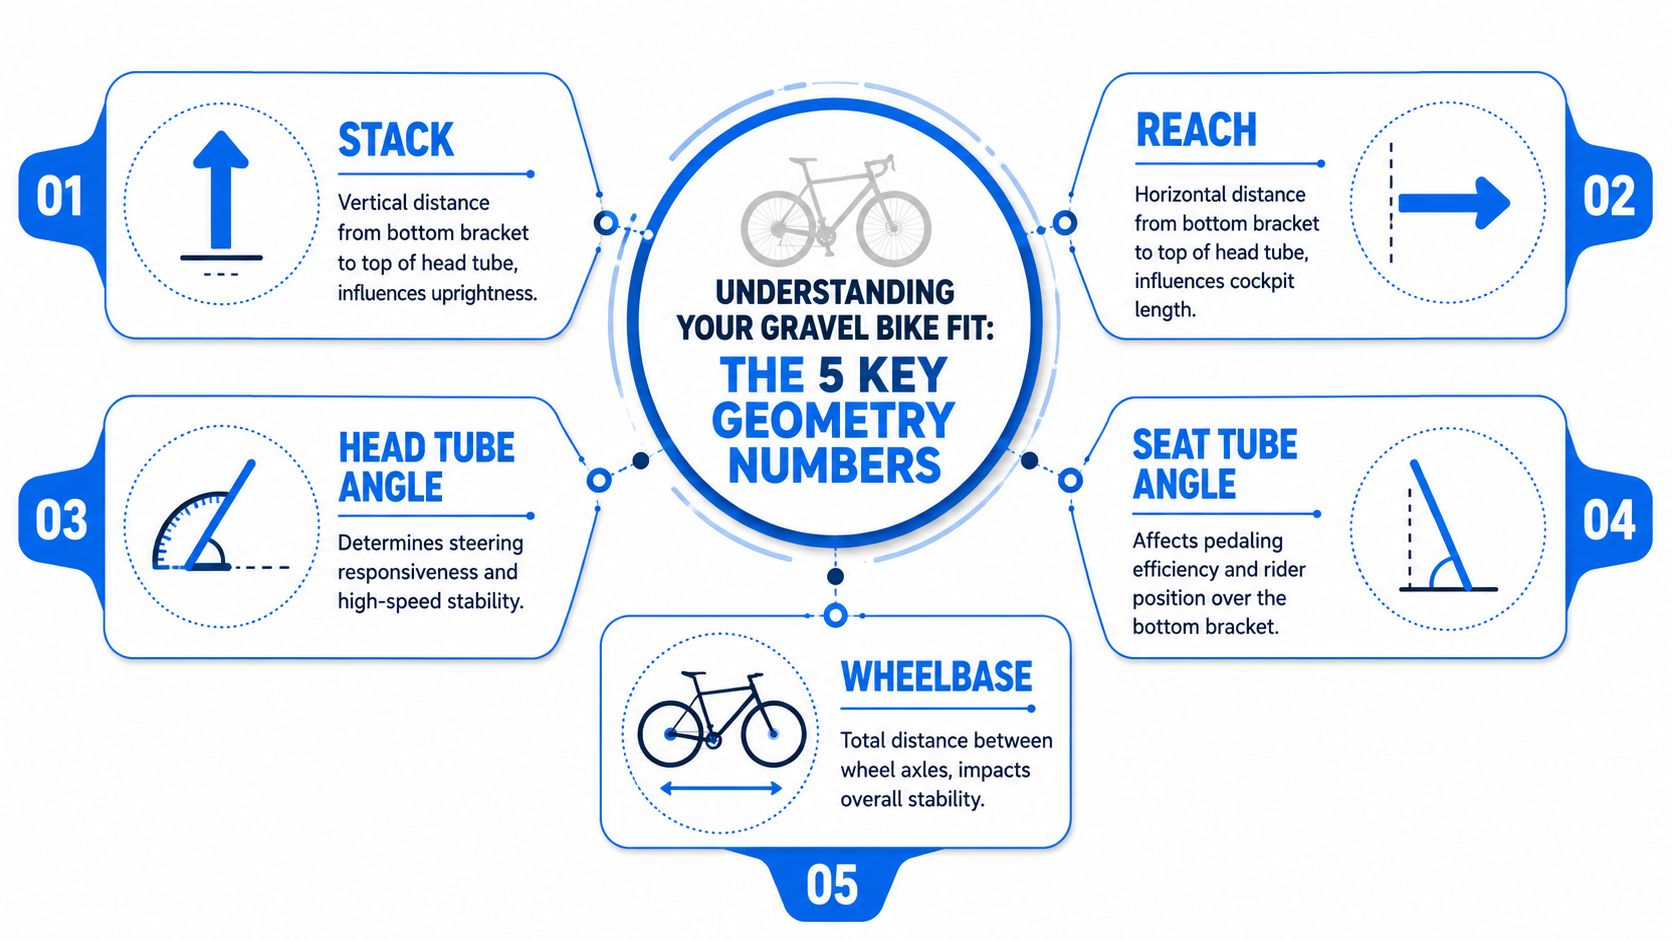
The 5 Key Geometry Numbers You Must Know
A geometry chart looks technical, but for buying decisions you do not need to decode every line. You need to understand the small group of numbers that most strongly affect how the bike feels under you.
What stack and reach actually tell you
Stack is the vertical distance from the bottom bracket to the top of the head tube. In simple terms, it tells you how high the front of the bike is. More stack usually means a more upright position. Less stack usually means a lower front end.
Reach is the horizontal distance from the bottom bracket to the top of the head tube. It tells you how long the bike is in front of the saddle. More reach generally feels more stretched. Less reach usually feels more compact.
These two numbers matter because they let you compare bikes across brands without relying on labels like “M” or “56”. If you want a deeper explanation while comparing listings, this stack and reach guide is the fastest place to start.
The remaining numbers that shape ride feel
Effective top tube describes the horizontal top-tube length used to estimate cockpit length. It is useful, but stack and reach are usually more reliable for comparing modern gravel bikes because top tube numbers do not capture front-end height directly.
Standover height tells you how much room you have when standing over the bike. This is a basic safety and comfort check. If the frame is too tall through the top tube, the bike can be awkward before you even start pedaling. For a practical explanation, see our guide to bike standover height.
Geometry is the overall set of frame dimensions and angles that shape fit and handling. In gravel terms, geometry often balances comfort, stability, and control across mixed terrain.
A few other numbers also influence ride character:
-
Head tube angle: Affects steering feel. Steeper often feels quicker. Slacker often feels calmer.
-
Seat tube angle: Influences your pedaling position over the bottom bracket.
-
Wheelbase: A longer wheelbase usually feels more stable. A shorter one often feels more responsive.
Buyer shortcut: If you only compare three things in a listing, compare size label, stack, and reach.
For practical shopping, think of it this way:
| Geometry term | What it affects most | What it feels like |
|---|---|---|
| Stack | Bar height | Upright vs low front end |
| Reach | Cockpit length | Compact vs stretched position |
| Effective top tube | Overall room | Similar to cockpit length, but less precise alone |
| Standover | Clearance | How safely and comfortably you can straddle the bike |
| Wheelbase and angles | Handling character | Stable vs quick steering feel |
How to Measure Yourself for a Better Fit
Good inputs matter. If your measurements are sloppy, your size recommendation will be sloppy too.
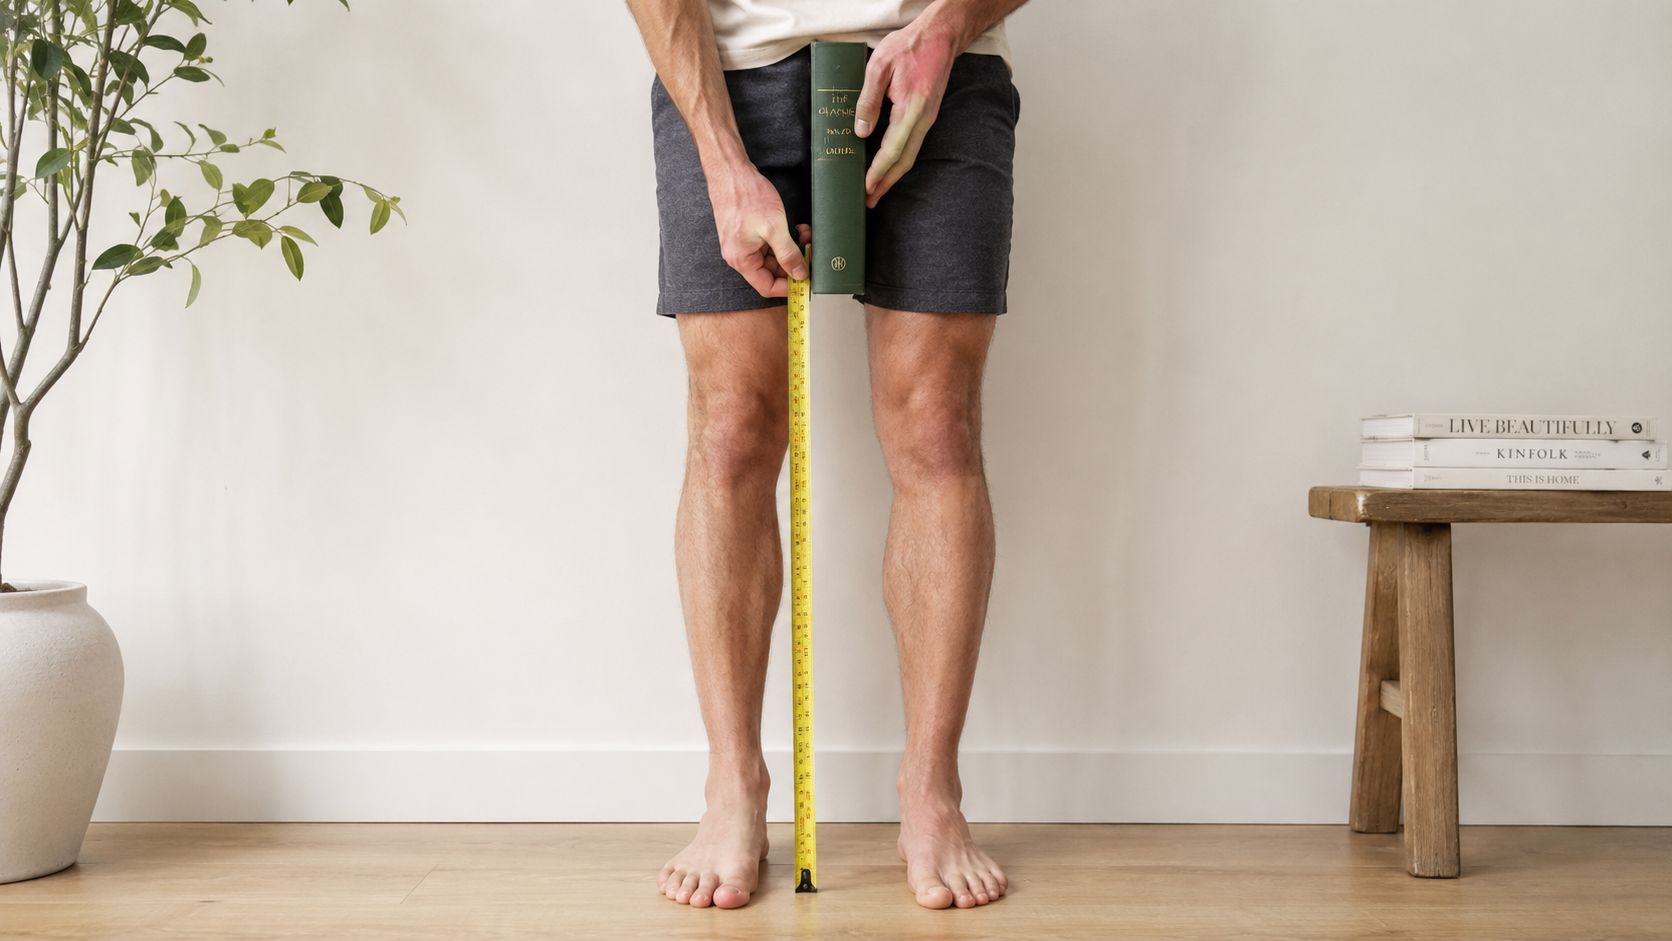
Take height and inseam the right way
Start with barefoot height against a wall. Stand tall, heels flat, and have someone mark the top of your head. Measure from floor to mark.
Then measure inseam. Stand barefoot against a wall, place a book firmly upward between your legs to simulate saddle contact, and measure from the floor to the top edge of the book. That inseam number helps you check whether a frame is likely to offer workable standover clearance.
Manufacturers such as Cannondale advise allowing 2.5 to 5 cm (1 to 2 inches) of top-tube clearance, which you can see in Cannondale’s gravel bike sizing guidance. If you want a practical explanation of how that clearance works in real shopping situations, this overview of bike standover height is worth reading before you commit to a frame.
Turn your measurements into buying filters
Once you have both numbers, use them differently.
-
Height narrows the likely frame category.
-
Inseam checks whether the bike is manageable at a stop.
-
Geometry decides whether the bike will fit well in motion.
That is why height-only charts fail so often. Height gets you near the right shelf. Inseam and geometry tell you which bike on that shelf deserves a closer look.
Here is a simple measuring walkthrough before you start comparing listings:
If you have your numbers ready and want to put them to work, you can start with your height, bike type, and budget to shortlist better-fit bikes before you contact sellers.
How to Read and Compare Geometry Charts
A frame-size label alone will not tell you how a gravel bike fits. For sizing, compare stack, reach, and standover against a bike you already know, and treat the rest of the geometry table as supporting context. For the full method of reading and comparing the numbers, see how to read a bike geometry chart.
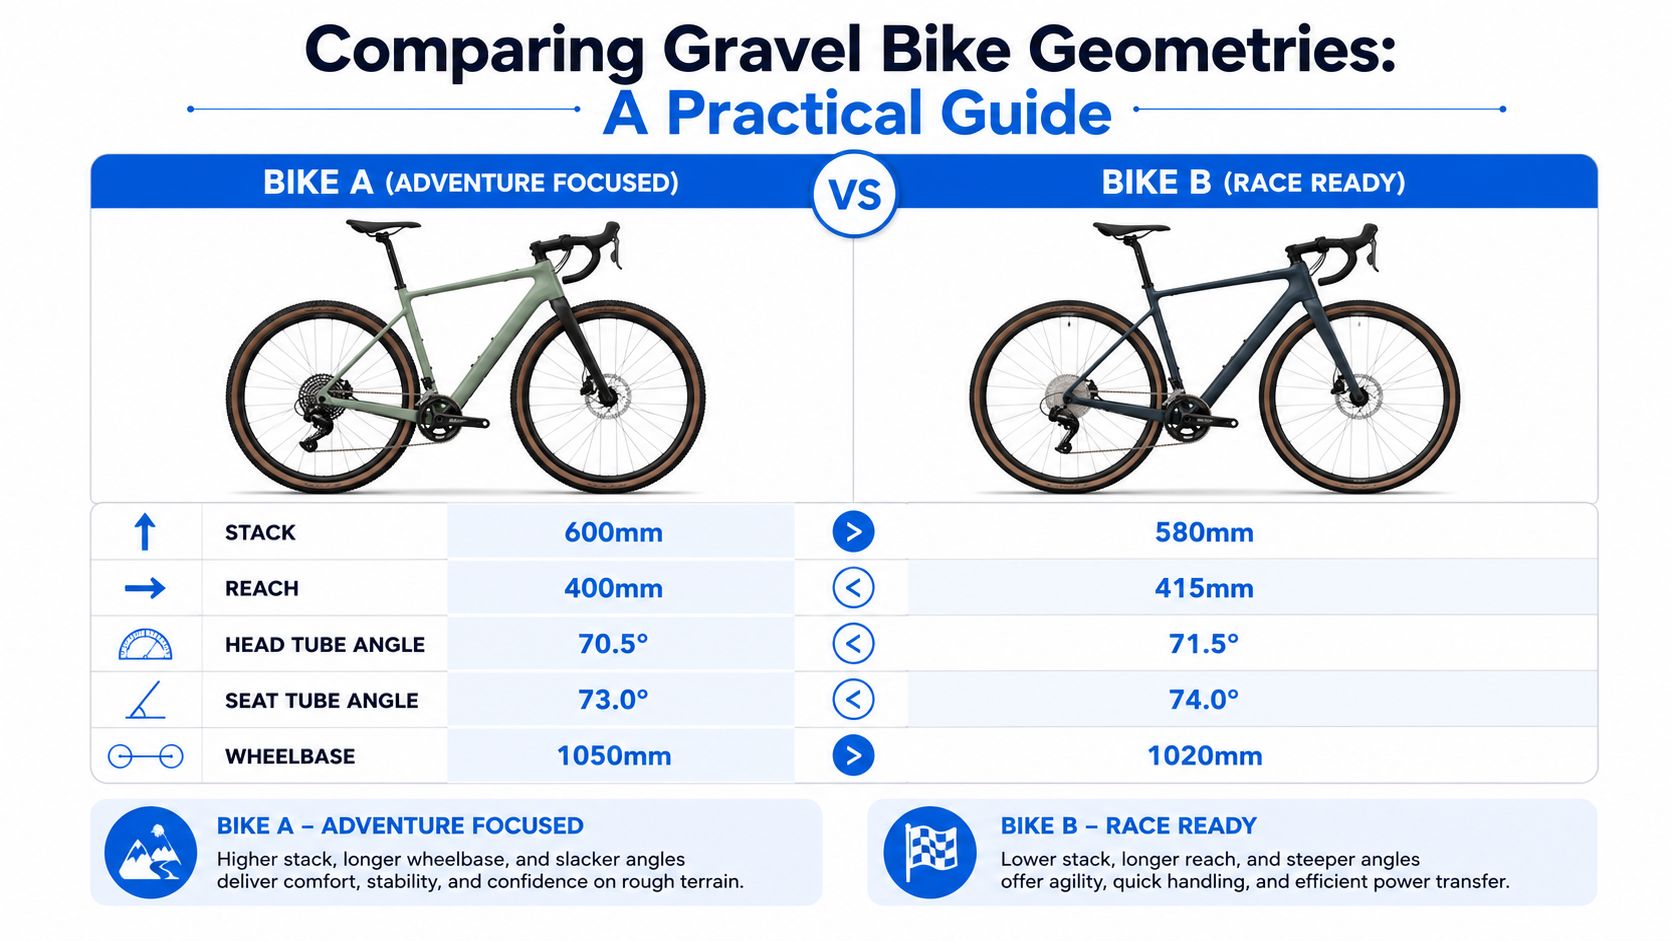
Why two bikes with the same size label can fit differently
Take two gravel bikes both labeled “56 cm.”
One has more stack and less reach. That bike will usually put you in a more upright, less stretched position. It often suits long mixed-surface rides, rougher terrain, and riders who value comfort and stability.
The other has less stack and more reach. That usually creates a lower, longer position. It can feel faster and more direct, but also more demanding if your flexibility or riding goals do not match it.
This is exactly why there is no universal gravel standard. Canyon’s gravel bike sizing guidance is a useful example of why model-specific charts matter. Direct-to-consumer brands often ask for height and inseam, then recommend a size by model rather than relying on a universal centimeter chart.
Two bikes with the same labeled size can fit differently because stack, reach, standover, wheelbase, head angle, model year, and intended use vary by brand and model.
What to compare first in a listing or geometry table
When you open a geometry chart, compare in this order:
-
Stack first
If one bike is much taller in front, it will usually feel more upright right away. -
Reach second
This determines whether the cockpit is likely to feel compact or stretched. -
Standover after that
A bike can look good on paper and still fail the basic clearance test. -
Handling numbers last
Head angle, seat angle, and wheelbase matter, especially if you are choosing between race-oriented and adventure-oriented bikes.
A “56 cm” label is not a fit description. It is a category marker.
For used listings, a simple comparison table helps:
| What to compare | Why it matters | What to watch for |
|---|---|---|
| Size label | Starting point only | Same label across brands can hide major fit differences |
| Stack | Front-end height | Too low can feel aggressive fast |
| Reach | Cockpit length | Too long often shows up as overreach |
| Standover | Clearance | Must work before anything else |
| Model year | Geometry context | Older frames may fit and handle very differently |
If you want a more geometry-specific reference while comparing models, this stack and reach guide is a good companion.
Sizing Pitfalls When Buying a Used Gravel Bike
Used gravel bikes create a different kind of sizing problem. The frame might be good, the price might be good, and the bike might still be a poor buy for you.
A common example is the seller who lists a bike as “medium” because that is what they were told when they bought it. But the actual frame label may be a 54 in one brand, a small in another, or a geometry shape that rides nothing like the label suggests.
Three mistakes that cost buyers time and money
-
Trusting the listing title too much
“Fits riders 5’8 to 6’0” is not enough. Ask for the exact model, model year, and labeled frame size. -
Ignoring missing geometry data
If the seller cannot provide the model year, you may struggle to find the right chart. That is a warning sign, especially when the bike sits near your size boundary. -
Assuming old gravel geometry feels modern
Some older bikes that sellers call gravel bikes were closer to cyclocross or all-road setups. They may ride lower, quicker, or harsher than a modern buyer expects.
Used-bike fit vetting starts before the test ride. If the numbers do not add up, do not talk yourself into it just because the listing looks clean.
Before assuming a used bike fits, verify the exact model, model year, frame size label, stack, reach, standover, seller photos, cockpit modifications, and manufacturer geometry chart.
Another trap is modification. A bike may have a very short stem, a heavily offset seatpost, or a tall stack of spacers covering up a poor size match. Those parts can improve a fit, but they can also hide a frame that was wrong from the start.
Ask for side photos, cockpit details, and if possible, the original geometry chart from the manufacturer. A good used bike deal still is not a good decision if the frame size or geometry is off.
Your Final Fit Checklist Before You Buy
Before you pay, run through a short fit checklist. This catches the mistakes that generic size charts miss.
Pre-purchase checks that matter
-
Confirm standover clearance
You want enough room to stand over the bike comfortably. Industry guidance commonly points to 2.5 to 5 cm (1 to 2 inches) of clearance between your body and the top tube for safety and comfort. -
Check the cockpit feel
On the hoods, do you feel stretched out or folded up? Gravel bikes should feel controlled, not tense. -
Look at front-end height
If the bars are much lower than you can comfortably support for your riding style, do not assume a small parts swap will fix everything. -
Review the geometry table
Compare stack and reach with a bike you already know fits reasonably well. -
Factor in your riding use
A smaller frame can feel more agile. A larger one can feel more stable. Choose based on terrain, handling preference, and comfort, not ego.
The final confirmation
Test rides still matter most. Charts cannot account for flexibility, terrain preference, or how you like a bike to respond under load.
If you are between sizes, ride both if you can. If you are buying used and cannot test ride for long, at least check standover, seated reach, bar drop, and low-speed handling before handing over the money.
How SYCLR Helps You Compare by Fit
SYCLR is built for the exact point where a generic gravel bike frame size chart stops being enough. Once you have narrowed your likely size, the hard part is comparing actual listings by fit, geometry, price context, model year, and source quality.

Instead of treating bike shopping like a simple marketplace search, SYCLR helps riders use fit-aware recommendations, geometry signals, listing comparison, and confidence signals to reduce guesswork. That is especially useful when you are comparing used gravel bikes from different brands and years, where the same frame label often hides very different fit outcomes.
Two practical paths make sense:
-
If you are just starting out, start with your height, bike type, and budget to compare road and gravel bike listings.
-
If you already know your fit details, use them to improve your recommendations with a more geometry-aware search path.
SYCLR does not replace a professional bike fit, and it does not promise a guaranteed result. What it does well is help you shortlist smarter, compare better-fit options, and make a more informed buying decision before you click through to a seller.
If you want a stronger shortlist before you start messaging sellers, use SYCLR to compare listings by fit, price, and confidence signals.
Frequently Asked Questions About Gravel Bike Sizing
Should I size up or down if I’m between sizes?
If you are between sizes, the better choice depends on your proportions and riding goals. A smaller frame often feels more agile, while a larger frame can feel more stable. Check stack, reach, and standover before deciding.
Does gravel bike sizing differ from road bike sizing?
Yes. Gravel bikes often use different geometry priorities, including more relaxed positioning and fit decisions influenced by mixed-surface control. Do not assume your road bike’s labeled size will translate directly to a gravel bike.
Is height enough to choose a gravel bike?
No. Height is a useful starting point, but inseam, stack, reach, standover, and comfort preference give a much better sizing picture. Height alone narrows the field. It does not finish the decision.
How much can a stem or saddle adjustment fix?
A stem and saddle can fine-tune a fit, but they cannot fully rescue the wrong frame geometry. If the bike is too long, too low, or too tall in standover, cockpit changes only go so far.
Does tire size change frame fit?
Tire size can affect ride feel and slightly influence standover and handling impressions, but it does not change the frame’s core geometry. Size the frame first, then think about tire setup.
Is a professional bike fit worth it for a gravel bike?
Yes, especially if you have known fit challenges, you are between sizes, or you are investing in a higher-value bike. A professional fit can be very helpful, and your fit details can then be applied more effectively while shopping.
What matters most when comparing used gravel bike listings?
Start with frame size label, model year, stack, reach, and standover. Then look at condition and modifications. A clean used bike is still the wrong buy if the geometry does not match you.
If you are shopping for a road or gravel bike and want to reduce sizing guesswork before you contact a seller, SYCLR helps you compare listings with fit-aware recommendations, geometry signals, price context, and confidence signals so you can shortlist better-fit options with more confidence.